# A Dagster Crash Course
> Learn the basics of Dagster in under 10 minutes. This quick crash course will get your data pipelines up and running fast.
Source: https://dagster.io/blog/dagster-crash-course-oct-2022
Published: 2022-10-06
Hey - I’m the head of engineering at Dagster Labs, the company that builds Dagster. This post is my take on a crash-course introduction to Dagster.
And if you want to support the Dagster Open Source project, be sure to [star our Github repo](https://github.com/dagster-io/dagster).
💡 [**What does Dagster do?**](https://dagster.io/blog/dagster-crash-course-oct-2022#what-does-dagster-do)👩\
💻 [Who is Dagster for?
](https://dagster.io/blog/dagster-crash-course-oct-2022#who-is-dagster-for)🧠 [How is Dagster different?
](https://dagster.io/blog/dagster-crash-course-oct-2022#how-is-dagster-different)🏇 [Getting started with Dagster
](https://dagster.io/blog/dagster-crash-course-oct-2022#getting-started-with-dagster)🛠 [**Improving the code**](https://dagster.io/blog/dagster-crash-course-oct-2022#improving-the-code)👨\
🏫 [**Learning more**](https://dagster.io/blog/dagster-crash-course-oct-2022#learning-more)
## 💡 What does Dagster do?
Dagster is a *data orchestrator*. What’s that mean?
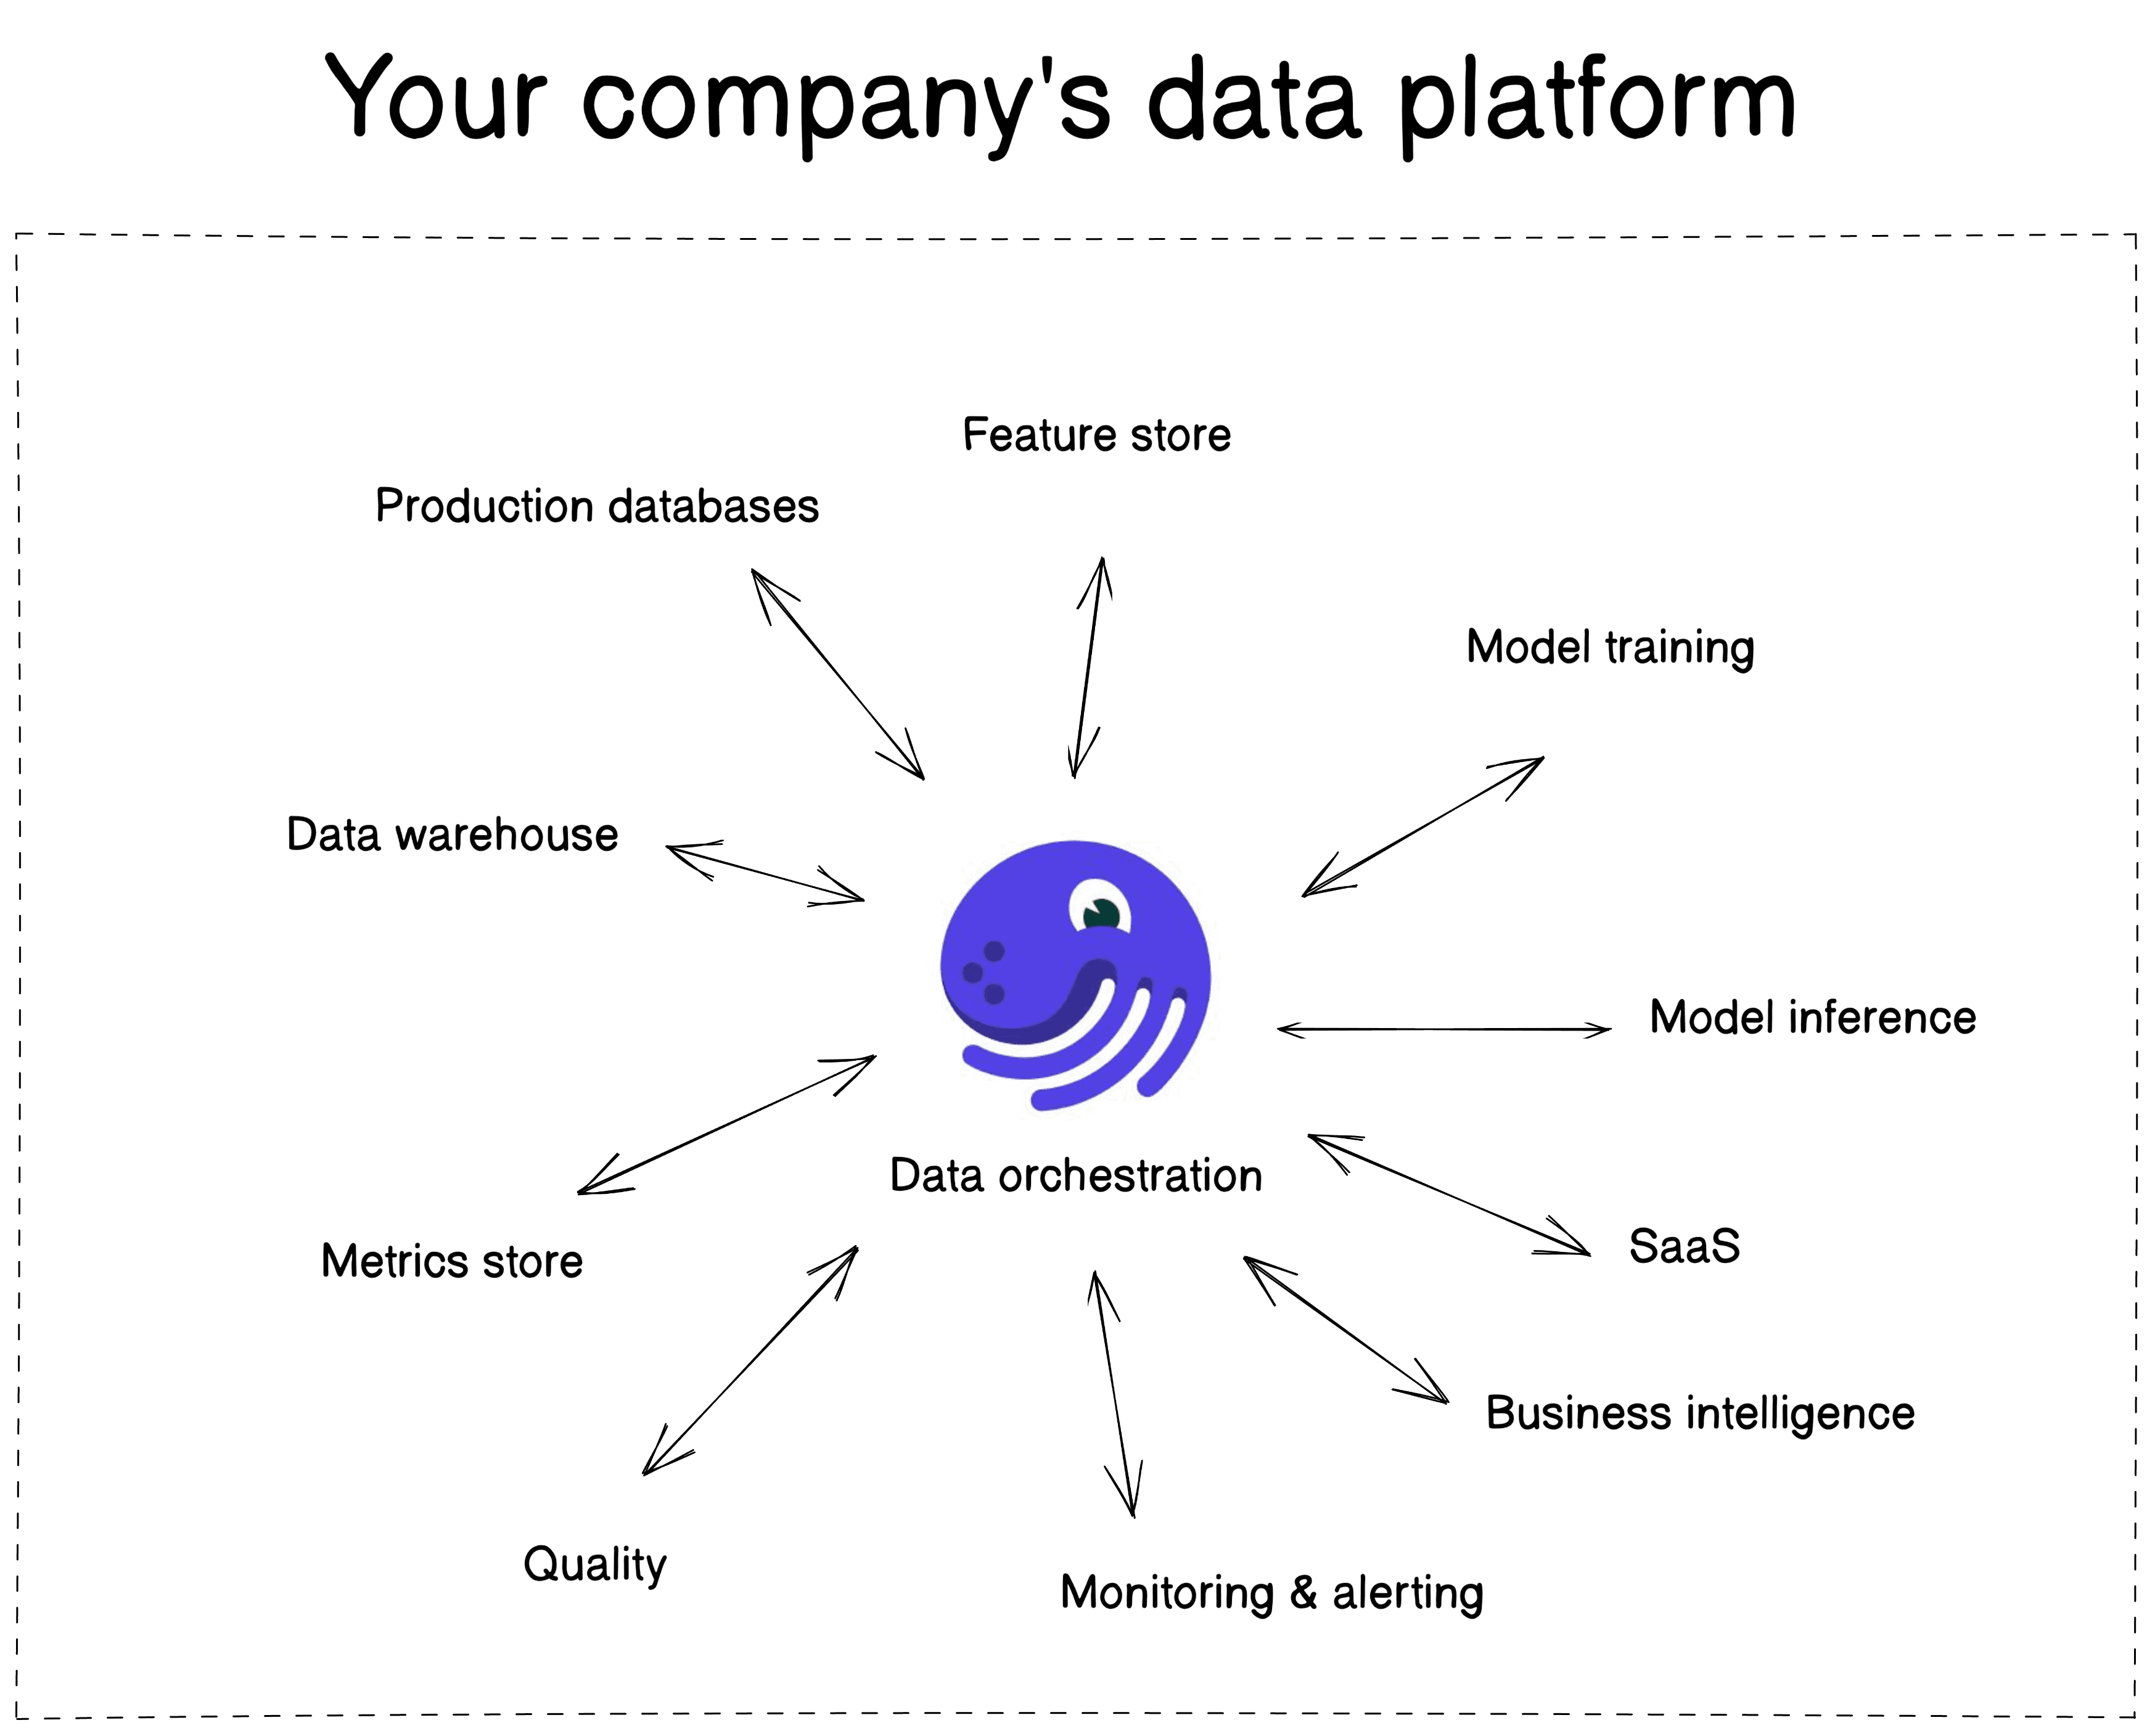
Think of Dagster as **a framework for building data pipelines**, similar to how Django is a framework for building web apps.
Data pipelines produce **data assets**. Data assets can be many things, but they’re usually machine learning models, tables in a data warehouse, or a report. In order to build a data asset, you basically need to do four things:
- [Ingest data](https://dagster.io/glossary/data-ingestion) from external sources or other data assets.
- Combine and transform the data in a meaningful way.
- Store the asset in a place where it can be used
- Re-run this process incrementally whenever the asset is out of date - either on a schedule or when an external system triggers the run.
There are *tons* of tools that do these things. Why choose Dagster? Dagster is for a particular type of user and has several unique differentiators that make it a great choice to sit at the center of your data platform for both new and existing data pipelines.
## 👩💻 Who is Dagster for?
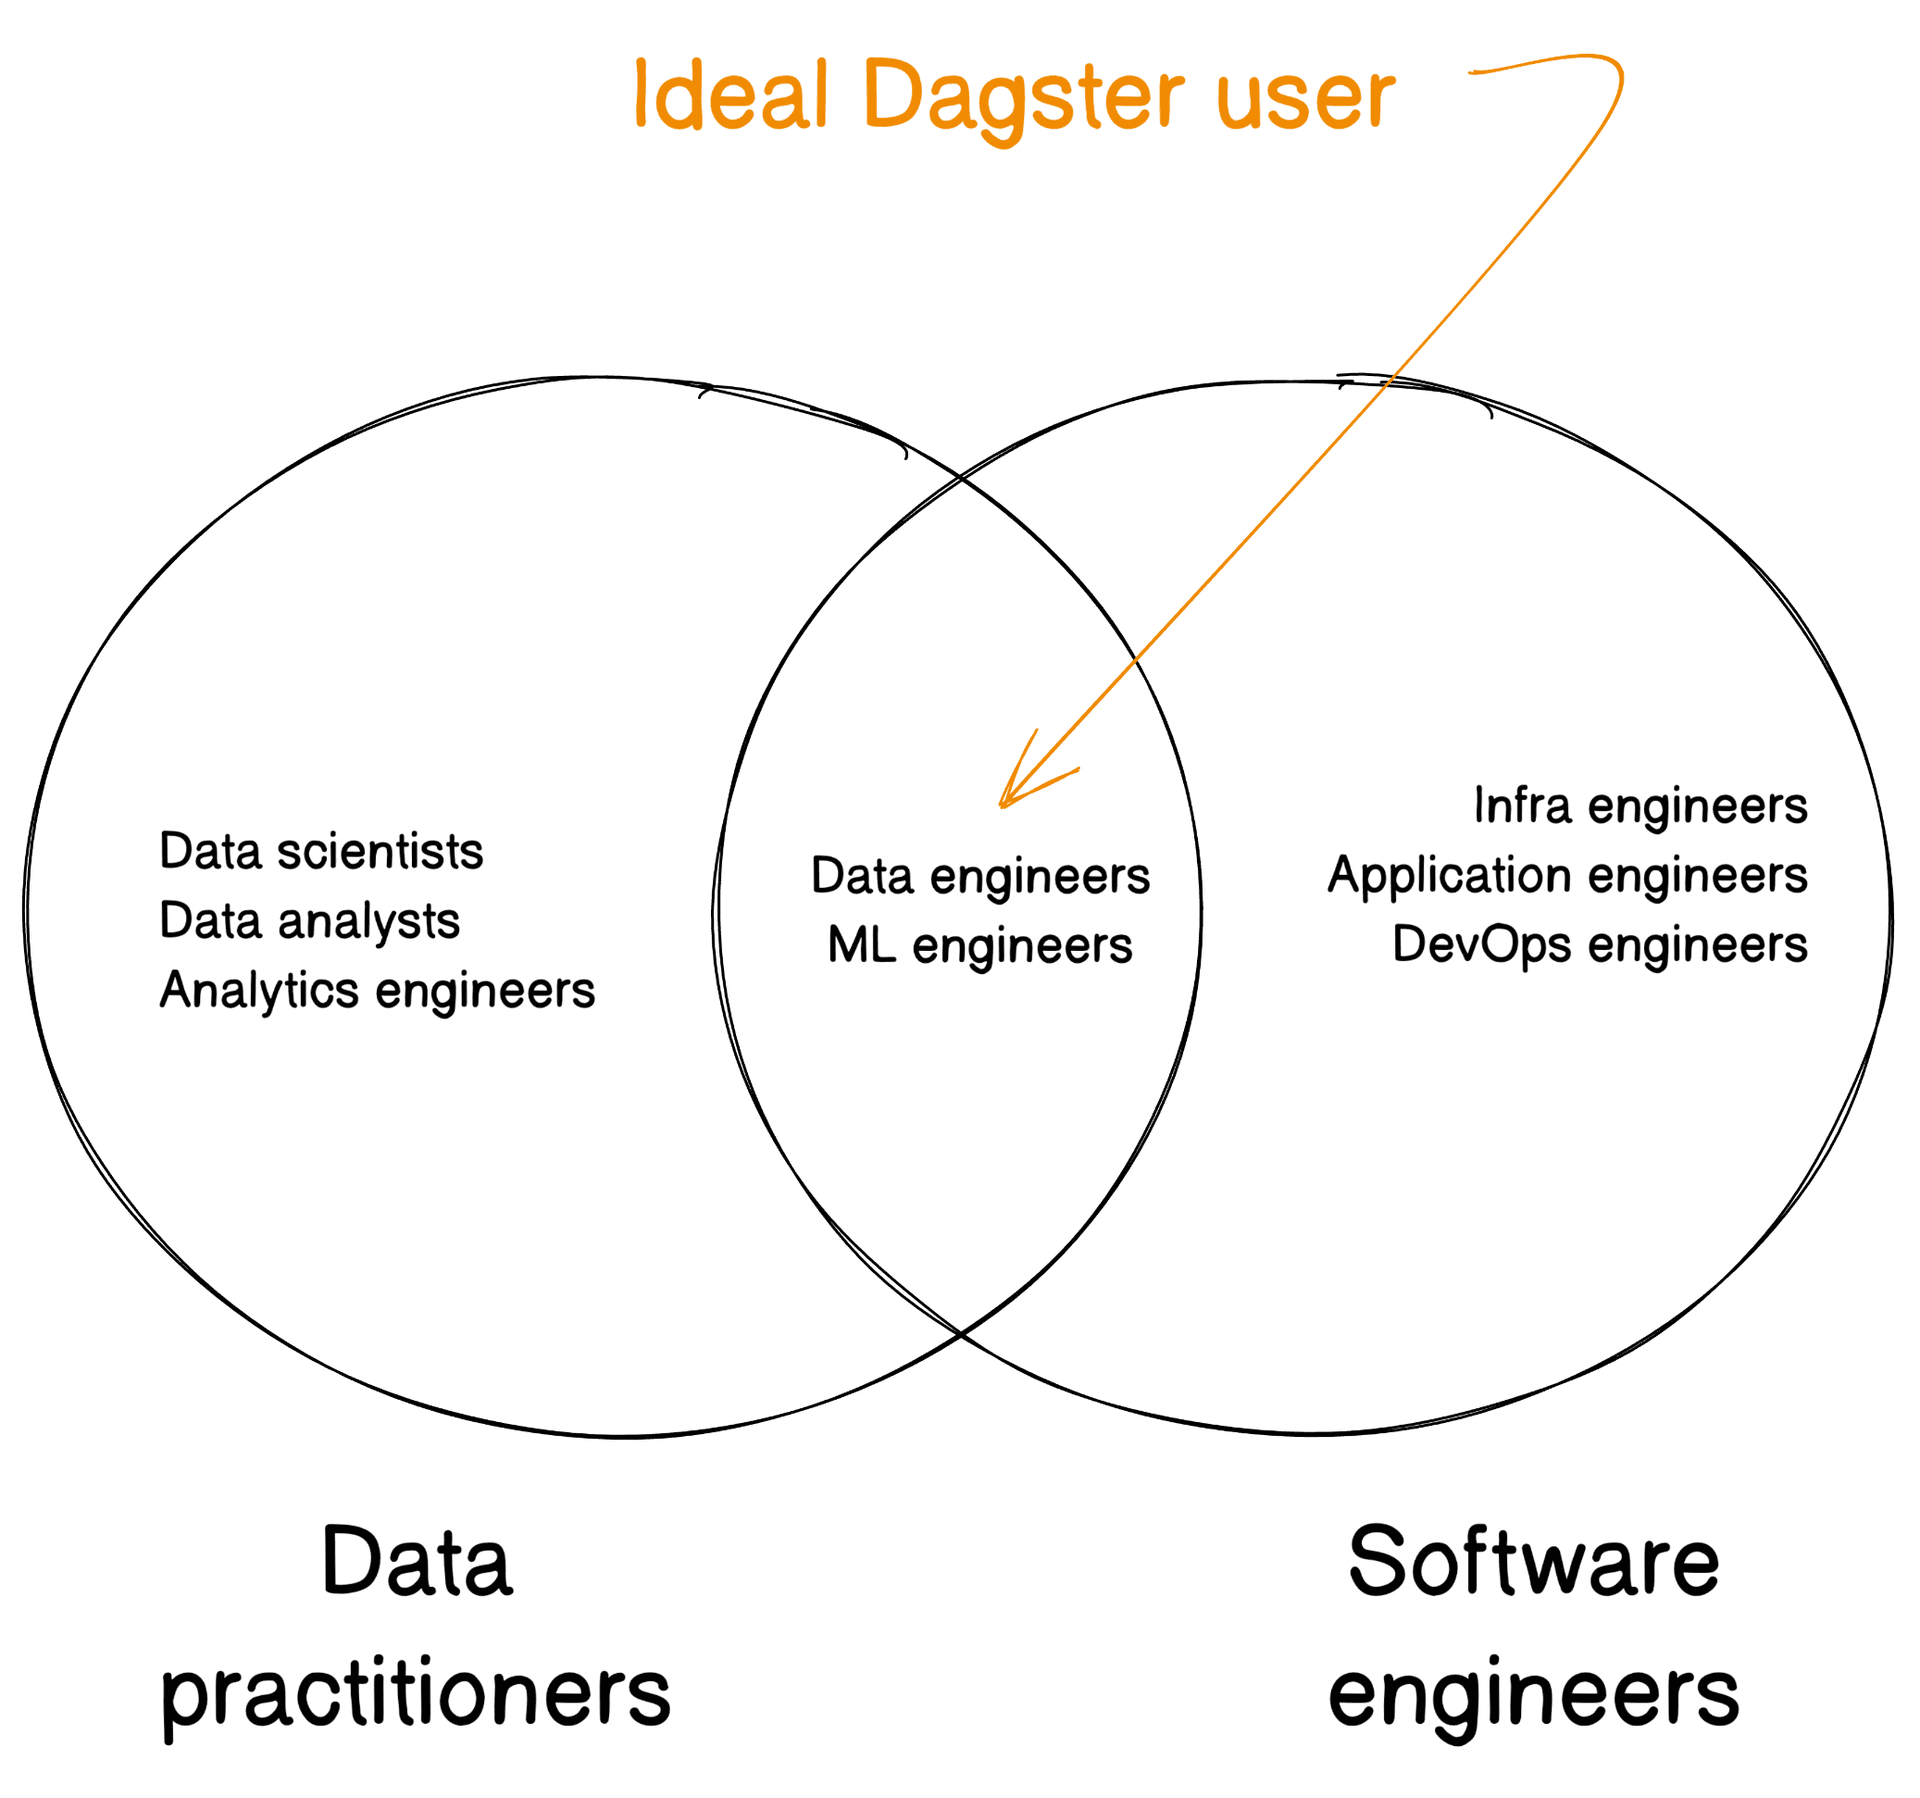
Dagster is meant for *data engineers* and *machine learning engineers*. These are people that:
- **Are software engineers.** They know languages like Python and SQL, and use tools like git and Visual Studio Code.
- **Are knee-deep in data.** They’re usually tasked with “cleaning data”, fixing broken pipelines in the middle of the night, and are often on-call for questions and asks from business intelligence analysts, data scientists
- **Bridge the engineering and data worlds.** They’re frequently required to work in both the infrastructure stack - managing AWS resources, debugging production services, etc - as well as in the data domain.
- **Respect the complexity of the data domain.** Data engineers know that building data apps is a complex problem that requires sharp tools to manage.
## 🧠 How is Dagster different?
In my opinion, Dagster has three key differentiators that make it better than the alternatives:
- **Local development and testing.** Dagster was built from the ground-up to make local development and automated testing easy through its emphasis on separating business logic from I/O concerns such as storage and interacting with external systems.
- **Software defined assets (SDAs).** Dagster’s primary abstraction is the [SDA](https://docs.dagster.io/guides/build/assets/defining-assets): a declarative, pure Python function that computes the value of an asset and has associated metadata. Other orchestrators use imperative tasks as their primary abstraction, which is much more primitive on a number of dimensions:
- Engineers generally find the declarative mental model of SDAs much easier to work with.
- SDAs unambiguously document which assets are meant to exist.
- SDAs have clear, fine-grained data lineage that makes debugging and understanding the state of an asset easy.
- SDAs decouple the business logic for computing the asset’s value from the I/O logic to read to and write from storage ([docs](https://docs.dagster.io/guides/build/io-managers))
- SDAs can be - SDAs support rich, searchable metadata and grouping tools to support scaling to large, complex organizations.
- SDAs support time partitioning and backfills out of the box.
- **Decoupling pipelines from the environment.** Dagster was built from the ground up to abstract away the environment from the business logic in your data pipeline, which leads to a number of elegant capabilities that are clunky or nonexistent in other orchestrators:
- Staging and Testing environments are much easier to set up by swapping out external services ([docs](https://docs.dagster.io/deployment/dagster-plus/deploying-code/branch-deployments/testing-against-prod-data))
- The underlying runtime can be swapped out without changing any user code (see the docs on [run launchers](https://docs.dagster.io/deployment/execution/run-launchers) and [executors](https://docs.dagster.io/guides/operate/run-executors) if you want the gritty details)
- Dagster was built with containers in mind from day 1, so you don’t have to deal with \~\~pip-hell\~\~ managing conflicting Python environments in large projects ([docs](https://docs.dagster.io/guides/build/projects/workspaces/workspace-yaml))
## 🏇 Getting started with Dagster
[Video: Embedded article media](https://www.loom.com/embed/c6b826268a5344c2b3eba7a7bc320c74?hide_owner=true\&hideEmbedTopBar=true\&hide_title=true)
[Video: Embedded article media](https://www.loom.com/embed/c6b826268a5344c2b3eba7a7bc320c74?hide_owner=true\&hideEmbedTopBar=true\&hide_title=true)
Let Pete Hunt walk you through the Dagster Crash Course
Let’s build a quick, realistic example that pulls some data from GitHub and visualizes it. This is an example of an [ETL pipeline](https://www.snowflake.com/guides/etl-pipeline).

This tutorial assumes you have basic familiarity with Python and Python data tools like Jupyter and `pandas`.
If you want to just see the code, it’s [available on GitHub](https://github.com/petehunt/dagster-github-stars-example).
[Follow along with this tutorial with Gitpod.](https://gitpod.io/#https://github.com/petehunt/dagster-github-stars-example)
### Installing Dagster
⚠️ You may have to adapt these instructions depending on your environment. However, these instructions have been tested on [Gitpod](https://gitpod.new/), a free cloud development environment, which is the easiest way to get started. [Click here](https://gitpod.new/) to launch a fresh development environment.
Let’s start by [following the setup instructions](https://docs.dagster.io/guides/build/projects/creating-projects). tl;dr:
```bash theme=classic
$ pip install dagster
$ dagster project scaffold --name my-dagster-project
$ cd my-dagster-project
$ pip install -e '.[dev]'
$ dagster dev
```
This will scaffold a new project with default settings and launch the Dagster UI at .
#### Installing the dependencies for this example
For this tutorial we’ll need to install a few dependencies. Modify your `setup.py` file to add the required dependencies:
```python
from setuptools import find_packages, setup
if __name__ == "__main__":
setup(
name="my_dagster_project",
packages=find_packages(exclude=["my_dagster_project_tests"]),
install_requires=[
"dagster",
"PyGithub",
"matplotlib",
"pandas",
"nbconvert",
"nbformat",
"ipykernel",
"jupytext",
],
extras_require={"dev": ["dagit", "pytest"]},
)
```
Once this is done, install by running `pip install -e '.[dev]'` and restart `dagster dev`.
#### Creating an asset for GitHub stars
Before we begin, go to Github and [generate a personal access token](https://github.com/settings/tokens) with the `gist` permission. Then, let’s create an asset that fetches the GitHub stars for the Dagster repo by updating the `my_dagster_project/assets.py` file:
```python
from dagster import asset
from github import Github
ACCESS_TOKEN = "ghp_YOUR_TOKEN_HERE"
@asset
def github_stargazers():
return list(Github(ACCESS_TOKEN).get_repo("dagster-io/dagster").get_stargazers_with_dates())
```
🚨 There is **obviously a big problem** with this code: it includes a very sensitive secret right in the source, and the token has broad permissions. We’ll fix this in a bit.
### Aggregate the GitHub stars by week
Let’s add a second asset that [aggregates](https://dagster.io/glossary/data-aggregation) the raw stargazers data into a weekly count and stores it in a `pandas.DataFrame`. Let’s add some more code to `my_dagster_project/assets.py`:
```python
import pandas as pd
from datetime import timedelta
@asset
def github_stargazers_by_week(github_stargazers):
df = pd.DataFrame(
[
{
"users": stargazer.user.login,
"week": stargazer.starred_at.date()
+ timedelta(days=6 - stargazer.starred_at.weekday()),
}
for stargazer in github_stargazers
]
)
return df.groupby("week").count().sort_values(by="week")
```
Most of this code is just data transformation using pandas; see [the pandas docs](https://pandas.pydata.org/docs/index.html) for more information.
Notice that this asset takes an argument called `github_stargazers`. Dagster will automatically find the asset named `github_stargazers` and materialize it before calling `github_stargazers_by_week`. This might seem like magic at first, but it’s very easy to get used to, and extremely convenient when you’re building large pipelines.
### Visualize the GitHub stars
Now that we have a dataset of GitHub stars per week, let’s visualize it as a bar chart. [Jupyter Notebooks](https://jupyter.org/) are a great tool for this. We’ll use a neat library called [jupytext](https://github.com/mwouts/jupytext) which lets us author notebooks as Markdown strings instead of using raw `.ipynb` files. Add the following to `my_dagster_project/assets.py` to create an asset representing the notebook:
````python
import nbformat
from nbconvert.preprocessors import ExecutePreprocessor
import pickle
import jupytext
@asset
def github_stars_notebook(github_stargazers_by_week):
markdown = f"""
### Github Stars
```python
import pickle
github_stargazers_by_week = pickle.loads({pickle.dumps(github_stargazers_by_week)!r})
#### Github Stars by Week, last 52 weeks
github_stargazers_by_week.tail(52).reset_index().plot.bar(x="week", y="users")
"""
nb = jupytext.reads(markdown, "md")
ExecutePreprocessor().preprocess(nb)
return nbformat.writes(nb)
````
There are a few things going on here.
- We create a markdown string representing our notebook.
- We use **`pickle`** to pass the **`DataFrame`** to the notebook.
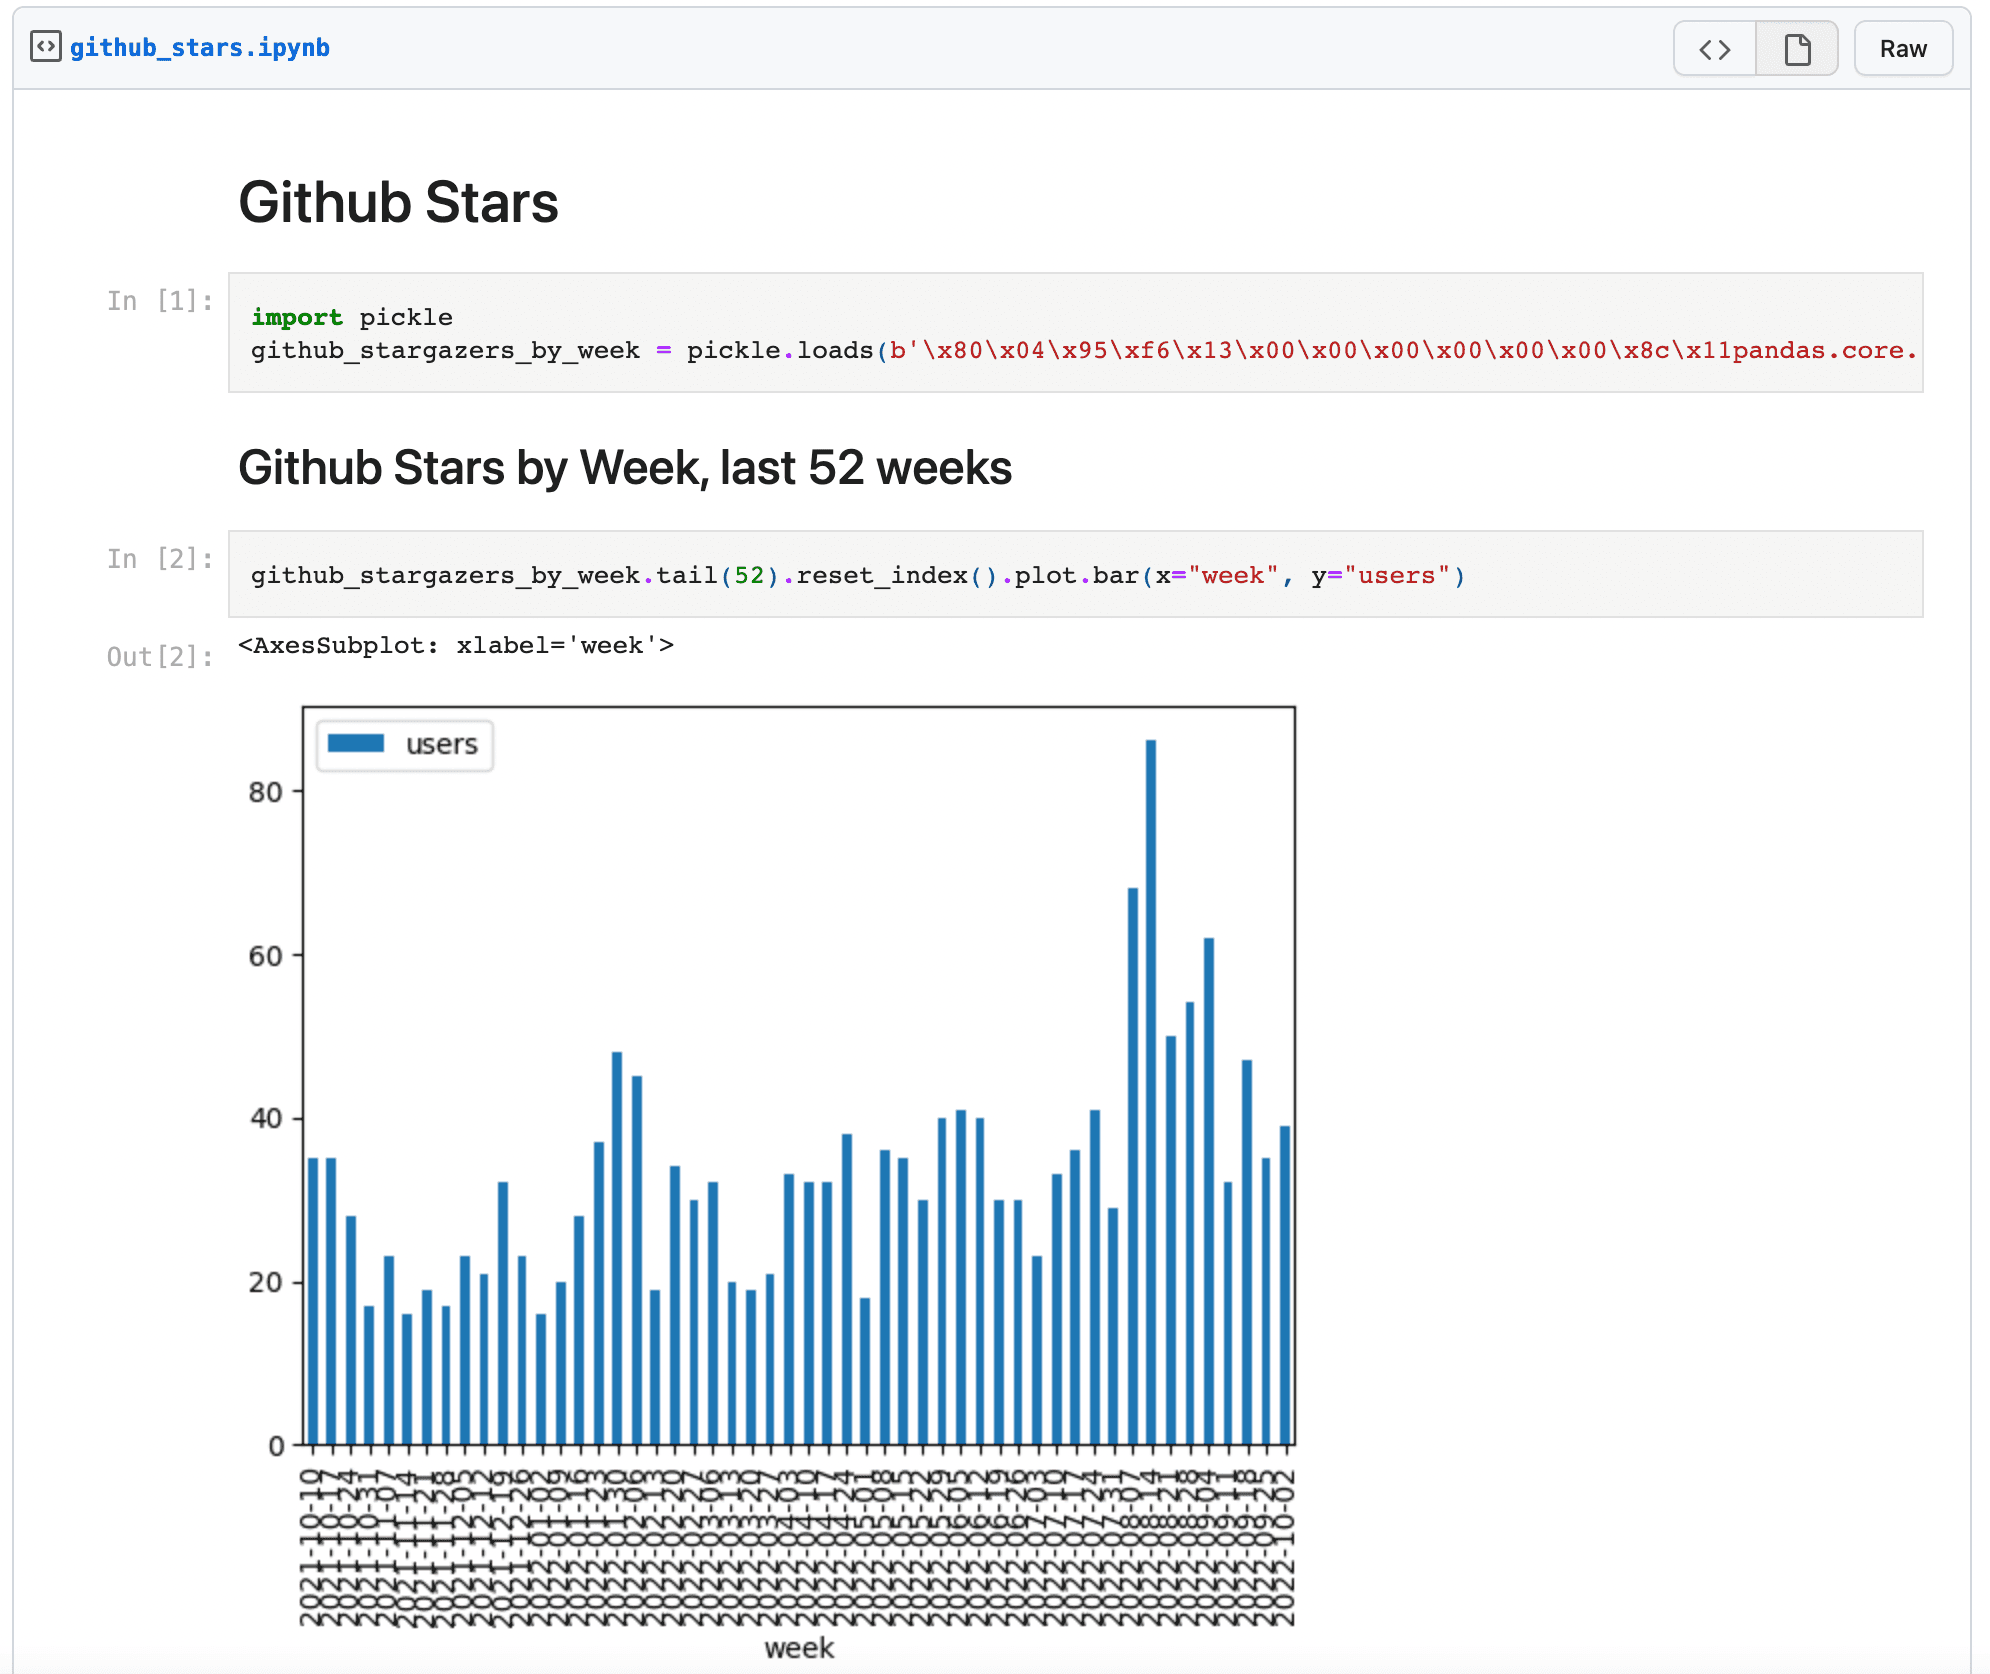
- We use **`pandas`** to plot the last 52 weeks as a bar chart.
- We use **`jupytext`** to convert the markdown string to a Jupyter **`NotebookNode`**
- We use **`ExecutePreprocessor().preprocess()`** to execute the notebook in a new kernel
- And we use **`nbformat.writes()`** to write out the **`NotebookNode`** as **`ipynb`** file contents.
### Share the notebook as a GitHub gist
Now we have a notebook. How can we view it?
One easy way is to upload the **`ipynb`** as a GitHub gist. GitHub has built-in support for visualizing notebooks, and they’re very easy to share with stakeholders. Update **`my_dagster_project/assets.py`** with the following:
```python
import nbformat
from github import InputFileContent
@asset
def github_stars_notebook_gist(context, github_stars_notebook):
gist = (
Github(ACCESS_TOKEN)
.get_user()
.create_gist(
public=False,
files={
"github_stars.ipynb": InputFileContent(github_stars_notebook),
},
)
)
context.log.info(f"Notebook created at {gist.html_url}")
return gist.html_url
```
This is a fairly straightforward asset that simply takes the **`github_stars_notebook`** asset contents, attaches it to a new GitHub gist, and returns the URL.
Note the **`context`** argument. This is a special argument that does not correspond to the name of an asset. It contains various useful pieces of information and utilities, including **`context.log`** - the primary way to log information to the user in Dagster. Read [**the docs**](https://docs.dagster.io/api/dagster/execution#dagster.OpExecutionContext) for more information.
### Adding a schedule
Finally, let’s be sure that we refresh the notebook every day, so we always have the latest numbers. We can use [**Schedules**](https://docs.dagster.io/guides/automate/schedules) to do this.
Update your **`my_dagster_project/__init__.py`** file to read:
```python
from dagster import (
load_assets_from_modules,
Definitions,
define_asset_job,
ScheduleDefinition,
)
from my_dagster_project import assets
defs = Definitions(
assets=load_assets_from_modules([assets]),
schedules=[
ScheduleDefinition(
job=define_asset_job(name="daily_refresh", selection="*"),
cron_schedule="@daily",
)
],
)
```
We've added some new definitions to our project:
- A Dagster [**job**](https://docs.dagster.io/guides/build/jobs/asset-jobs) **`daily_refresh`** that materializes all of the assets in the project.
- A schedule that runs **`daily_refresh`** once per day.
At this stage, your **`my_dagster_project/assets.py`** should contain the following and your **`my_dagster_project/__init__.py`** file should be as per the code shown in the prior paragraph.
````python theme=classic
from dagster import asset
from github import Github
import pandas as pd
from datetime import timedelta
import nbformat
from nbconvert.preprocessors import ExecutePreprocessor
import pickle
import jupytext
from github import InputFileContent
ACCESS_TOKEN = "ghp_YOUR_ACCESS_TOKEN"
@asset
def github_stargazers():
return list(Github(ACCESS_TOKEN).get_repo("dagster-io/dagster").get_stargazers_with_dates())
@asset
def github_stargazers_by_week(github_stargazers):
df = pd.DataFrame(
[
{
"users": stargazer.user.login,
"week": stargazer.starred_at.date()
+ timedelta(days=6 - stargazer.starred_at.weekday()),
}
for stargazer in github_stargazers
]
)
return df.groupby("week").count().sort_values(by="week")
@asset
def github_stars_notebook(github_stargazers_by_week):
markdown = f"""
### Github Stars
```python
import pickle
github_stargazers_by_week = pickle.loads({pickle.dumps(github_stargazers_by_week)!r})
```
#### Github Stars by Week, last 52 weeks
```python
github_stargazers_by_week.tail(52).reset_index().plot.bar(x="week", y="users")
```
"""
nb = jupytext.reads(markdown, "md")
ExecutePreprocessor().preprocess(nb)
return nbformat.writes(nb)
@asset
def github_stars_notebook_gist(context, github_stars_notebook):
gist = (
Github(ACCESS_TOKEN)
.get_user()
.create_gist(
public=False,
files={
"github_stars.ipynb": InputFileContent(github_stars_notebook),
},
)
)
context.log.info(f"Notebook created at {gist.html_url}")
return gist.html_url
````
### Actually run the job
Now it’s time to run the job with Dagster.
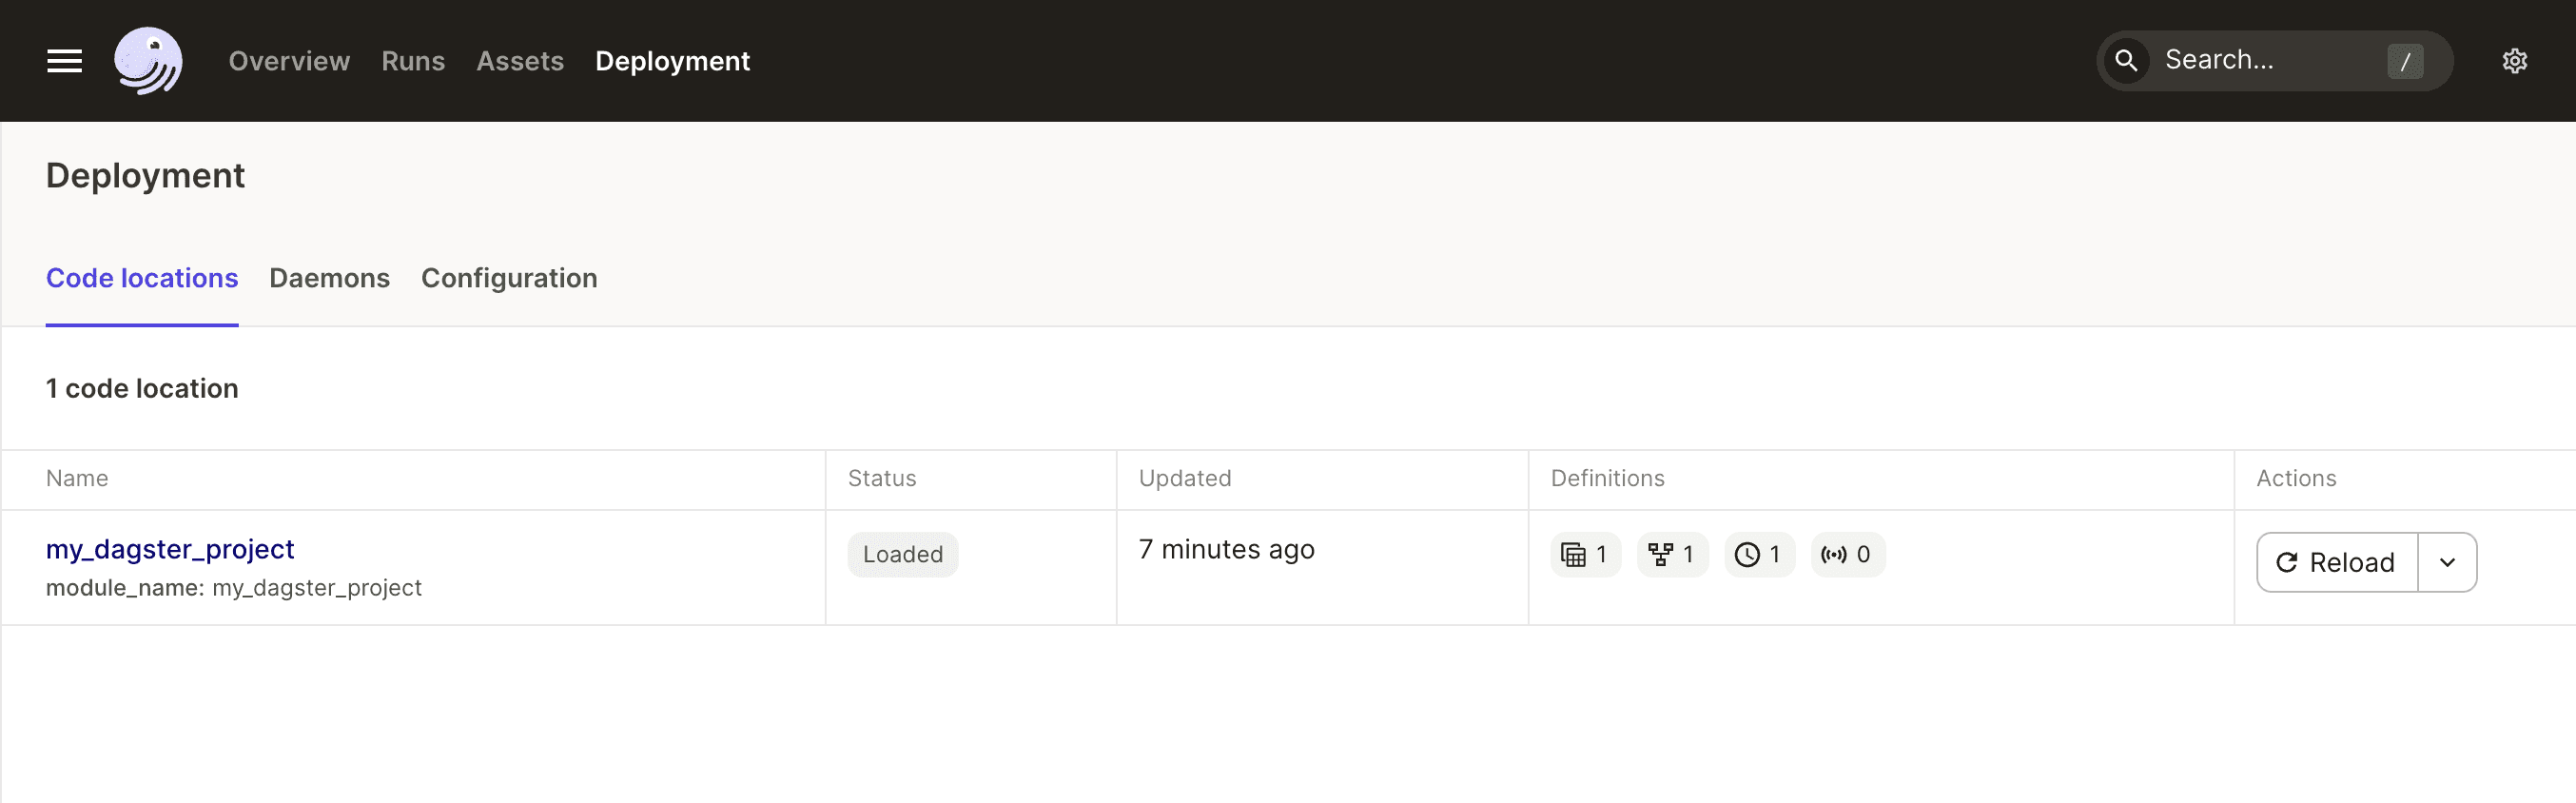
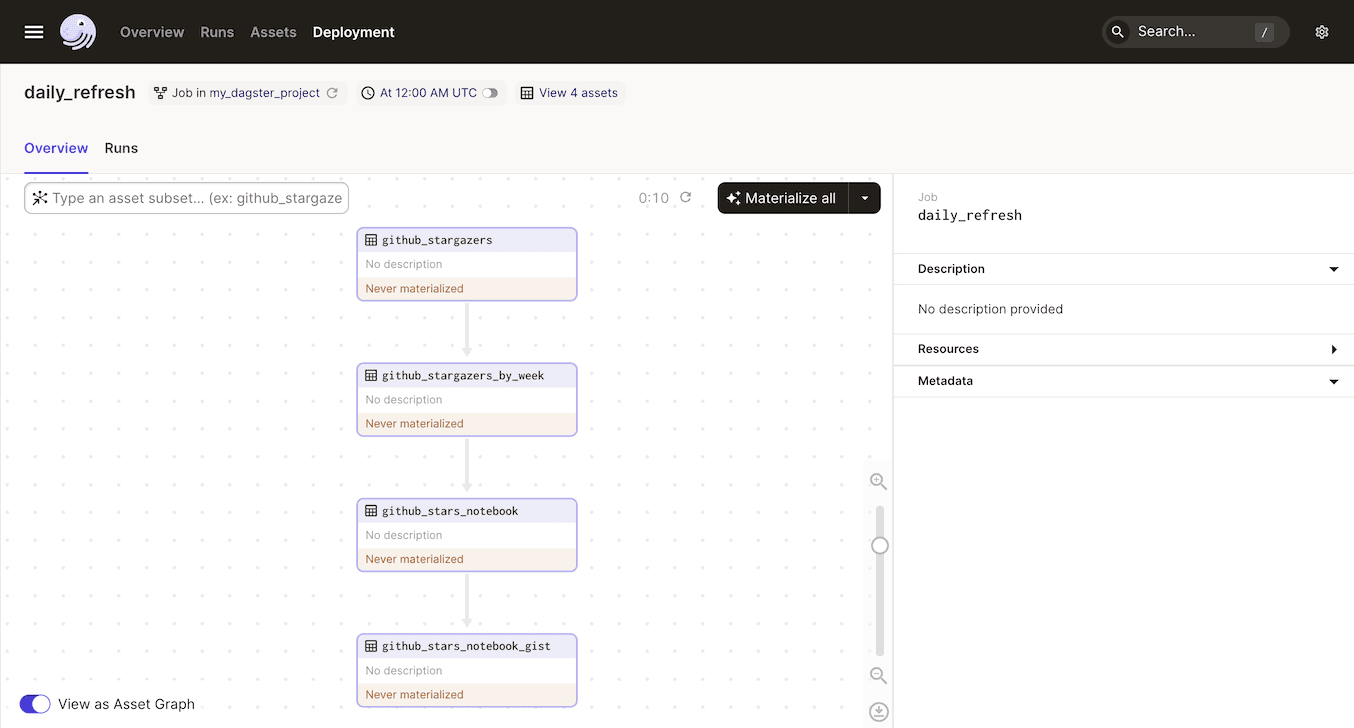
First, open the UI by going to [**http://localhost:3000/**](http://localhost:3000/). Then click “Deployment” in the top navigation bar and click the "Reload" button next to "my\_dagster\_project". This will reload our code, making our new job and schedule available.
Next, click “Overview” in the top nav, and select the “Schedules” tab. We should see our daily schedule. Here, we can see that the schedule is currently disabled, and that is is affiliated with the **`daily_refresh`** job.
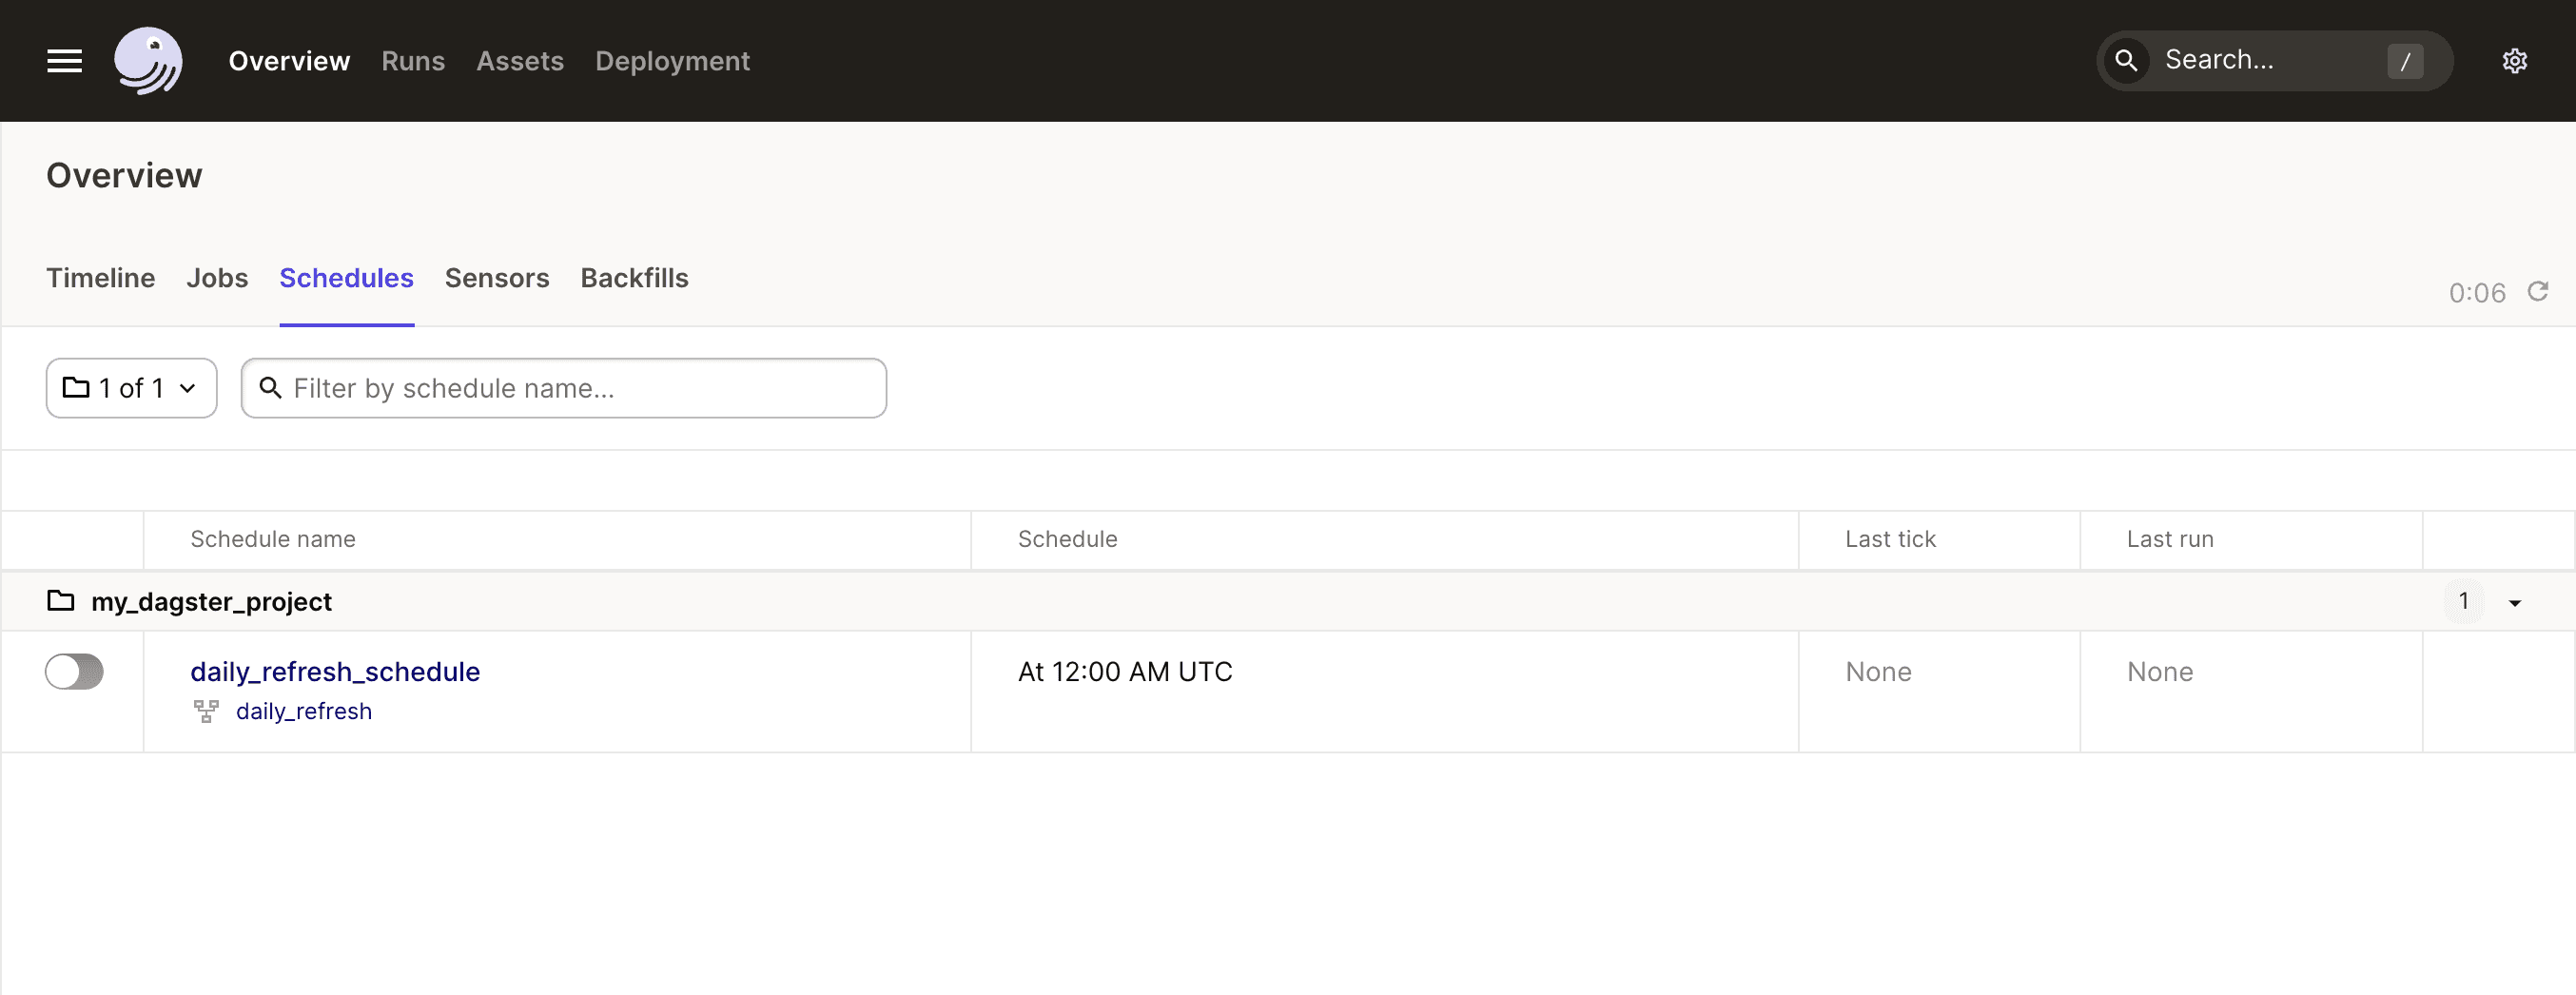
Click the job corresponding to the schedule: **`daily_refresh`**. Then hit “materialize all” to run the job.
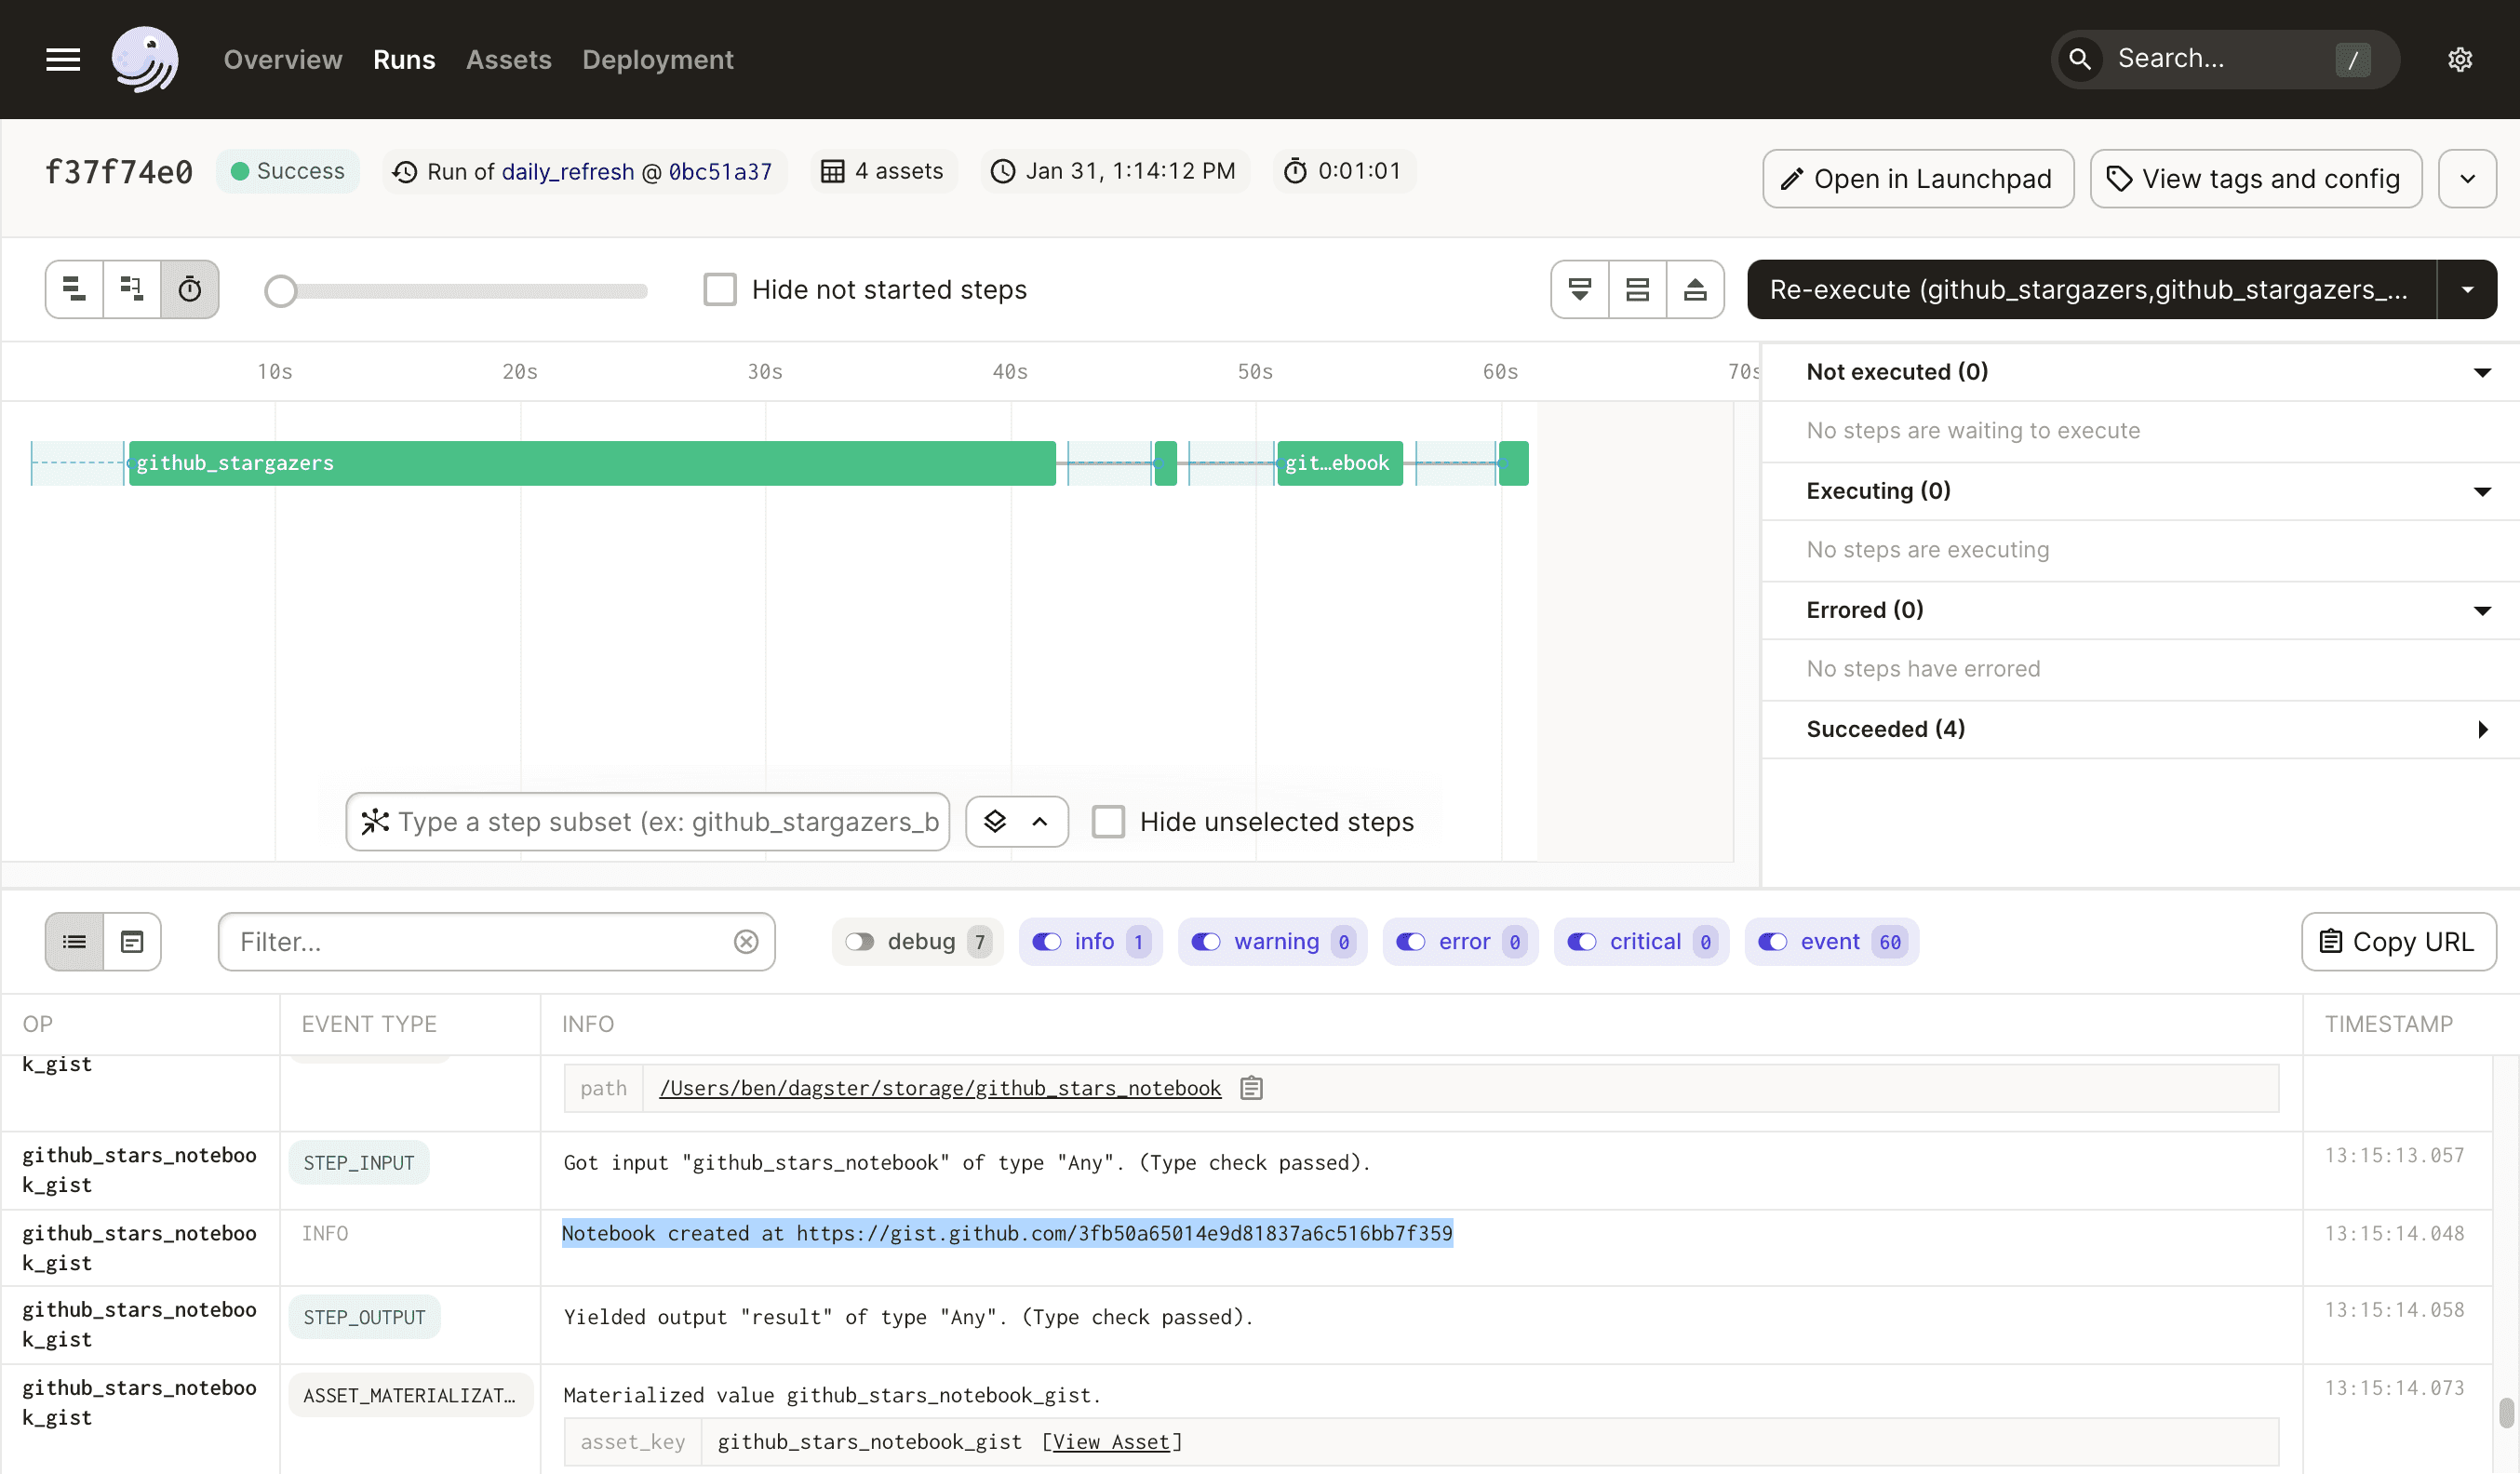
The process will run for a bit, and when it completes, you should see a GitHub gist URL printed to the log in the Dagster UI. Note that the first step of this pipeline can take a while; as you iterate, you only have to materialize that asset once and subsequent runs can reuse it.
And when you navigate to the gist, it should look something like this:
## 🛠 Improving the code
Our current example is working great, but it has several issues.
- The GitHub access token is present in the source code in cleartext, which is a big security hole.
- There are no tests. We should have some!
### Handling secrets the right way: Config and Resources
The first thing we need to do is get the GitHub access token out of the source code. We’ll provide the secret via an environment variable and use Dagster [**Resources**](https://docs.dagster.io/guides/build/external-resources) to connect to GitHub.
So what's a **`Resource`**? A **`Resource`** is usually a connection to an external service, like GitHub. There are two main advantages to using resources:
1. **They can be configured separately from the rest of your app.** We can configure the GitHub **`Resource`** once, and then reuse it in our whole pipeline.
2. **They can be swapped out in different environments.** For example, it’s easy to use a different GitHub account in staging, or swap in a mock GitHub implementation during testing.
3. **They are observable.** Resources show up in the Dagster UI, which lets you keep track of where the resource is used and how it is configured.
#### Add the resource to our project
Let's start by creating a PyGithub client and adding it to our project as a Resource. Change **`my_dagster_project/__init__.py`** to look like this:
```python
from dagster import (
load_assets_from_package_module,
Definitions,
define_asset_job,
ScheduleDefinition,
)
from my_dagster_project import assets
import os
from github import Github
defs = Definitions(
assets=load_assets_from_package_module(assets),
schedules=[
ScheduleDefinition(
job=define_asset_job(name="daily_refresh", selection="*"),
cron_schedule="@daily",
)
],
resources={"github_api": Github(os.environ["GITHUB_ACCESS_TOKEN"])},
)
```
- We use the **`resources`** argument of **`Definitions`** to provide our resources. The name **`github_api`** is called a **resource key** and is how our assets can reference the Resource.
- We provide the access token to PyGithub via an environment variable **`GITHUB_ACCESS_TOKEN`**.
#### Setting the environment variable
We're no longer hardcoding our GitHub token, which has greatly improved security. However, there's now another question: how can you safely provide the access token as an environment variable?
For the purposes of local development, the easiest way to go is to create a **`.env`** file containing the environment variables you want to set. Create a **`.env`** file with the following contents:
```javascript theme=classic
GITHUB_ACCESS_TOKEN=ghp_YOUR_TOKEN_HERE
```
Dagster will automatically look for this file and set the environment variables for you.
⚠️ It's important to avoid checking in the \`.env\` file into your repo, so your secrets stay local. We suggest adding .env to your [**.gitignore file**](https://git-scm.com/docs/gitignore).
In production, you have a few options.
- If you're using Dagster Cloud, you can provide secrets in production via the [**Dagster Cloud UI**](https://dagster.io/blog).
- If you're deploying Dagster OSS yourself, see [**the deployment guides**](https://docs.dagster.io/deployment) for how to set environment variables.
#### Use the Resource from our assets
Next, we need to make two changes to our assets. First, change our **`github_stargazers`** asset to use the new resource.
Resources can either be Dagster resource definitions, which include configuration schema and initialization logic, or plain Python objects, such as the PyGithub client that we're using in this case. When we pass plain Python objects as resources, we can use the **`ResourceParam`** type annotation to tell Dagster that we want to populate this argument with a Resource.
```python
from dagster import ResourceParam
from github import Github
@asset
def github_stargazers(github_api: ResourceParam[Github]):
return list(
github_api.get_repo("dagster-io/dagster").get_stargazers_with_dates()
)
```
And change the `github_stars_notebook_gist` asset to use the Resource.
```python
@asset
def github_stars_notebook_gist(context, github_api: ResourceParam[Github], github_stars_notebook):
gist = github_api.get_user().create_gist(
public=False,
files={
"github_stars.ipynb": InputFileContent(github_stars_notebook),
},
)
context.log.info(f"Notebook created at {gist.html_url}")
return gist.html_url
```
### Re-run the job
Now, relaunch dagster dev and kick off the job:
```javascript theme=classic
$ dagster dev
```
At this point you can safely remove the **`ACCESS_TOKEN`** from your codebase.
### Adding some tests
Now it’s time to add some tests. Open up **`my_dagster_project_tests/test_assets.py`** and drop the following code in:
```python theme=classic
from dagster import materialize_to_memory
from unittest.mock import MagicMock
from my_dagster_project.assets import (
github_stars_notebook_gist,
github_stars_notebook,
github_stargazers_by_week,
github_stargazers,
)
from datetime import date, datetime
import pandas as pd
def test_smoke():
mock_stargazers = [
("user1", datetime(2021, 1, 1)),
("user2", datetime(2021, 1, 1)),
("user3", datetime(2021, 2, 1)),
]
github_api = MagicMock()
github_api.get_repo("dagster-io/dagster").get_stargazers_with_dates.return_value = [
MagicMock(
user=MagicMock(login=login),
starred_at=starred_at,
)
for (login, starred_at) in mock_stargazers
]
github_api.get_user().create_gist.return_value = MagicMock(
html_url="https://gist.github.com/test_id"
)
result = materialize_to_memory(
[
github_stars_notebook_gist,
github_stars_notebook,
github_stargazers_by_week,
github_stargazers,
],
resources={"github_api": github_api},
)
assert result.success
assert result.output_for_node("github_stargazers_by_week").reset_index().to_dict("records") == [
{"users": 2, "week": date(2021, 1, 3)},
{"users": 1, "week": date(2021, 2, 7)},
]
assert result.output_for_node("github_stars_notebook_gist") == "https://gist.github.com/test_id"
assert "# Github Stars" in result.output_for_node("github_stars_notebook")
assert github_api.get_user().create_gist.call_args[1]["public"] is False
```
You can run the test using **`pytest my_dagster_project_tests -s`**. It should pass quickly.
There are three main parts to this test.
1. We use Python’s built-in [**MagicMock**](https://docs.python.org/3/library/unittest.mock.html) to create a mock version of the PyGithub client and populate it with some test data.
2. We use **`materialize_to_memory()`** to materialize our assets. This function allows us to pass in any resources that should be used for the test job.
3. We use **`result.success`** and **`result.output_for_node()`** to examine the outputs of the assets to ensure that they executed as expected, and inspect the mocked client to ensure it was called with the correct parameters.
## 👨🏫 Learning more
Hopefully, this is enough to get you up and running with building a real-ish data pipeline with Dagster. I encourage you to read [**the docs**](https://docs.dagster.io/) to learn more!
Good luck! And if you need any help, [**join our expanding Slack community**](https://dagster.io/slack). Also, I’m just a tweet away: [**floydophone on Twitter**](https://twitter.com/floydophone).
If you want to support the Dagster Open Source project, be sure to [**Star our Github repo**](https://github.com/dagster-io/dagster).

We're always happy to hear your feedback, so please reach out to us! If you have any questions, ask them in the Dagster community Slack ([**join here**](https://dagster.io/slack)!) or start a [**Github discussion**](https://github.com/dagster-io/dagster/discussions). If you run into any bugs, let us know with a [**Github issue**](https://github.com/dagster-io/dagster/issues/new/choose). And if you're interested in working with us, check out our [**open roles**](https://www.prefect.io/careers)!