# Pushing REST-API data to Google Sheets with Dagster
> Follow this beginner tutorial to push REST API data into Google Sheets using Dagster and explore key abstractions and patterns.
Source: https://dagster.io/blog/dagster-google-sheets-tutorial
Published: 2022-11-11
## In this beginner’s guide, we pull data from the Bureau of Labor Statistics database, store it in Google Sheets, then do some calculations on the data.
**Before we get started...**
Don’t be intimidated by the length of this tutorial - it only looks long because it takes things step-by-step. It is also self-contained, meaning that all the steps to execute are here, and it doesn’t send you off to some other tutorial with a ‘just follow these 20 steps then come back here’ instruction.
This is a beginner's tutorial and assumes no prior knowledge of **Dagster**. You should, however, have a basic understanding of **Python coding**, working in the terminal, and a basic understanding of **Pandas dataframes**.
**Pushing data to an external Google Sheet has obvious security concerns.** While we will be restricting access to the Google Sheet using [Google's permissions framework](https://support.google.com/docs/answer/1218656?hl=en\&co=GENIE.Platform%3DDesktop), you should never push highly sensitive data out to a Google sheet.
Finally, this post was updated on **April 7th, 2023** to reflect changes to the **Dagster framework**, and now references version numbers that came after the original publishing date.
When building data pipelines, it’s sometimes useful to push data out to a Google Sheet. You might do this as a quick QC test. Or maybe you just need to knock out a quick table for a business user. Giving them a Google sheet is a quick way to cross this off your list.
You can output data samples to individual tabs of a Google Sheet as a lightweight way for other collaborators to check that the assets created meet their needs.
Dagster makes this task trivial thanks to its [software-defined assets (SDA) abstraction](https://docs.dagster.io/guides/build/assets/defining-assets). In this beginner's tutorial, we will look at how to add a Google Sheet SDA to your pipeline using the Python library [`pygsheets`](https://pygsheets.readthedocs.io/en/stable/).
#### Key concepts
To understand Dagster, it helps to know a few key concepts:
- Assets: Assets refer to either the definition of a data asset we wish to create or an existing asset we can use in (or is output by) our pipeline.
- Materialization: Having defined a required asset, we generate an instance of that asset by ‘materializing’ it. So by ‘materialize’ you can simply think ‘create’ or ‘generate’.
- I/O Managers: In Dagster we use I/O Managers to separate out our operations on the data from where we store our results. This is very handy when you want to quickly swap out your storage from - say - Google Sheets to a database or data warehouse.
### What we will cover:
- [**Section 1: getting to a basic POC**](#section-1-getting-to-a-basic-poc)
- [Step 1: Install the Dagster project.](#step-1-install-the-dagster-project)
- [A quick walk-through of the Dagster project structure.](#a-quick-walk-through-of-the-dagster-project-structure)
- [Our first data asset: from API call to Pandas dataframe](#our-first-data-asset-from-api-call-to-pandas-dataframe)
- [We have an asset!](#we-have-an-asset)
- [Create a Google Sheet](#create-a-google-sheet)
- [Create a Google Service Account](#create-a-google-service-account)
- [Declare a Google Sheet data asset you want to exist](#declare-a-google-sheet-data-asset-you-want-to-exist)
- [**Section 2: Building out the framework**](#section-2-building-out-the-framework)
- [Let’s group our assets](#lets-group-our-assets)
- [Declaring Definitions](#declaring-definitions)
- [Switching from an asset to an I/O Manager](#switching-from-an-asset-to-an-io-manager)
### Section 1: getting to a basic POC
`In this first section we will set up a functioning—but fairly basic—pipeline to push data to Goggle Sheets.`
```text
$ cd ~
```
#### **Step 1: Install the Dagster project.**
Let’s start in our home folder:
As a best practice, we will run this project inside a [virtual environment](https://realpython.com/python-virtual-environments-a-primer/).
```text
$ python3 -m venv .dag-venv
$ source ./.dag-venv/bin/activate
$(dag-venv) python3 --version
```
That last command will confirm what version of Python you are on.
For reference, I am currently running Python 3.10.8
So next let’s install Dagster, Dagit (the UI for Dagster) and build out a project:
```text
$(dag-venv) pip install --upgrade pip
$(dag-venv) pip install dagster dagit
$(dag-venv) dagster --version
```
For reference, I am currently running dagster, version 1.2.6Now, to get started quickly we are going to build a vanilla [Dagster ‘scaffolded’ project](https://docs.dagster.io/guides/build/projects/creating-projects) using the CLI command:
```text
$(dag-venv) dagster project scaffold --name dagster-gsheets
```
Note that we are calling this project `dagster-sheets` but that is arbitrary. Name it as you like.You should now see the message “Success! Created dagster-gsheets at /Users/*yourname*/dagster-gsheets.”
If you run into issues at this stage, [the installation steps for Dagster can be found here](https://docs.dagster.io/getting-started/installation).
So now lets enter our new directory and run the install command.
```text
$(dag-venv) cd dagster-gsheets
$(dag-venv) pip install -e '.[dev]'
```
The step above will fetch a list of required packages found in the file `setup.py` on line 7:
```python
install_requires=[
"dagster",
"dagster-cloud"
],
```
Python
Granted, the list is quite short for now.
```text
$(dag-venv) dagster dev
```
Let’s boot up Dagster:
You can go check this out in a browser at [http://localhost:3000/](http://localhost:3000/)
This is very cool, but you are also presented with an underwhelming message:
*No jobs: Your definitions are loaded, but no jobs were found.*
This makes sense. It is a blank instance for now. Since we will be working with `pygsheets` and pandas, let’s add that to the requirements list. Update the file `dagster-gsheets/setup.py` to read:
```python
install_requires=[
"dagster",
"dagster-cloud",
"pygsheets",
"pandas"
],
```
If Dagit is still running in your browser, you can interrupt it in the terminal window with cntl+C, then rerun the following commands to install the additional packages and restart Dagit:
```text
$(dag-venv) pip install -e '.[dev]'
$(dag-venv) dagster dev
```
At this point, we have what we need, and we can start to build a simple pipeline.
```bash
dagster-gsheets
├── README.md
├── dagster_gsheets
│ ├── assets.py
│ └── __init__.py
├── dagster_gsheets.egg-info
├── dagster_gsheets_tests
├── pyproject.toml
├── setup.cfg
└── setup.py
```
```bash
/dagster_gsheets/assets.py
```
##### A quick walk-through of the Dagster project structure.
If you look inside our `dagster-gsheets` folder, you will see a barebones Dagster project:
For now, we are going to just worry about the following two files:
This file is currently empty, but is going to be our main working file where we will define in code the data assets we want Dagster to generate. Dagster can call on any arbitrary python function to work on data.
```bash
/dagster_gsheets/__init__.py
```
In the main `__init__.py` file we will define the‘components’ we will use to build our pipeline. This will include our assets and I/O Managers which we will discuss later. But it could also include schedules, sensors, and other bits and pieces.
##### Our first data asset: from API call to Pandas dataframe
First, we are going to create a basic pandas DataFrame using an API call.

We will use the Bureau of Labor Statistics’ public API to pull in [Consumer Price Index data](https://data.bls.gov/timeseries/CUUR0000SA0). The [BLS API 2.0](https://www.bls.gov/developers/api_signature_v2.htm) allows us to make an anonymous call to pull small amounts of data so we don’t need an API key for this.
Dagster has a full pandas integration which allows us to do clever things, like [run validation of the data types in a DataFrame](https://docs.dagster.io/integrations/libraries/pandas). But for now, we will keep this simple.

First, let's pull in the `dagster` and `pandas` libraries so we can use DataFrames.
We will also include `json` and `requests` so that we can pull in a json payload form an API.
```python
from dagster import asset
import pandas as pd
import requests
import json
```
```python
@asset
def my_dataframe() -> pd.DataFrame:
"""
Pull inflation data from BLS
"""
headers = {"Content-type": "application/json"}
data = json.dumps({"seriesid": ["CUUR0000SA0"], "startyear": "2017", "endyear": "2022"})
p = requests.post("https://api.bls.gov/publicAPI/v2/timeseries/data/", data=data, headers=headers)
json_data = json.loads(p.text)
df = pd.DataFrame.from_dict(json_data["Results"]["series"][0]["data"])
df = df.astype({"year":'int32',"period": 'string',"periodName": 'string',"value":'float'})
if 'footnotes' in df.columns:
df.drop(columns=['footnotes'], axis=1, inplace=True)
print(df)
return df
```
Edit `dagster_gsheets/assets.py` as follows:
Then let’s declare our first data asset - a simple pandas dataframe
Simply put we are:
1. Decorating our next Python function as an ‘Asset’ which informs Dagster to add it to our asset catalog and expands the functionality of the function.
2. Defining the function itself. On this line we also validate the output of this asset, namely a Pandas DataFrame.
3. Adding a description as to what this asset is.
4. Calling the BLS API and retrieve our data series, and set the time period we want.
5. Selecting the right node. The json payload we retrieve has a lot of information, but we only need the `data` node and we convert that to a Pandas dataframe.
6. Converting the data types - this is actually redundant in this example, but is good practice in case we want to do more manipulations of the data.
7. Returning the value (the dataframe) to whatever calls this decorated function.
So why is this now an ‘asset’? Because we have declared an actual set of data that is generated during the run of our pipeline. When this runs, we will have a new dataset of BLS data from 2018 to 2022 that we can work with.
If we refresh our Dagit interface by clicking the folder button in the bottom left corner of Dagit
Our new asset shows up:
And we can click ‘Materialize’ to see it run.
Note it will take a minute to run - the BLS API is not the fastest. You can click on ‘Runs’ in the header to watch the execution of the call.
###### Where did my data go?
Granted. It does not appear to do much right now. But when Dagster materialized the dataframe, it actually stored the outputs in a local folder in your `dagster-gsheets` directory under a temporary folder. If you explore that temporary folder (called something like `tmpxcejtrqi`) you will find three sub-folders: `history`, `schedules`, and `storage`.
These temporary folders will only persist for the duration of your session. When you close down Dagster, they will be removed from disk. This is something we can change later by running [a local daemon](https://docs.dagster.io/deployment/execution/dagster-daemon).
As you learn more about Dagster, you will discover why this interim storage is a powerful architecture that provides great flexibility.
For now, we did include a `print(df)` command, so the output of the dataframe was also printed to your terminal. If you check there you will see the dataframe output as follows:
```text
2022-11-06 23:13:47 -0500 - dagster - DEBUG - __ASSET_JOB - XXXXXXX - 86444 - my_dataframe - STEP_START - Started execution of step "my_dataframe".
year period periodName latest value
0 2022 M09 September true 296.808
1 2022 M08 August NaN 296.171
2 2022 M07 July NaN 296.276
3 2022 M06 June NaN 296.311
4 2022 M05 May NaN 292.296
.. ... ... ... ... ...
64 2017 M05 May NaN 244.733
65 2017 M04 April NaN 244.524
66 2017 M03 March NaN 243.801
67 2017 M02 February NaN 243.603
68 2017 M01 January NaN 242.839
```
##### We have an asset!
Now Dagit shows the details of this first materialization (date and run id).
If you now navigate to **Assets** in the header:
You will see the details of the new materialized asset:
From here you can click on **View details** to explore some of the powerful cataloging and lineage features.
Now let’s go ahead and create a Google sheet, then add the code to populate it with data.
##### Create a Google Sheet
While you can create a Google Sheet programmatically, for this demo it’s easier to start with an existing one. Using your regular Google Account, create a new [Google Sheet.](https://docs.google.com/spreadsheets/u/0/)
For this demo, mine is called ‘Dagster Demo Sheet’:
##### Create a Google Service Account
You will be familiar with regular Google accounts for accessing Gmail, Drive, or Docs. These regular accounts allow you to provide permissions, such as sharing a Google Sheet with another user.
Google also allows you to create *Service Accounts* which are designed to manage the same permissions for systems. To allow our Dagster instance to access your Google Sheets, it needs its own Google Service Account.
You will find [a general guide to Google Service accounts here](https://cloud.google.com/iam/docs/service-accounts).
You'll need to create a service account and OAuth2 credentials from the [Google API Console](https://console.developers.google.com/). Follow the steps below to enable the API and grab your credentials. But the steps in creating a service account are as follows:
1. Go to - if you already have a GCP account, click on ‘Console’ in the top right corner. Otherwise, sign up with the ‘Get Started For Free’ button.
2. If you are required to provide a payment method for Google Cloud, don’t fret - the amount of usage we will generate will not incur any billing.
3. Create a new project by selecting My Project -> + button or by clicking the project drop-down in the top left corner.
4. Give your project a name and click 'Create'
5. Use the search function, or click on API & Services -> Library. Locate 'Google Drive API', and enable it.

1. Now click on 'Credentials' in the left hand menu
2. Click '+ CREATE CREDENTAILS' and select 'Service Account'
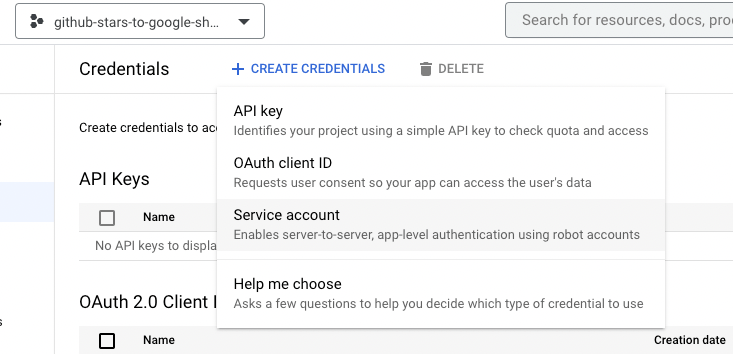
1. Create a service account by giving it a name and a description of your choice. You can ignore the two optional steps.
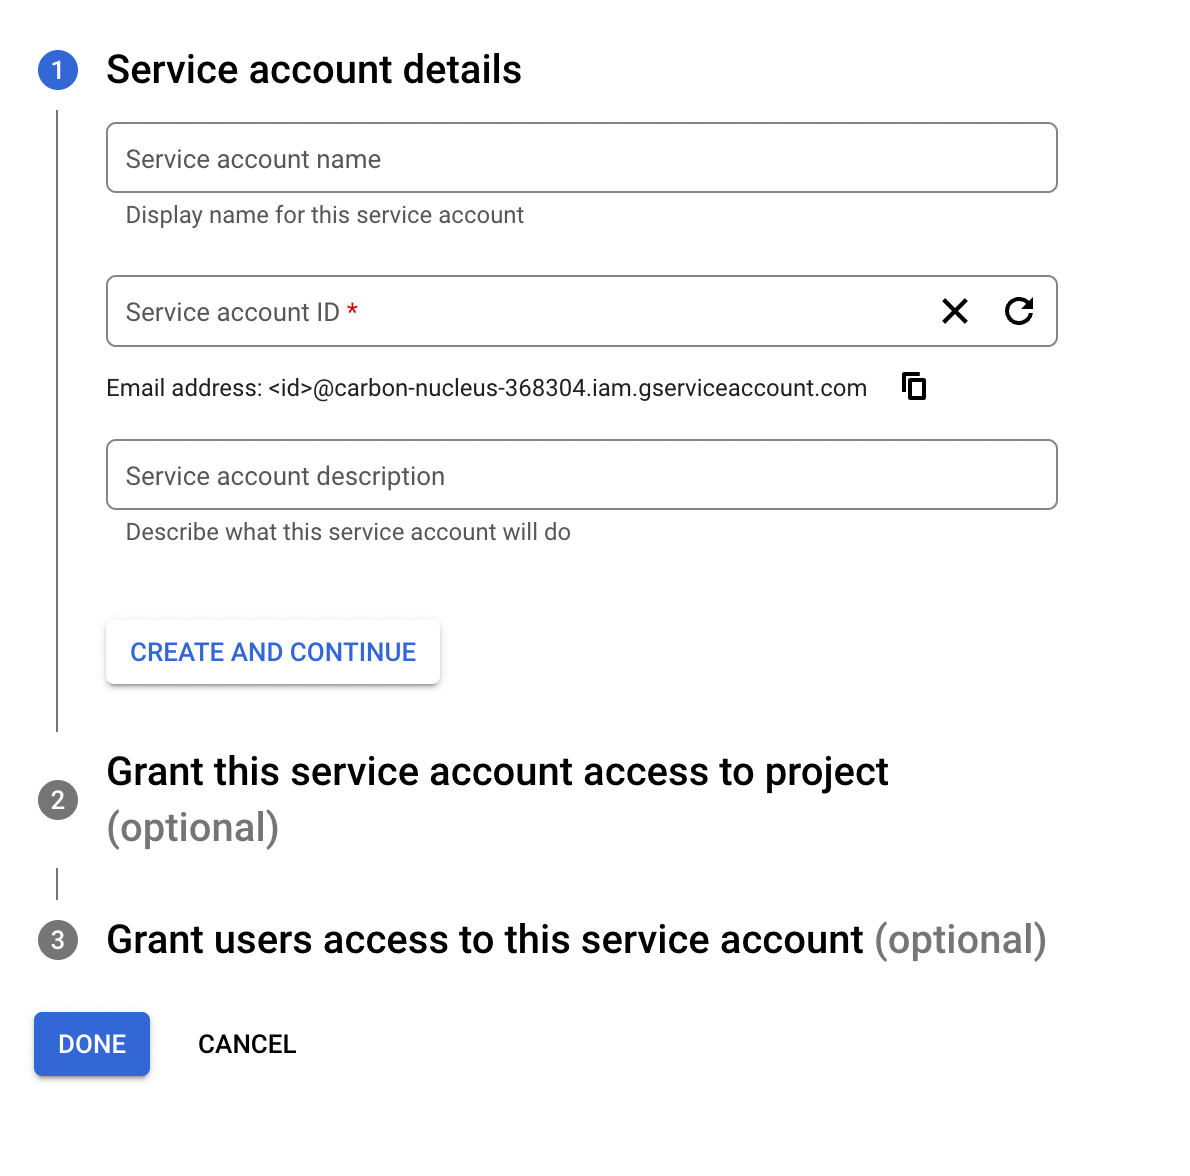
1. On the next screen, click on the email address you want to create a key for (under 'Service Accounts')
2. Look for the 'KEYS' tab
3. Click on 'Add Key' -> 'Create a new key'
4. Select 'JSON' and the key you need will download.
5. Save the JSON file in the `dagster_gsheets` folder hosting your project renamed as `service-key.json`.
An important note here is that the JSON file we created is essentially your username and password for this Google Cloud project. It is important to restrict its scope (access) to just this one project and this one sheet. You also would not store this file in your project as this would mean the file would get included in any remote repository like Github.
You can now make this Service Account an editor on your Google Sheet:
##### Declare a Google Sheet data asset you want to exist
With Dagster’s declarative approach, we simply define a new asset we wish to exist - in this case it will be a dataset inside our Google Sheet:
First, let’s add `pygsheets` to our available modules, and add an additional dagster object called `AssetIn` - update the top of your file as follows:
```python
from dagster import asset, AssetIn
import pandas as pd
import requests
import json
import pygsheets
```
```python
@asset
def my_gsheet(context, my_dataframe):
gc = pygsheets.authorize(service_file='dagster_gsheets/service-key.json')
sh = gc.open('Dagster Demo Sheet')
wks = sh[0]
wks.clear()
wks.title = "My Data"
wks.set_dataframe(my_dataframe, (1, 1))
context.add_output_metadata({"row_count": len(my_dataframe)})
```
Now let’s add our new asset as the end of the file:
So what’s going on here?
1. Again we are using the @asset decorator to declare our asset.
2. We are providing an asset key (`my_gsheet`) and specifying the key of our upstream asset.
3. We create an authorized connection using our service key
4. We open up a connection to our specified sheet
5. We open the first tab in our worksheet (Sheet with index of 0)
6. We clear any old data from the sheet
7. We assign a name to the tab (this could be useful, for example to rename the tab with today’s date)
8. We write the contents of our `my_dataframe` asset to the Google sheet starting in cell A1.
9. The final line illustrates how we can write additional metadata using the `context` object. In this case we capture the number of rows written to Google sheets.
Now, if you reload the location in Dagit, you will see our two assets in the asset graph, along with the dependency between them:
If we now click ‘Materialize all’, the mini pipeline we created will execute and our DataFrame should now be written to the Google Sheet:
Now, if you click on 'Assets' in the header menu in Dagit, and select the `my_gsheets` asset you will see some of the basic metadata on our materialized asset.
Congratulations, this completes part 1. As you create more sophisticated pipelines, having the option to push data out to Google Sheets provides a nimble way of testing or sharing data, and I am sure you will find many creative ways of putting this to use.
Continue reading for part 2 of this tutorial...
#### Section 2: Building out the framework
Now that our rudimentary pipeline is built out let’s look at how we can shore it up with some additional features of Dagster.
##### Let’s group our assets
You may have noticed that our asset graph sits in a view called ‘default’ which is not very endearing.
With Dagster you may end up creating dozens of pipelines (or asset graphs), and each graph may have dozens of assets. It would help for us to group the assets we have created and give them a descriptive label.
```python
@asset(group_name="google_sheets")
```
We do this by simply specifying a group name as the argument `group_name` in the `@asset` decorator for both assets:
Now, when we refresh the location in Dagster, we see:
That’s better.
##### Declaring Definitions
Right now our little pipeline is sort of hanging out there as just a couple of Dagster software-defined assets.
It would help for us to create a Dagster project to keep all of our elements in one place. We do this using [`Definitions`](https://docs.dagster.io/guides/automate/schedules) — entities that Dagster learns about by importing your code.
*Managing one type of definition, such as assets, is easy. However, it can quickly become unruly as your project grows to have a variety of definitions (ex. schedules, jobs, sensors). To combine definitions and have them aware of each other, Dagster provides a utility called the Definitions object.*
```python
from dagster import Definitions, load_assets_from_modules
from . import assets
all_assets = load_assets_from_modules([assets])
defs = Definitions(
assets=all_assets,
)
```
As it turns out, we are already using a `Definitions` object, and you will find it declared in the `__init__.py` file:
Right now our `Definitions` includes every asset it finds in the ‘**`dagster_gsheets`**’ folder, which is why our UI has updated automatically.
##### Switching from an asset to an I/O Manager
We have hardwired our ‘write to Google Sheet’ function into an asset, and this works, but to make it more versatile, it would be good to set this up as [a Dagster I/O Manager](https://docs.dagster.io/guides/build/io-managers). Why is that?
An Asset is a specific, one-of-a-kind declaration. Right now our second ‘asset’ is simply writing the outputs of the first asset to Google sheets, and that is not really the idea of what an asset should do.
What if we wanted to write many of our assets to a google sheet? It would be better to just have Google Sheets set up as a generic destination for our data. This would open up our pipeline to do a couple of things:
1. It would be easy to then write our dataframe to a different destination than Google Sheets, such as, say, a .csv file or a database.
2. It would allow us to use the Google Sheets connector for many different assets.
An I/O manager is a user-provided object that stores asset and op outputs and loads them as inputs to downstream assets and ops. As per the docs: “the I/O manager effectively determines where the physical asset lives.”
As it turns out, Dagster uses I/O Managers whether you tell it to or not. If we don’t specify one, it uses a default I/O manager, `fs_io_manager`, which saves all outputs to the local file. We saw it in action when we first clicked ‘Materialise All’ and our data was saved to file.
So we just need to turn our Google Sheet connection into an I/O manager to enjoy a whole new suite of capabilities.
Dagster has a lot of pre-built I/O Managers that you can just import and plug into your code. But there is not one for Google Sheets, so we will have to roll our own.
Luckily the Dagster Docs have [a guide on writing your own I/O Manager](https://docs.dagster.io/guides/build/io-managers#defining-an-io-manager).
We are going to do this by deleting our second asset (`my_gsheet`) and we are going to replace it with a reusable I/O Manager.
```python
from dagster import asset, AssetIn
import pandas as pd
import requests
import json
@asset(group_name="google_sheets")
def my_dataframe() -> pd.DataFrame:
"""
Pull inflation data from BLS
"""
headers = {"Content-type": "application/json"}
data = json.dumps({"seriesid": ["CUUR0000SA0"], "startyear": "2019", "endyear": "2022"})
p = requests.post("https://api.bls.gov/publicAPI/v2/timeseries/data/", data=data, headers=headers)
json_data = json.loads(p.text)
df = pd.DataFrame.from_dict(json_data["Results"]["series"][0]["data"])
df = df.astype({"year":'int32',"period": 'string',"periodName": 'string',"value":'float'})
if 'footnotes' in df.columns:
df.drop(columns=['footnotes'], axis=1, inplace=True)
print(df)
return df
```
As a first step, delete the asset entirely from the `dagster_gsheets/assets.py` file, so that file now just reads:
You will note that we have also removed the **`import pygsheets`** command in the file above. Since we have moved the Google Sheet connection to an I/O Manager, this is no longer required when defining the assets.
Now, working in the **`__init__.py`** file, we are going to need a few more dependencies. Update the imports from **`dagster`** as follows:
```python
from dagster import Definitions, load_assets_from_modules, with_resources, IOManager, io_manager
from dagster_gsheets import assets
import pygsheets
import pandas as pd
```
So we are adding:
- [`with_resources`](https://docs.dagster.io/api/dagster/resources#dagster.with_resources) (which allows us to add dagster resources to our assets, such as the IO manager)
- [`IOManager`](https://docs.dagster.io/api/dagster/io-managers#dagster.IOManager) (base class for user-defined I/O Managers)
- [`Io_manager`](https://docs.dagster.io/api/dagster/io-managers#dagster.io_manager) (Decorator that defines an IO manager)
- `Pygsheets`
- `Pandas`
Let’s update the `Definitions` in the `__init__.py` file so that our assets can use the I/O Manager we are going to define. We add I/O Managers as `resources`:
```python
defs = Definitions(
assets=all_assets,
resources={"io_manager": gsheets_io_manager}
)
```
Next, we are going to add our custom I/O Manager. For this, we need two items:
1. A new child class for `dagster.IOManager` (which I will call `GSIOManager`)
2. A @io\_manager decorated function.
Let’s add the child class to the `__init__.py` file:
```python
class GSIOManager(IOManager):
def __init__(self):
self.auth = pygsheets.authorize(service_file='dagster_gsheets/service-key.json')
self.sheet = self.auth.open('Dagster Demo Sheet')
self.wks = self.sheet[0]
self.wks.title = "My Data"
def handle_output(self, context, obj: pd.DataFrame):
self.wks.clear()
header = self.wks.cell('A1')
header.text_format['bold'] = True # make the header bold
self.wks.set_dataframe(obj, (1, 1))
context.add_output_metadata({"num_rows": len(obj)})
def load_input(self, context):
return Null
```
You will notice that for now, I am specifying how to write to Google sheers (`handle_output`) but not how to read from it yet (`load_input`).
In this example, I am embedding the authentication in the I/O Manager. In practice, you would pass the authentication details to the I/O Manager as a configuration variable. But for this example we will keep things simple.
```python
@io_manager
def gsheets_io_manager():
return GSIOManager()
```
Next, let’s add our @io\_manager
So all told, your `__init__.py` file will now look like this:
```python
from dagster import Definitions, load_assets_from_modules, IOManager, io_manager
import pygsheets
import pandas as pd
from . import assets
all_assets = load_assets_from_modules([assets])
class GSIOManager(IOManager):
def __init__(self):
self.auth = pygsheets.authorize(service_file='dagster_gsheets/service-key.json')
self.sheet = self.auth.open('Dagster Demo Sheet')
self.wks = self.sheet[0]
self.wks.title = "My Data"
def handle_output(self, context, obj: pd.DataFrame):
self.wks.clear()
header = self.wks.cell('A1')
header.text_format['bold'] = True # make the header bold
self.wks.set_dataframe(obj, (1, 1))
context.add_output_metadata({"num_rows": len(obj)})
def load_input(self, context) -> pd.DataFrame:
df = self.wks.get_as_df()
return df
@io_manager
def gsheets_io_manager():
return GSIOManager()
defs = Definitions(
assets=all_assets,
resources={"io_manager": gsheets_io_manager},
)
```
```python
class GSIOManager(IOManager):
def __init__(self):
self.auth = pygsheets.authorize(service_file='dagster_gsheets/service-key.json')
self.sheet = self.auth.open('Dagster Demo Sheet')
self.wks = self.sheet[0]
self.wks.title = "My Data"
def handle_output(self, context, obj: pd.DataFrame):
self.wks.clear()
header = self.wks.cell('A1')
header.text_format['bold'] = True # make the header bold
self.wks.set_dataframe(obj, (1, 1))
context.add_output_metadata({"num_rows": len(obj)})
def load_input(self, context) -> pd.DataFrame:
df = self.wks.get_as_df()
return df
```
Now you would think that we should go to the asset itself (`my_dataframe`) and specify that we want it to use our new I/O Manager. But that is not necessary, as we have overwritten the default I/O Manager, and Dagster will now use the new one by default.
If you refresh the location in Dagit, you will now see just our one asset:
Hit ‘Materialize all’ one more time, and your dataframe will now write neatly to your Google Sheet.
###### Adding the input
Now let’s tackle the ‘I’ side of I/O - the Input. We will rework to I/O manager to also be able to load data from Google sheets. We do this by defining the `load_input` method for our GSIOManager class:
```python
def load_input(self, context) -> pd.DataFrame:
df = self.wks.get_as_df()
return df
```
So now your GSIOManager class will look like this:
To complete this section of our tutorial, let’s add a second asset called `my_dataframe_percent_change` that will read from the Google sheet, compute a new column, then write that back to the sheet.
```python
@asset(group_name="google_sheets",
ins={"my_dataframe": AssetIn(input_manager_key="io_manager")}
)
def my_dataframe_percent_change(context, my_dataframe) -> pd.DataFrame:
"""
Add a percentage difference column.
"""
my_dataframe = my_dataframe.sort_values(by=['year','period'])
my_dataframe.loc[:, f'percent_change'] = (my_dataframe['value'].diff(periods=1) / my_dataframe['value']).map('{:.2%}'.format)
return my_dataframe
```
Back in the file `assets.py` let’s add this asset:
In order, this block of code:
- Defines a new asset, adds it to our asset group, and specifies the input for creating this asset, namely our new `io_manager`.
- Gives our asset a name, specifies the upstream dependency (`` `my_dataframe ``)\`, and specifies the expected output (a dataframe)
- Adds a descriptor for the asset
- Sorts the dataframe by `year` then `period`
- Calculates a new column, namely the percentage change between periods
- Returns the new dataframe.
Again, no need to specify where to save the output, as Dagster will handle that for you automagically.
Reload our Dagit location, and we now have our two assets:
You now have the choice to `materialize all` and run the whole pipeline. But by now you are probably tired of waiting on the BLS API. Luckily you also have the choice of selecting just the new asset and clicking `materialize selected`
….since we have already materialized the first asset and the data is already in our Google Sheet.
Assuming all went to plan, you will now see a new column called `percent_change`.
So there you have it. To recap we have:
1. Installed Dagster locally
2. Created two distinct data assets - one that pulls and stores data from a REST API and one that creates a new asset based on manipulating an existing asset.
3. Created a custom I/O Manager for Dagster that can read and write to Google Sheets.
Naturally, there are lots of enhancements we can make from here. First we would want to make our authentication details secure, and you can [find details on that here](https://github.com/dagster-io/dagster/blob/master/examples/project_fully_featured/project_fully_featured/resources/snowflake_io_manager.py). We can make the I/O Manager more flexible by accepting inputs, which might control things like which worksheet to save to. We could also put our little pipeline on a schedule so that it updates every month (BLS data does not refresh that often!). Or we could [factor out the API as a resource](https://docs.dagster.io/dagster-basics-tutorial).
But for now, I hope you enjoyed this introduction to Dagster.