Using pex, Serverless Dagster Cloud now deploys 4 to 5 times faster by avoiding the overhead of building and launching Docker images.
Serverless development and feedback loops
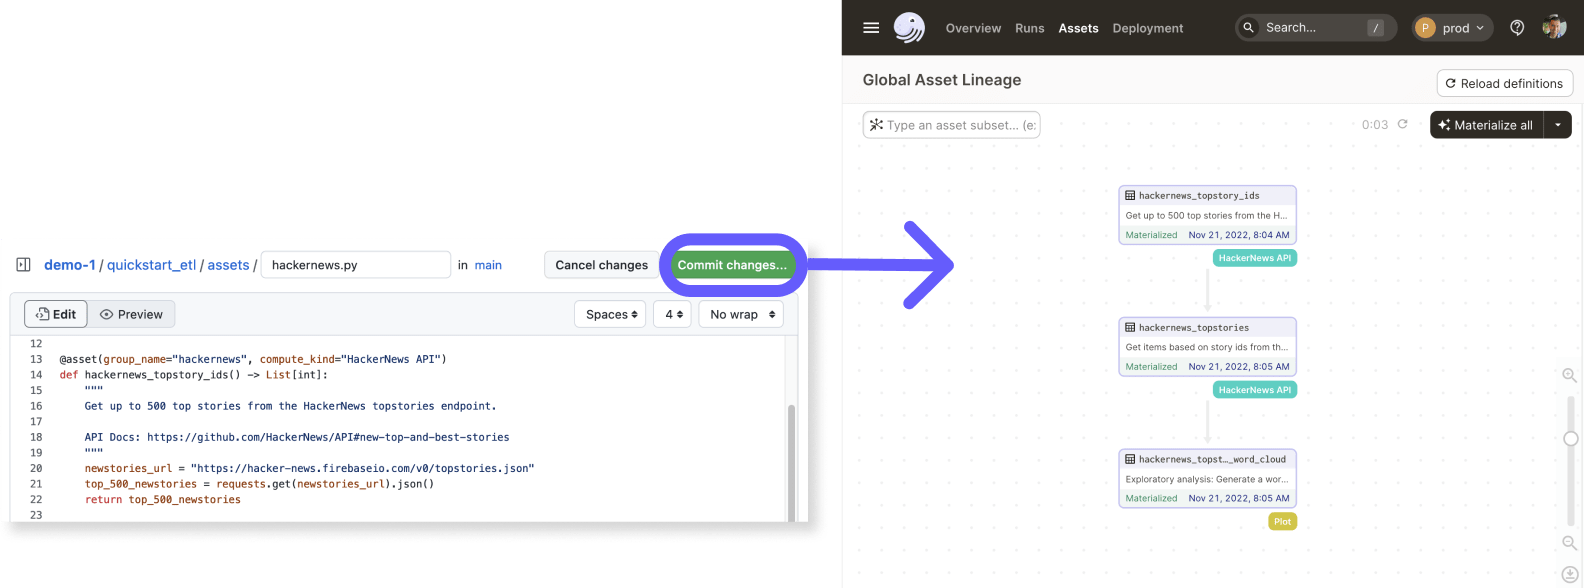
With Serverless Dagster Cloud you can develop and deploy Dagster code without setting up either a local development environment or any cloud infrastructure. When you commit a change to GitHub, a GitHub Action builds and deploys your code directly to Dagster Cloud, where you can view and interact with your Dagster objects in the UI. With Dagster Cloud, remote environments are used for sharing deployments with collaborators using auto-created staging environments. The combination of individual local development and shared remote environments make for a powerful development cycle.
Initially, we used our standard Docker-based build process for Dagster Cloud Serverless, however, we soon discovered that this makes the edit-deploy-run cycle tediously slow. To speed this up we implemented a system to ship code outside Docker images. This post describes the problems we analyzed, the solution we settled on, and the various trade-offs we made in the process.
The problem with Docker images
When we build Docker images on GitHub and deploy them to Dagster Cloud, each commit takes anywhere from 3 to 5 minutes to show up in the Dagster UI. Serverless developers often make a small change to the code in each iteration, and having to wait upwards of 3 minutes to see the effect of that change gets tiresome very quickly. We analyzed “what happens when you change one line of code and commit” and discovered the following:
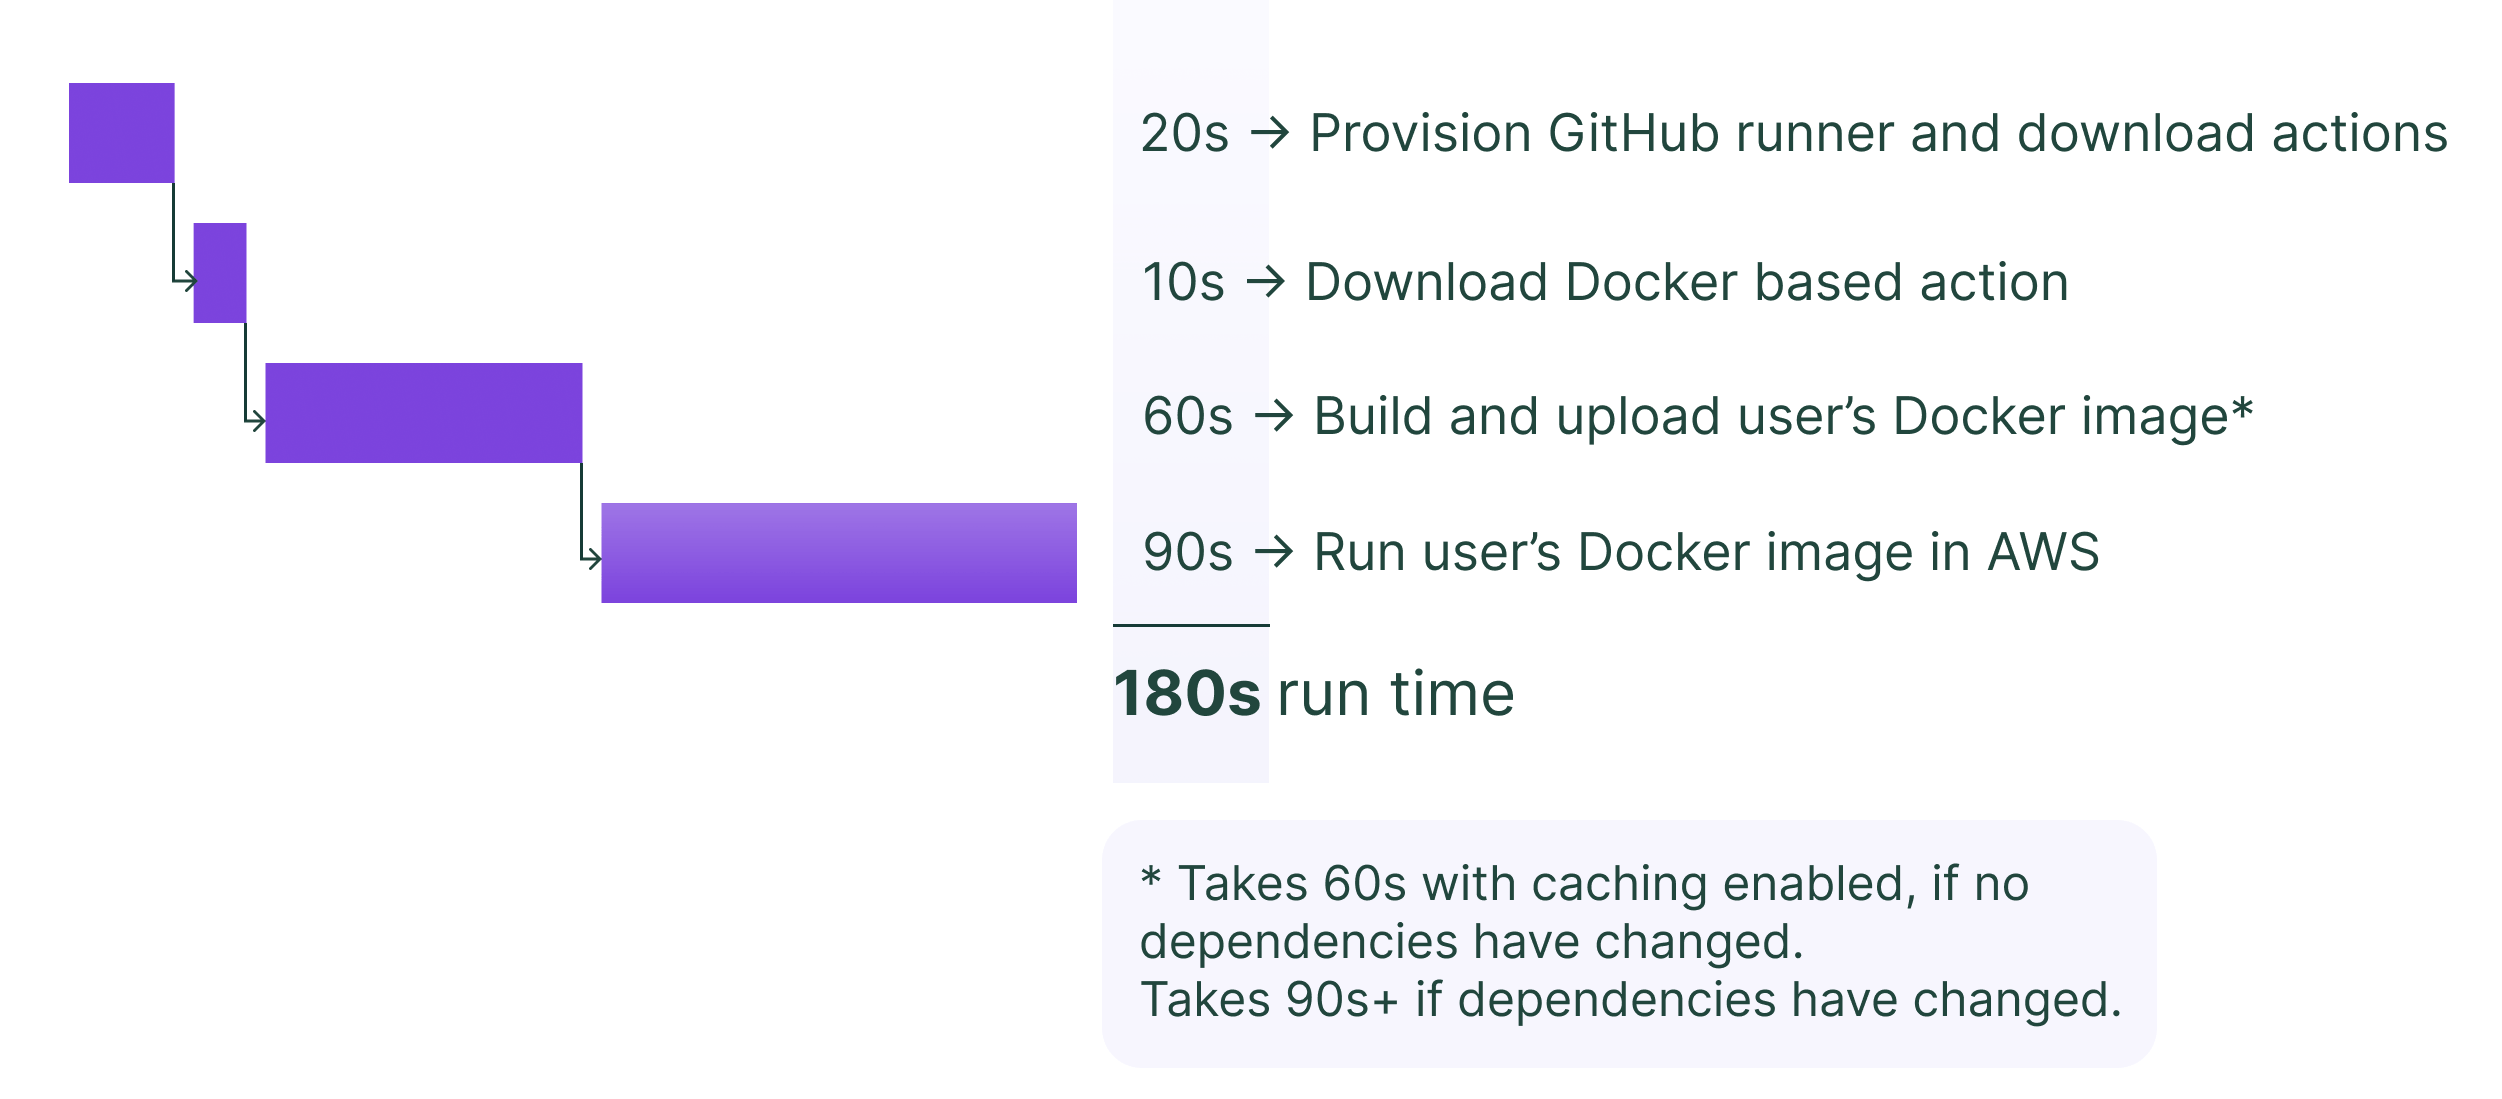
As you see above, the two things that take the longest are:- building a Docker image (60 - 90+ seconds)- deploying the Docker container (90 seconds)
Let's look at each of these.
Building Docker images
Some things to note about building a Docker image:
- Docker images are made of multiple layers in a stack, where each layer is built by a subset of the commands in the
Dockerfile. - Each layer is identified by a hash.
- When uploading images to a registry, only the layers not present in the registry (as identified by the hash) are uploaded.
- Rebuilding images on a GitHub build machine using the GitHub Actions cache pulls all unaffected layers from the cache onto the build machine. Note that if you have a large set of dependencies in your project that don't change, they will still be copied from the cache to the build machine during the build process.
- Docker builds are not deterministic. If you build an image twice with the same exact same contents, it may produce a different hash each time. (While not directly relevant, we wanted to note this unexpected observation. As a corner case, consider that a freshly built large layer that is identical to a layer already in the registry may still get uploaded as a new layer.)
Launching Docker containers
The main thing to note about launching Docker containers is that we use AWS Fargate and it takes anywhere from 45 to 90 seconds to provision and boot an image. It does not provide any image caching. Launching a new container downloads all layers from the registry onto the provisioned container.
Other constraints
After the Docker image is built and launched, we run the user's code to extract metadata that is displayed in the UI. This is unavoidable and can take anywhere from a couple of seconds to 30 seconds or more, depending on how the metadata is computed (for example, it could connect to a database to read the schema). This code server remains alive and serves metadata requests until a new version of the code is pushed, which then launches a new container.
One key requirement we have is repeatability: we need to be able to redeploy the exact same code and environment multiple times. Using the Docker image hash as an identifier for the code and environment works very well for this requirement.
Roundup of alternatives
Here are some alternatives we explored and discussed:
- Switch from Fargate to EC2 for faster container launches. This would increase our ops burden, requiring us to pre-provision, monitor and scale our cluster. We would still have the problem of Docker builds being slow.
- Switch to a different Docker build system such as AWS CodeBuild. This would require a lot more implementation work and deeper integration with GitHub. It was unclear if the payoff would be worth it.
- Switch to AWS Lambda with much faster launch times. The Lambda environment comes with its own base images making it harder to customize if needed. It also imposes a 15-minute limit on execution time which would require complicated workarounds for longer-running servers.
- Reuse the long-running code server by building and uploading only the changed code to the same server. The challenge here would be implementing the packaging and runtime mechanism to ensure a reliable and repeatable execution environment. We looked into various ways to package and distribute Python environments, including rsync, poetry, nix, shiv, and pex. We also thought about using EFS volumes to mount Python environments in combination with these tools.
The key factor behind our decision was the realization that while Docker images are industry standard, moving around 100s of megabytes of images seems unnecessarily heavy-handed when we just need to synchronize a small change. Consider git – it only ships the diffs, yet it produces whole and consistent repositories. This made us lean towards option 4… if only we could find a suitable tool that would do most of the work for us. After some experimentation, we found pex had many features that worked very well for our use case - more on this in the next section.
What is PEX?
Short for Python Executable, pex is a tool that bundles Python packages into files called pex files. These are executable files that carry Python packages and some bootstrap code within them. For example, we can bundle the dagster package and it’s dependencies into a single file and then run it:
% pex dagster --python=python3.8 -o dagster.pex
% ./dagster.pex
Python 3.8.16 (default, Dec  7 2022, 01:24:57)
[Clang 14.0.0 (clang-1400.0.29.202)] on darwin
Type "help", "copyright", "credits" or "license" for more information.
(InteractiveConsole)
>>> import dagster
>>>
Bash
Having the entire environment in a single file is convenient to ship around and store in S3. pex provides more than just a “virtual environment in a file” – here are other features that we use:
- Isolation
- At runtime, pex environments are fully isolated from other site-wide packages. The only packages present in the environment are those bundled in the pex file. We ship multiple pex files to the same machine without having to worry about environment isolation.
- Determinism
- Using the same set of input packages produces bit-for-bit identical pex files :
Bash
- This gives us confidence in using content addressing to identify these pex files. To implement repeatability, we use pex file hashes in addition to the Docker image hash.
- Composition
- Multiple pex files can be merged at runtime, effectively merging the environments into one.
Bash
- We use this to split the code into two parts that we merge at runtime: a
deps.pexfile containing all the dependencies and asource.pexfile containing just the user code. - Cross-platform builds
- We use the Linux
python:*-slimderived base images in our Serverless Cloud. Thepextool can build pex files for Linux on any platform as long as the wheels for the packages are available.
Fast Deploys
Using pex in combination with S3 for storing the pex files, we built a system where the fast path avoids the overhead of building and launching Docker images.
Our system works like this: when you commit code to GitHub, the GitHub action either does a full build or a fast build depending on if your dependencies have changed since the previous deploy. We keep track of the set of dependencies specified in setup.py and requirements.txt.
For a full build, we build your project dependencies into a deps.pex file and your code into a source.pex file. Both are uploaded to Dagster cloud. For a fast build we only build and upload the source.pex file.
In Dagster Cloud, we may reuse an existing container or provision a new container as the code server. We download the deps.pex and source.pex files onto this code server and use them to run your code in an isolated environment. We never share a container across users and all environments on a container belong to the same user. The best case and worst case timelines for fast deploys are show below:
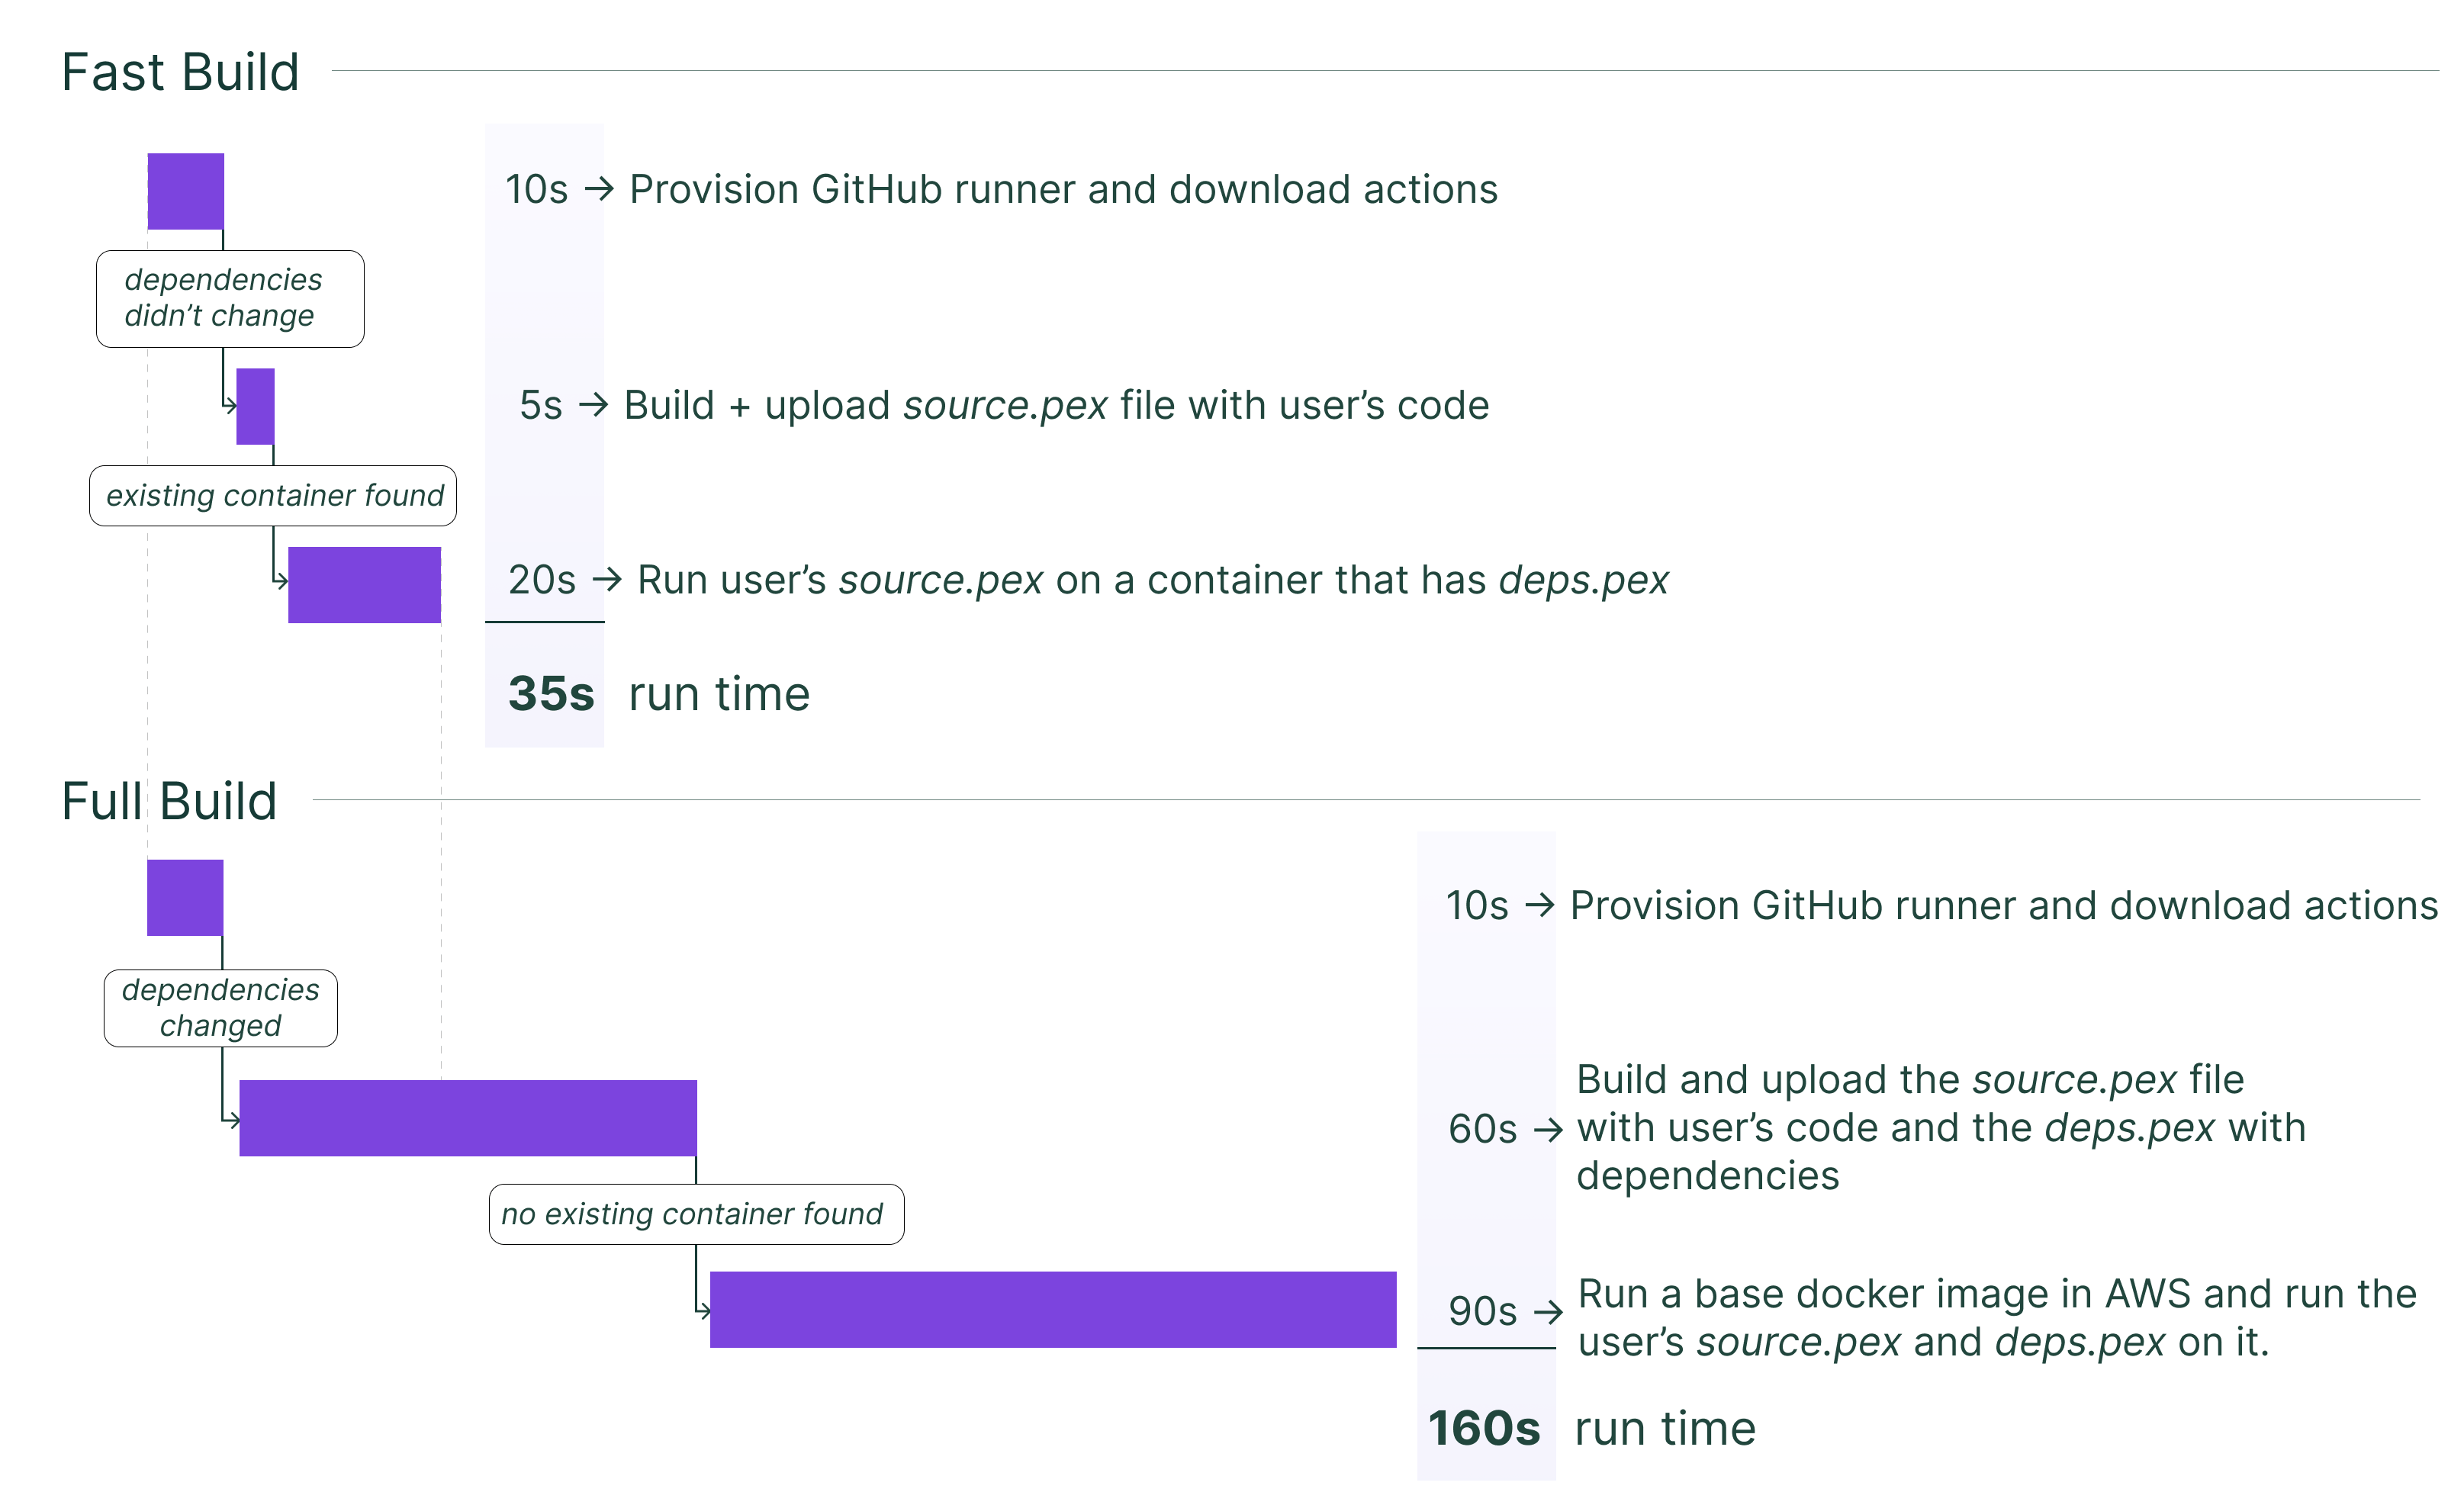
The upshot here is that in the fast path – when we do a fast build and also reuse and existing container – the entire process takes about 40 seconds instead of 3+ minutes that it used to.
We call this feature fast deploys and it is now on by default for all new serverless sign-ups.
Trade-offs and issues
Fast deploys significantly improve the deploy speed (4-5X), but it comes with some trade offs and other factors we have tuned:
- While we can now run multiple environments on one code server and they are isolated code-wise, they still share the same RAM and CPU. If we put too many environments on one container and one environment takes up too much memory, it can adversely affect other running environments in the same container.
- Docker can build Python packages for Linux on any OS because the target Linux OS and Python interpreter are available during the build process. pex can only build pex files for Linux for packages that provides wheels. As as fallback we use a Docker container during the build to handle source distributions. This step could be moved into a separate shared service in the future.
- Deep customization is possible when building a Docker image, for example you can specify a custom base image instead of one of the default
python:*-slimimages. For feature parity, we had to implemented a way for users to specify their own base Docker image that we use with fast deploys.
GitHub workflows and pex
You may have noticed that Download Docker based action in the original diagram used to take about 10 seconds. How did we eliminate this step entirely?
We used to package our GitHub action code into a Docker image and used the Docker container action. Instead, we now package our action code as a pex file, which we check into our action repository and run directly on the GitHub runner. This eliminates the time spent downloading and launching the Docker action image, while still allowing us to package all dependencies.
Another small optimization we made was to only use one GitHub workflow job. Every job launch in GitHub takes about 10s to provision a new runner.
Conclusion
Reducing the deploy time from over 3 minutes to 40 seconds is a significant speed-up and we’re very happy with the outcome, specially when we’re testing our own service. Using pex allowed us to build a repeatable, consistent environment on top of Docker and we’re excited to explore other possibilities using this pex-on-docker combination.
If you found this post interesting, here is another blog post from the pex team on the topic of deployment with Docker. It describes how to use pex files as intermediate targets to speed up Docker image builds.
If you want to support the Dagster Open Source project, be sure to Star our Github repo.


.jpg)
.png)
.png)