.png)


Once the model is trained, the final step is getting it into users’ hands. This guide walks through turning your model into a fast, reliable RunPod endpoint—complete with orchestration and automated updates from Dagster.
At this point in the journey, we finally have a trained model. Depending on how much data you used and how long you let the training run, the model may be fairly capable or relatively small and experimental. Either way, the next question becomes the same: where will this model live, and how will we interact with it?
We could simply create a final Dagster asset that loads the model and accepts prompts directly inside the pipeline. That would work, but it would move us away from the spirit of nanochat. The original project serves its model through a simple script that runs outside the training loop. To stay faithful to that idea, we want to host our model as a separate service. A place where anyone, not just the orchestrator, can send messages to the model and get responses back.
Fortunately, we already have everything we need to achieve that. RunPod not only provides GPU-backed pods for training, but also offers serverless endpoints for inference. This gives us a clean way to host the model while paying only for the compute we actually use.
Packaging the Model for Deployment
Before we deploy anything, we need to define the environment that will run the model. During training, we built a Docker image that contained the tokenizer code, the nanochat training scripts, and all the Python dependencies. For inference, we create a separate image focused on loading the trained model checkpoints and serving responses through a handler function.
The project includes a second Dockerfile called Dockerfile.serverless which contains exactly what is needed to execute the model inside a serverless environment. It installs the model code, the Rust BPE tokenizer, and the logic that interprets incoming inference requests. We push the image to our registry using the same approach from Part 2.
Once this image exists, we have a frozen snapshot of the model runtime. Any serverless endpoint created from it will behave consistently and predictably.
Writing the Serverless Handler
The final piece of code that makes the deployment work is the handler function. This is the entry point for RunPod's serverless environment. It receives an event object containing the user prompt and other inference parameters. It loads the model, runs the generation process, and returns a structured response.
It feels similar to writing a function for AWS Lambda or any Function as a Service environment. The structure is simple:
def handler(event):
    ...
    return {
        "response": response_text,
        "tokens_generated": tokens_generated,
        "finish_reason": finish_reason,
        "model_info": {
            "vocab_size": model.config.vocab_size,
            "n_layers": model.config.n_layer,
        },
    }

if __name__ == "__main__":
    runpod.serverless.start({"handler": handler})
This small function becomes the public face of the model. Everything else in the image supports it, but the handler defines how the outside world interacts with the model. Once the handler is in place and packaged inside the serverless Docker image, we are ready to deploy.
Creating the Serverless Endpoint
To maintain the clarity and lineage that guided the first two parts of this series, we also represent the serverless endpoint as a Dagster asset. Even though this asset creates infrastructure instead of files or model artifacts, it still fits naturally into the pipeline. The endpoint depends on the successful creation of the model, the availability of the serverless image, and the correct configuration of the environment variables.
RunPod's Python SDK does not currently expose a high-level interface for creating serverless endpoints, but the underlying API includes everything we need. To make this manageable, we build another custom resource called ServerlessResource. This resource encapsulates all the API calls necessary to create, retrieve, update, or delete serverless endpoints and templates.
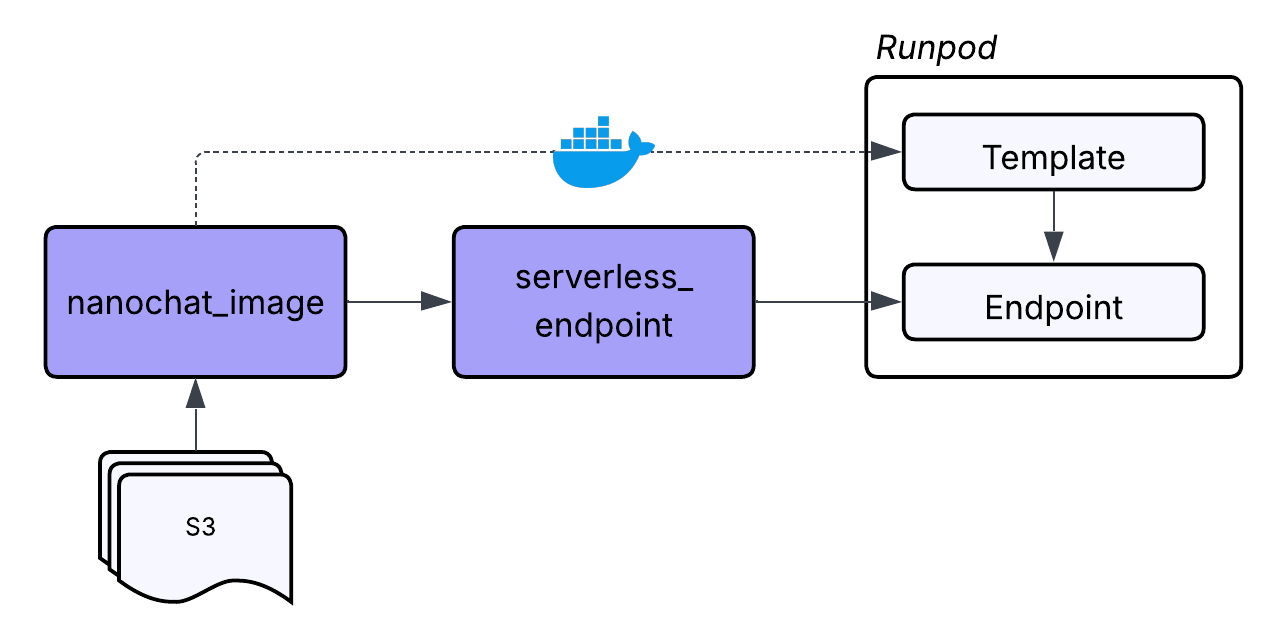
A serverless deployment in RunPod consists of two parts:
- A template - This defines the Docker image and the code that powers the endpoint.
- An endpoint - This defines how many workers to run, the GPU type, and the configuration for scaling.
When our endpoint asset runs, it uses the resource to create or reuse the appropriate template, then create or reuse the endpoint based on the template. By handling everything inside the resource, the asset remains simple and focused. It asks for the endpoint to exist, and the resource figures out how to make that true.
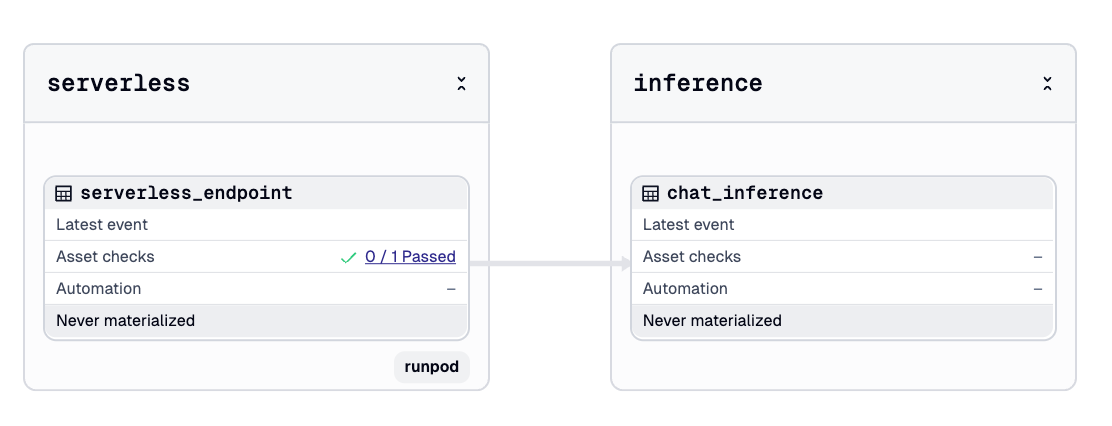
Representing the endpoint as an asset also gives us an easy way to track its lifecycle. If the asset is materialized again, the resource checks for existing templates and endpoints instead of creating duplicates. And we can attach a blocking asset check to confirm that the endpoint exists before the pipeline proceeds. This gives us confidence that the infrastructure was created successfully.
Interacting With the Model Through a Chat Asset
Once the endpoint is live, the final step is creating something that can talk to it. In the original nanochat repository, this is handled by a script and command line interface. To fit our workflow, we make a Dagster asset called chat_inference.
This asset does not have to be part of the pipeline, but making it an asset gives us a few helpful benefits. We can reuse our API key through the same resource. We can keep a record of all previous prompts and model outputs inside the Dagster UI. And we can parameterize the questions we ask through Dagster run configuration.
The ChatInferenceConfig defines the shape of each request:
class ChatInferenceConfig(dg.Config):
    question: str  # User question/prompt (required)
    max_tokens: int = 256  # Maximum tokens to generate
    temperature: float = 1.0  # Sampling temperature
    top_k: int = 50  # Top-k sampling parameter
The custom serverless resource includes a method called run_inference which sends the question to the endpoint and returns the generated text. The result becomes part of Dagster's execution history. If we retrain the model at a later time with more compute or better data, we can run the same inference asset again and see differences in the responses.
This gives us a lightweight evaluation loop without writing any additional scripts. The pipeline that started with raw FineWeb shards now ends with a working model you can chat with.
Wrapping Up the Journey
By completing the deployment step, we have taken nanochat from raw text all the way to a working model you can interact with. We ingested data, trained a tokenizer, orchestrated multi-stage GPU training, evaluated the checkpoints, and deployed the final model through a serverless endpoint.
The core intelligence still comes from nanochat. What Dagster and RunPod add is structure: clear lineage, predictable environments, and compute that appears only when needed. Even a small project becomes easier to understand and maintain when each step is explicit and visible.
The intent of this series was not to reinvent nanochat, but to show how orchestration supports modern LLM workflows. With this foundation in place, you can retrain the model, adjust the datasets, or expand the deployment without starting over. If you want help polishing the full series or creating diagrams for publication, I am happy to assist.


.jpg)
.png)

.png)