In part IV of our series, we explore setting up a Dagster project, and the key concept of Data Assets.
The following article is part of a series on Python for data engineering aimed at helping data engineers, data scientists, data analysts, Machine Learning engineers, or others who are new to Python master the basics. To date this beginners guide consists of:
- Part 1: Python Packages: a Primer for Data People (part 1 of 2), explored the basics of Python modules, Python packages and how to import modules into your own projects.
- Part 2: Python Packages: a Primer for Data People (part 2 of 2), covered dependency management and virtual environments.
- Part 3: Best Practices in Structuring Python Projects, covered 9 best practices and examples on structuring your projects.
- Part 4: From Python Projects to Dagster Pipelines, we explore setting up a Dagster project, and the key concept of Data Assets.
- Part 5: Environment Variables in Pthon, we cover the importance of environment variables and how to use them.
- Part 6: Type Hinting, or how type hints reduce errors.
- Part 7: Factory Patterns, or learning design patterns, which are reusable solutions to common problems in software design.
- Part 8: Write-Audit-Publish in data pipelines a design pattern frequently used in ETL to ensure data quality and reliability.
- Part 9: CI/CD and Data Pipeline Automation (with Git), learn to automate data pipelines and deployments with Git.
- Part 10: High-performance Python for Data Engineering, learn how to code data pipelines in Python for performance.
- Part 11: Breaking Packages in Python, in which we explore the sharp edges of Python’s system of imports, modules, and packages.
Sign up for our newsletter to get all the updates! And if you enjoyed this guide check out our data engineering glossary, complete with Python code examples.
Python has become a cornerstone of modern data engineering due to its versatility and rich ecosystem of libraries. Whether building ETL pipelines, automating workflows, or processing large datasets, Python offers robust solutions. In this guide, we explore how to leverage Python for data engineering, specifically focusing on using Dagster for efficient data orchestration and setting up your first project. This guide aims to help data engineers, data scientists, data analysts, Machine Learning engineers, and others new to Python master the basics of building data pipelines.
Today, we take a look at how to start your first data engineering project with just a basic understanding of Python. This guide is most useful if you have some understanding of Python and are just starting with Dagster. It is also helpful if you are new to data engineering and want to start somewhere to get a sense of how it works in Python. By focusing on Assets in Dagster, this step-by-step guide helps you understand how to create successful data engineering pipelines. Along the way, we share useful tips and tricks for writing clean, maintainable Python code that follows best practices.
Let’s get started!
Data engineering in Python
Data engineering involves building systems that can store, process, and analyze data at scale.
For example, a data engineer might create a pipeline that extracts data from different sources on a fixed schedule, transforms it into a useful format, and loads it into a database for further analysis. This is a traditional ETL task, but they may also build systems that can automatically integrate, clean, validate, and perform complex calculations on the data.
These tools are useful as they help organizations work with large and complex datasets in a way that is fast, reliable, and scalable.
Python is a popular language for data engineering because it has powerful libraries for data manipulation, like pandas and NumPy, and it is also a general-purpose language that can be used for a wide range of tasks.
Dagster is an open-source solution for data orchestration, the process of automating the data pipelines that aggregate, process, and store the information that powers applications and business processes. Data orchestration supports a range of applications, from internal business intelligence to critical customer-facing services. A modern data orchestration process may include machine learning, data science and analytics use cases and range from simple linear data processes that run in a few minutes to massive complex data processing tasks that take many days to execute with work distributed across dozens if not hundreds of individual computers.
Dagster offers several key components to help users build and run their data pipelines, including Assets, Ops, and Jobs.

Assets: An asset is an object in persistent storage, such as a table, file, or persisted machine learning model. They are the primary end-product of a data engineer’s work. In Dagster, Software-defined Assets are a key declarative concept: they are a way of defining this asset in our pipeline code, so that we can easily refer to it and track its dependencies. Assets can be a database table, a file, or a machine learning model. Under the hood, every software-defined asset contains an op (or graph of ops), which is the function that’s invoked to compute its contents. In most cases, the underlying op is invisible to the user.

Ops: Ops are the core unit of computation in most orchestration tools. An individual op performs a relatively simple task, like getting data from one place and storing it somewhere else. Ops can be combined to form a graph, which is a collection of ops that are connected together to create a data pipeline. They are the building blocks for more complicated jobs and assets. Note that in Dagster, while ops are available, the framework emphasises Assets as the main abstraction to build upon.

Jobs: Jobs are a logical, ordered grouping of Dagster Assets or Ops. The core of a job is a "graph" of "ops." Think of a graph as a diagram of how different tasks are connected. The ops are the individual tasks that need to be executed, and they're connected by lines that show which tasks depend on which others. Jobs are the main unit of execution and monitoring in Dagster: When you ‘run a pipeline,’ you ask Dagster to run a Job. In turn, that Job will materialize one or more Assets.
If you would like to explore Assets, Ops and Jobs in more detail, consult the Dagster docs.
Setting up the project's root directory
Once we initiate a new Dagster project, it is important to keep all project folders and files inside a root directory. Root directories are the first or top-most directory in our project’s file system that contains all other folders. This is where we will write our Dagster project code, and it’s important to keep it organized this way for two reasons.
First, the root directory provides a common reference point when using relative paths. This helps ensure that files can be found and referenced consistently, regardless of the location of the files.
Second, when deploying a project, the root directory is often used as the starting point for the packaging and deployment process. This ensures that all required files are included and that the project is deployed in the correct structure.
With this in mind, let’s create a new directory for your project:
mkdir my_dagster_projectWe can then change the working directory to our project’s root directory using the cd command:
cd my_dagster_project
Launching a virtual environment
Next, we’ll set up a virtual environment in our root directory, which allows for different versions of Python and libraries to be used in separate projects, without interfering with each other.
We can name the virtual environment anything you want. In this example, we went with .dag-venv.
In Unix-based operating systems such as Linux and macOS, a dot (.) before a filename indicates that the file should be hidden. These are typically system files that are generally not intended to be accessed or modified by the user directly.The dot is a convention used by the operating system to identify such files as hidden. By default, these files are not displayed when you list the contents of a directory using a command like `ls`. However, you can still access these files by specifying their name explicitly or by using a command that displays hidden files such as `ls -la`.
$ python3 -m venv .dag-venvThen, activate the virtual environment:
$ source ./.dag-venv/bin/activateYou can use this optional command to confirm the version of Python you are on:
$(dag-venv) python3 --versionFor reference, when writing this blogpost, I was on version 3.10.9
Installing Dagster & scaffolding an initial project
Let’s first install Dagster and other Python packages you’ll need by running the following command in your terminal:
### run in a terminal in your favorite python environment
pip install dagster dagit pandas
It’s good practice to verify the version of Dagster installed:
dagster --versionFor reference, when writing this blogpost, I was on version 1.2.6 of Dagster.
Dagster provides a helpful “scaffolded” project through the following command:
dagster project scaffold --name dagster-tutorialWe’ve named our project “dagster-tutorial” but you can replace that with any name you prefer.
At this point, you should see a message appear to know that you’re on the right track:
Success! Created dagster-tutorial at /Users/<your_name>/my_dagster_project/dagster-tutorialWhat is Scaffolding?
Before we proceed any further, it’s helpful to understand what happens when you run dagster project scaffold --name dagster-tutorial. You’ll notice that this creates a bunch of files in your root directory:
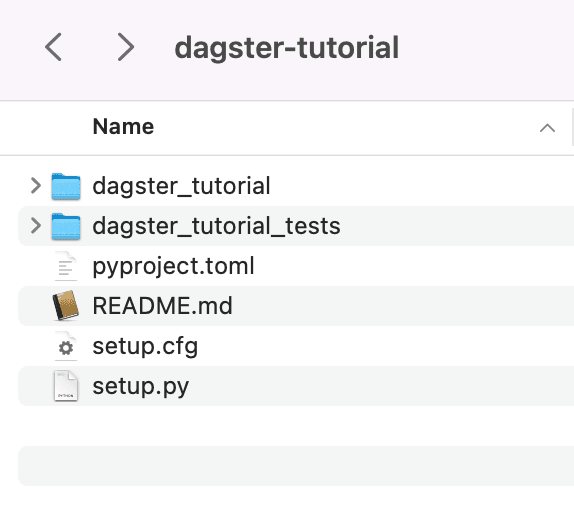
This is a standard Dagster template that makes it easy to get started without having to create all the necessary files from scratch. We call this code scaffolding: the automatic generation of a basic structure or framework of code for a software application. It saves time for developers by providing a starting point for building an application. It can also help ensure consistency and structure in the code, making it easier for developers to understand and maintain the application over time.
What is the setup.py file?
In a previous article, we covered in greater detail how to manage dependencies with different tools. The dagster-tutorial/setup.py file lets us specify any Python packages we will need.
In the setup.py file, you’ll find the following code:
from setuptools import find_packages, setup

setup(
    name="dagster_tutorial",
    packages=find_packages(exclude=["dagster_tutorial_tests"]),
    install_requires=[
        "dagster",
        "dagster-cloud"
    ],
    extras_require={"dev": ["dagit", "pytest"]},
)
Once we have defined our dependencies and libraries, Dagster will automatically manage their installation and execution.
What is the __init__.py file, and where does it sit?
Some of these files are critical for running Dagster. For instance, when you look under the dagster_tutorial folder, you'll find an __init__.py file with the following code:
from dagster import Definitions, load_assets_from_modules

from . import assets

all_assets = load_assets_from_modules([assets])

defs = Definitions(
    assets=all_assets,
)
We’ll explain more about what assets are later, but just for now, this __init__.py file loads assets that we will create shortly for the application to access. The assets themselves are defined in code in the assets.py file in this same folder and imported with the command from . import assets.
What are Definitions?
Inside the __init__.py file, you'll notice the following lines of code:
defs = Definitions(
    assets=load_assets_from_modules([assets])
)
The Definitions object, named defs, collects all the functions and pipelines you want to use in your Dagster project for a Code Location. These include assets, schedules, sensors, jobs, resources, executors, and loggers. Putting all these objects into Definitions helps make it easier to manage and organize your code.
Note: `Definitions` was a recent enhancement to Dagster as of version 1.2 and if you refer to older tutorials you might see a similar concept called `repositories`. `Definitions` is a much more streamlined API which provides more functionality while reducing boilerplate.
Dagster separates user-defined code from system tools like the web server and the daemon. Instead of loading code directly into these tools, Dagster uses a process called serialization to allow the tools to interact with the code. This separation helps to keep the system organized and prevents issues that might arise from different parts of the system interacting with each other directly.
Most importantly, it means that:
1. the user code can be managed in a clean repository so we can support CI/CD
2. any errors in the user code will not bring down the Dagster instance.
What is Serialization?
Serialization is the process of converting complex data structures such as objects, lists, and dictionaries into a format that can be easily stored, transmitted or shared.
This is particularly important in data engineering tools because large amounts of data need to be saved, transferred or used across different applications.
How does this work in Dagster? When Dagster uses a “serialization boundary”, this means that any data passed between the user-defined code (e.g. the Definitions object) and system tools is first serialized into a common format that can be easily transmitted across different systems.
Declaring an asset in Dagster
Assets are a crucial component in Dagster. As we explained earlier, an asset is an object in persistent storage, such as a table, file, or persisted machine learning model. A Software-defined Asset is a Dagster object that couples an asset to the function and upstream assets that are used to produce its contents. Software-defined Assets enable a declarative approach to data management, in which code is the source of truth on what data assets should exist and how those assets are computed.
In simple terms, a Software-defined Asset is an object in Dagster that is used to define how data should be stored and computed. It connects the data (asset) to the function that produces it and other data (upstream assets) that are used to create it. Assets are reusable and versioned pieces of data or code that can be used as inputs and outputs in Dagster pipelines. These include SQL scripts, data files, or machine learning models.
With software-defined assets, you can manage your data using a declarative approach, which means that you define what data should exist and how it should be computed through code. This approach helps to keep your data management organized and consistent and ensures that your code is the source of truth for how your data is handled.
When an asset is created or refreshed, we say that it is ‘materialized’ - meaning that a new instance of the asset has been created and committed to storage.
Let’s create two assets to download the top 10 HackerNews stories.
In our Dagster project, let’s add the following code to the dagster-tutorial/dagster_tutorial/assets.py file:
import pandas as pd
import requests

from dagster import Output, asset

@asset
def hackernews_top_story_ids():
   """
   Get top stories from the HackerNews top stories endpoint.
   API Docs: https://github.com/HackerNews/API#new-top-and-best-stories
   """
   top_story_ids = requests.get(
       "https://hacker-news.firebaseio.com/v0/topstories.json"
   ).json()
   return top_story_ids[:10]

### asset dependencies can be inferred from parameter names
@asset
def hackernews_top_stories(context, hackernews_top_story_ids):
   """Get items based on story ids from the HackerNews items endpoint"""
   results = []
   for item_id in hackernews_top_story_ids:
       item = requests.get(f"https://hacker-news.firebaseio.com/v0/item/{item_id}.json").json()
       results.append({item['title'],item['by'],item['url']})

   df = pd.DataFrame(results)

   context.log.info(df)

   return Output(value=df)
Now, run the dagster dev command in the terminal. This starts Dagster's user interface:
$ dagster devIn your browser, navigate to http://localhost:3000/. This is the local address where you can “find” the running Dagster app on your browser.
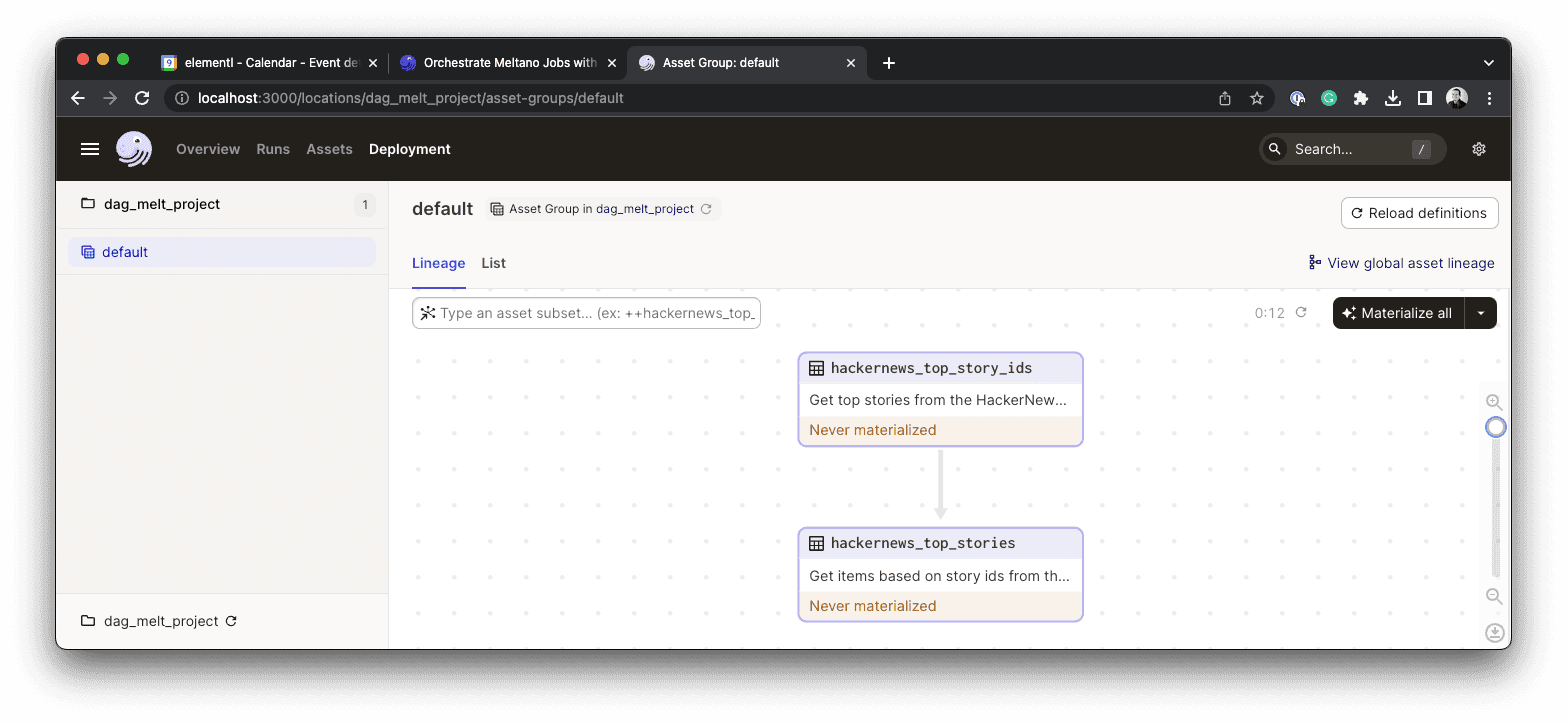
Under the Deployment tab, click Materialize All to run the pipeline and create your assets. We use the term 'materialized' to describe the process of creating or refreshing an Asset, which means that a new version of the Asset has been created and saved. This pipeline uses the Dagster defaults to save the result to a pickle file on disk.

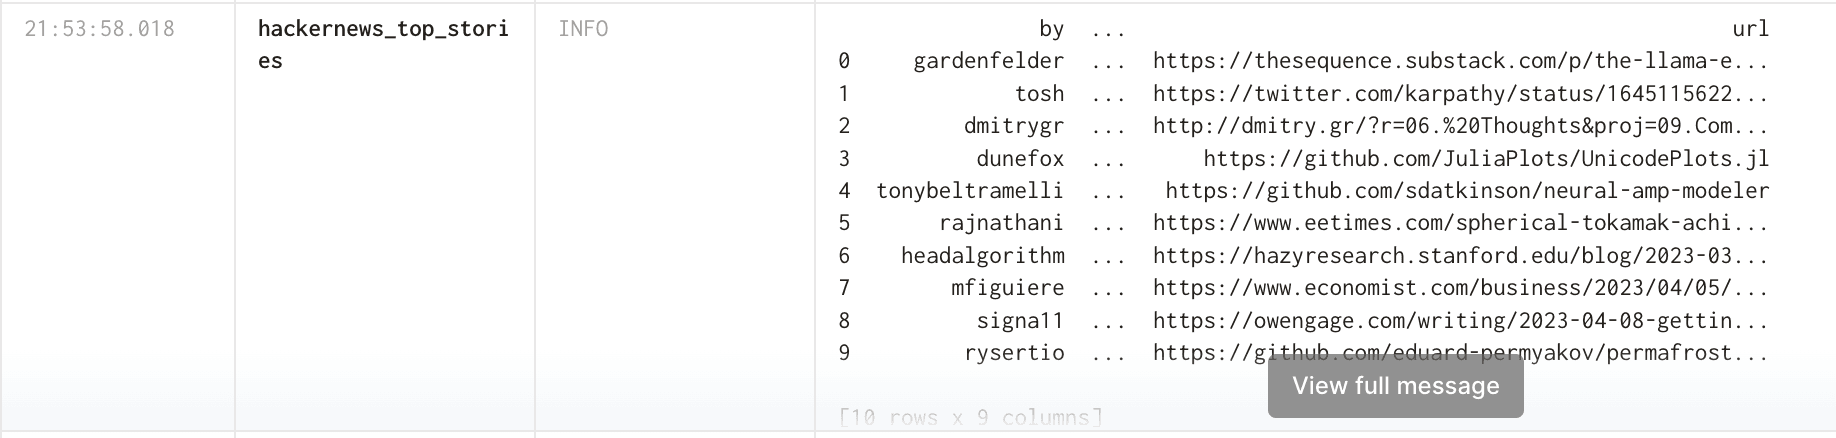
For the purpose of this tutorial, we will also output the contents of the Pandas dataframe to Dagster’s logging system with the command context.log.info(df). If you click on the “Runs” tab in the top menu, you will see the details of the run, along with the data generated:
Up next…
Building on Python programming best practices, we’ve looked at how assets, and in particular Dagster’s Software-defined Assets, make it easy to construct simple data engineering pipelines.
If you have any questions or need further clarification, feel free to join the Dagster Slack and ask the community for help. Thank you for reading!
In part 5 of our guide, we will review Environment Variables in Python - the importance of environment variables and how to use them.
FAQs about Python Data Engineering with Dagster
What is a Software-defined Asset in Dagster?
A Software-defined Asset in Dagster is a declarative concept that links an asset (like a database table or file) to the Python function and upstream assets used to generate its content. This approach provides a clear source of truth for how data assets are computed and managed within a pipeline. It enables a structured and versioned way to define data outputs, improving organization and traceability.
Why is using a virtual environment important for Dagster projects?
Virtual environments are crucial for isolating project dependencies, allowing different Python projects to use varying library versions without conflicts. For Dagster projects, this ensures that the specific versions of Dagster and other required packages are consistent and do not interfere with other Python installations on the system. It helps maintain project integrity and facilitates easier deployment by packaging only necessary dependencies.
How does Dagster's scaffolding command streamline project setup?
Dagster's scaffold command automatically generates a basic project structure and necessary files, providing a ready-to-use template for new projects. This automated process saves developers significant time by eliminating the need to manually create directory structures and configuration files from scratch. It also promotes consistency in project organization, making it easier for teams to collaborate and understand new Dagster applications.
What is the purpose of Definitions in organizing a Dagster codebase?
The Definitions object in Dagster serves as a centralized container for all components of a project, including assets, schedules, sensors, jobs, and resources. By collecting these elements, Definitions offers a streamlined and organized API for managing the entire codebase, replacing older concepts like repositories. This approach simplifies code management and helps ensure that all relevant parts of a data pipeline are properly registered and accessible.
How does Dagster manage user-defined code from system tools?
Dagster separates user-defined Python code from its internal system tools, like the web server, to enhance stability and organization. It uses a process called serialization to convert complex data structures, such as the Definitions object, into a common format that can be safely transmitted and interacted with across these separate systems. This serialization boundary ensures that errors in user code do not crash the main Dagster instance and supports clean code management for CI/CD workflows.


.jpg)
.png)
.png)