An introduction to managing Python dependencies and some virtual environment best practices.

The following article is part of a series on Python for data engineering aimed at helping data engineers, data scientists, data analysts, Machine Learning engineers, or others who are new to Python master the basics. To date this beginners guide consists of:
- Part 1: Python Packages: a Primer for Data People (part 1 of 2), explored the basics of Python modules, Python packages and how to import modules into your own projects.
- Part 2: Python Packages: a Primer for Data People (part 2 of 2), covered dependency management and virtual environments.
- Part 3: Best Practices in Structuring Python Projects, covered 9 best practices and examples on structuring your projects.
- Part 4: From Python Projects to Dagster Pipelines, we explore setting up a Dagster project, and the key concept of Data Assets.
- Part 5: Environment Variables in Python, we cover the importance of environment variables and how to use them.
- Part 6: Type Hinting, or how type hints reduce errors.
- Part 7: Factory Patterns, or learning design patterns, which are reusable solutions to common problems in software design.
- Part 8: Write-Audit-Publish in data pipelines a design pattern frequently used in ETL to ensure data quality and reliability.
- Part 9: CI/CD and Data Pipeline Automation (with Git), learn to automate data pipelines and deployments with Git.
- Part 10: High-performance Python for Data Engineering, learn how to code data pipelines in Python for performance.
- Part 11: Breaking Packages in Python, in which we explore the sharp edges of Python’s system of imports, modules, and packages.
Sign up for our newsletter to get all the updates! And if you enjoyed this guide check out our data engineering glossary, complete with Python code examples.
In part 1 of this series, we explored the basics of Python modules, Python packages and how to import modules into your own projects.
As you build larger and more complex packages, you'll often need to use code from other packages in your project. This is where managing dependencies becomes important.
Let’s talk about what dependency management in Python looks like today. We’ll cover everything from how to manage Python packages using both old and new methods, different dependency management tools, and how to manage them with virtual environments.
Table of Contents
- Managing dependencies
- Managing dependencies the old way: setup.py
- Managing dependencies the new way: pyproject.toml
- Installing “extras”
- Alternative Python dependency management tools
- Virtual environment
Managing dependencies
Dependencies are other packages that your package relies on to work correctly. Keeping track of dependencies can be a challenge, but there are tools to help you manage them effectively.

One of these tools is the Python Package Index (PyPI), which is a central repository of open-source Python packages. You can use PyPI to search for packages that you can include in your project and to make your own packages available to others.
In the following sections, we'll look at two different ways to manage dependencies in your Python projects: the old way using setup.py , and the new way using pyproject.toml.
Managing Dependencies the Old Way: setup.py
Before the introduction of pyproject.toml , the recommended way was to use a setup.py file to manage dependencies in Python projects.
setup.py is a file that you include in the root of your project, which contains information about your package and its dependencies. The file is used by pip, the package installer for Python, to install your package and its dependencies.
Here is an example of a setup.py file:
from setuptools import setup, find_packages

setup(
    name='your-package-name',
    version='0.0.1',
    description='A brief description of your package',
    author='Your Name',
    author_email='your.email@example.com',
    packages=find_packages(),
    install_requires=[
        'dependency1',
        'dependency2',
    ],
)
- The
nameandversionare required fields that specify the name and version of your package. - The
descriptionfield provides a brief description of your package. - The
authorandauthor_emailfields specify the name and email address of the person responsible for the package.Thepackagesfield specifies the packages that are included in your project. Thefind_packages()function is used to automatically find all packages in your project. - The
install_requiresfield is a list of dependencies that your package needs in order to run correctly. In this example, the package depends on two other packages, dependency1 and dependency2.
To install the dependencies of your package, you can run the following command:
pip install -e .The -e option tells pip to perform an "editable" install, which allows you to make changes to your package without having to reinstall it. The . at the end of the command specifies the current directory, which is the root of your package.
It is important to note that when you run the above command, pip will install the dependencies in the global environment which can create issues when you are working on multiple projects. This is addressed by virtual environments, which is covered later in this blog post.
Managing Dependencies the New Way: pyproject.toml
pyproject.toml is a new file format introduced to replace setup.py for managing dependencies in Python projects. It was introduced as part of PEP 518 and PEP 621.
It’s a configuration file that is used by pip to install your package and its dependencies. It has a simpler format compared to setup.py and is easier to read and maintain.
Here is an example of a pyproject.toml file:
[project]
name = "your-package-name"
version = "0.0.1"
description = "A brief description of your package"
authors = ["Your Name <your.email@example.com>"]

[project.dependencies]
dependency1 = "^1.0"
dependency2 = "^2.0"
- The
nameandversionfields are required, and specify the name and version of your package. - The
descriptionfield provides a brief description of your package. - The
authorsfield specifies the name and email address of the person responsible for the package. - The
dependenciessection specifies the dependencies that your package needs in order to run correctly. In this example, the package depends on two other packages,dependency1anddependency2.
Like we discussed above, you can run the following command to perform an editable install:
pip install -e .Installing “extras”
Let’s talk a bit about what happens when a package has optional features that require additional dependencies called "extras".
If you are using the setup.py file to manage your dependencies, you can specify the extras by including them in the extras_require argument of the setup() function. For example:
setup(
    ...
    extras_require={
        'extra_feature': ['dependency3', 'dependency4']
    }
    ...
)
To install the extra dependencies, you would run the following command:
pip install -e .[extra_feature]If you are using the pyproject.toml file, you can specify the extras in the [project.extras] section of the file. For example:
[project.extras]
extra_feature = ["dependency3", "dependency4"]
You can use the same command to install the extra dependencies as above:
pip install -e .[extra_feature]As mentioned earlier, the -e flag stands for "editable" and it installs the package in "developer mode". You’ll use this if you want to test any changes before publishing a new version.
The -e .[dev] flag is similar to the -e flag, but it also specifies that the package should be installed with the "dev" extras. Any additional packages or dependencies that are specified as "dev" in the package's setup.py file will also be installed. This is useful for installing development-specific dependencies that are not needed for production use.
Alternative Python Dependency Management Tools
Aside from pip, there are alternative tools available for managing dependencies in Python projects. One such tool is Poetry.
Poetry is a packaging and dependency management tool for Python projects. Poetry is designed to be more user-friendly than pip, with features like version constraint resolution and automatic virtual environment management.
One of the main advantages of using Poetry is its simplicity and ease of use. Poetry automatically manages your project's virtual environment, ensuring that each project has its own isolated environment with its dependencies. This reduces the risk of version conflicts between different projects. Additionally, Poetry provides a simple, concise syntax for specifying dependencies and version constraints in your pyproject.toml file.
However, there are also some disadvantages to using Poetry. For one, it is not as widely used as pip, and may not be as well-supported in the wider Python community. Some developers may prefer the more flexible and customizable approach offered by pip.
Virtual environments (a.k.a. 'venvs')
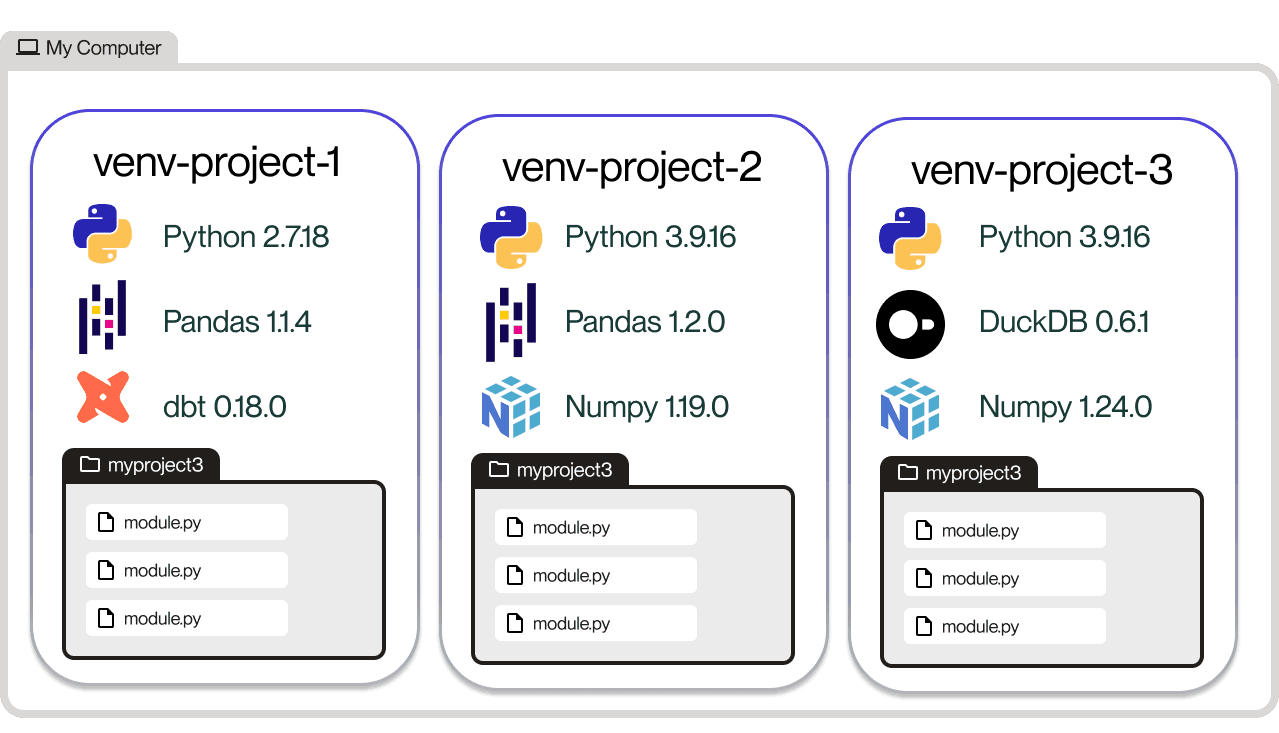
Virtual environments in Python provide a solution to the problem of dependency conflicts. By default, all Python packages are installed into a single global namespace, which can cause compatibility issues between different projects on a single machine and make it difficult to resolve conflicts.
A virtual environment creates isolated Python environments to allow for different versions of Python and libraries to be used in separate projects, without interfering with each other.
This means that you can have multiple virtual environments on the same computer, each with its own set of packages, without them interfering with each other.

To create a new virtual environment, you can use the python -m venv command. For example, to create an environment named "myenv", you would run:
python -m venv myenvNote: using python or python3
If you have multiple versions of Python installed, or if you’re working with legacy code that uses Python 2, you will need to use the command that explicitly refers to the Python version you’re using.
For example, if you’ve newly installed Python 3 on your computer, and thus you’re working in Python 3 by default, then you don’t need need to specify python3 explicitly. You can use either python3 or python as they both refer to Python 3.
But if you need to work with codebases in Python 2 but have Python 2 and 3 installed, using python will enable you to continue working without breaking any code.
The same logic applies for pip and pip3 when you use pip to install packages.
To activate a virtual environment, you can use the source command followed by the path to the environment's activate script.
On Linux and macOS, you would run:
source myenv/bin/activateOn Windows, you would run:
myenv\Scripts\activateWhen the environment is activated, any Python scripts or commands run will use the version of Python and libraries within the virtualenv, rather than the system's global version.
To deactivate a virtual environment, simply type deactivate in the terminal.
You will notice that when you activate a virtual environment, your command line prompt changes to indicate the active venv:
myname@mymachine myProject % source myenv/bin/activate
(myenv) myname@mymachine myProject % deactivate
myname@mymachine myProject %
It is best practice to create a specific virtual environment for each new project and to keep it in the same directory as the project. This makes it easy to manage and ensure that all dependencies are contained within the project folder.
If your virtual environment is in a Git repository, it is recommended to add it to your .gitignore file. This helps to keep your repository clean and ensures that each developer's virtual environment is isolated from the GitHub repository.
Up next…
We hope this blog post has provided a useful introduction to effectively managing Python dependencies. If you have any questions or need further clarification, feel free to join the Dagster Slack and ask the community for help. Thank you for reading!
Our next article will explore a roadmap for structuring Python projects.


