How Is dbt Used with Snowflake?
dbt connects directly to Snowflake and compiles transformation logic written in SQL and Jinja into executable SQL statements. These statements are then run on Snowflake, where the actual computation takes place. dbt uses Snowflake's compute resources to create and manage views or tables according to the project configuration.
A typical dbt project defines models as .sql files. When executed, dbt creates these models in a specified Snowflake schema, often organized by layers such as staging, intermediate, and mart. Developers can configure whether models are materialized as views, tables, or incrementally loaded tables, depending on the needs of the workflow and the performance characteristics of the data.
dbt also leverages Snowflake-specific features like MERGE statements for incremental models, GRANT statements to manage access, and Snowflake's query tags for better observability. Users can include custom SQL hooks to run pre- or post-model operations, integrate with Snowflake Tasks for lightweight orchestration, and use Snowflake’s role-based access control to manage security at the model level.
In practice, dbt serves as the transformation engine, while Snowflake acts as the execution layer and storage platform. This separation allows teams to write modular, testable, and version-controlled transformation logic in dbt, while taking advantage of Snowflake’s scalability, performance, and enterprise features.
Understanding the Role of dbt and Snowflake in Your Data Pipeline
Role of dbt
dbt acts as the transformation layer in the modern data stack, enabling teams to define, organize, and execute SQL-based transformations in a modular and version-controlled way. Each dbt project defines models, which are essentially SQL SELECT statements that build upon raw or previously transformed data. These models are grouped into logical layers such as staging, intermediate, and mart to promote clean architecture and maintainability.
Beyond SQL modeling, dbt provides functionality for testing, documentation, dependency management, and deployments. Developers can define assertions using built-in test macros, generate lineage graphs to visualize dependencies, and produce documentation directly from model code. This makes dbt both a transformation engine and a framework for managing analytics engineering workflows.
Role of Snowflake
Snowflake serves as the compute engine and storage layer for dbt transformations. All compiled SQL generated by dbt is executed directly on Snowflake, leveraging its cloud-native architecture. Snowflake handles the execution of queries, materialization of models, and storage of both intermediate and final datasets across its scalable compute clusters and persistent storage layers.
Snowflake offers key features that complement dbt's approach, including automatic scaling, zero-copy cloning, time travel, and fine-grained access control. These capabilities support high-performance execution, ease of testing, and secure collaboration, especially in complex or regulated environments.
How They Work Together
dbt and Snowflake integrate through a direct connection, where dbt compiles transformation logic into executable SQL and pushes it to Snowflake for processing. dbt leverages Snowflake’s compute resources to create or update datasets, while Snowflake ensures high availability, scalability, and consistent performance during execution. The combination allows teams to abstract transformation logic in dbt and delegate heavy lifting to Snowflake.
This collaboration also enables streamlined CI/CD workflows for analytics. Developers can test dbt models against isolated Snowflake environments (e.g., using clones), implement Git-based versioning, and automate deployments via orchestrators or dbt Cloud. The result is a robust, scalable, and testable transformation stack that aligns with software engineering practices.
Key Considerations for Working with dbt in Snowflake
Performance
A core technique is using incremental models to process only new or changed data rather than reprocessing entire datasets. This significantly reduces query runtime and compute usage, especially for large fact tables. Properly configured unique_key and incremental_filter logic is essential to ensure accuracy and efficiency.
Another key factor is warehouse sizing and concurrency scaling. Snowflake allows configuring different virtual warehouses for different dbt tasks. Lightweight transformations can run on small warehouses, while resource-intensive jobs (such as full refreshes or large joins) benefit from larger or multi-cluster warehouses. Enabling Snowflake’s automatic concurrency scaling ensures that multiple dbt models can run in parallel without queuing.
Model materialization choices also affect performance. Views are fast to create but compute-intensive at query time. Tables can improve performance by persisting results but consume storage. Ephemeral models reduce intermediate table overhead by compiling directly into downstream SQL, but may increase query complexity and execution time. Choose materializations based on data size, reusability, and performance tradeoffs.
Scalability
Scalability also depends on efficient SQL practices. Avoid unnecessary CTE nesting, use selective joins and filters early in queries, and leverage Snowflake’s clustering keys where appropriate for large tables with predictable access patterns.
It’s important to monitor and optimize regularly. Use dbt artifacts and Snowflake’s query history to analyze slow-running models. Combine dbt’s query_tag feature with monitoring tools to profile model execution over time and identify bottlenecks as data grows.
Cost Management for Transformations
Efficient scheduling in dbt projects involves aligning model runs with data availability and minimizing compute costs. Teams typically schedule dbt runs using orchestrators like Airflow, dbt Cloud, or Snowflake Tasks.
Warehouse sizing should match the workload: smaller warehouses for lightweight transformations and larger ones for compute-intensive operations. Snowflake’s ability to auto-scale and auto-suspend helps reduce idle time and cost.
To cut down on redundant computation, dbt encourages designing models that avoid reprocessing data unnecessarily. Incremental models are the primary mechanism for this, allowing only new or changed data to be processed.
Using ephemeral models in place of intermediate tables can also reduce storage I/O. Developers should review model dependencies regularly and remove unused or outdated models from the DAG.
Access Control
dbt itself doesn’t manage access control but integrates tightly with Snowflake’s role-based access control (RBAC). Access to data and models is governed by Snowflake roles and privileges, which can be configured to restrict who can run dbt models, access schemas, or view specific datasets.
dbt users often assign different roles to development and production environments. For example, developers may only have access to dev schemas, while production deployments use a service account with elevated privileges.
GRANT statements can be automated using dbt’s post-hook configurations, ensuring proper access is applied when models are created or updated.
Sensitive Data Handling
When working with sensitive data, teams must ensure that dbt models don't expose PII or confidential information unintentionally. This includes:
- Masking or redacting sensitive fields in staging or intermediate layers
- Ensuring models with sensitive data are only materialized in secure schemas
- Using Snowflake’s dynamic data masking and row access policies
- Excluding sensitive fields from documentation or exposures
dbt supports column-level documentation, allowing teams to tag fields that contain sensitive data and implement review processes to ensure compliance with data governance policies.
Working with Snowflake Dynamic Tables in dbt Projects
Why Use Snowflake Dynamic Tables for dbt?
Performance tuning with dbt on Snowflake involves matching model execution with the compute environment’s characteristics. In dev and staging environments, smaller warehouses are typically sufficient for testing and debugging. However, in production, larger warehouses, or multi-cluster warehouses, may be necessary to meet throughput and SLA requirements, especially for large fact models or concurrent workloads.
To improve scalability, teams should adopt modular modeling practices to keep individual queries manageable. Breaking down complex logic into layered models (e.g., staging → intermediate → mart) allows better caching, faster compilation, and easier debugging. dbt’s tags and resource_type selectors enable targeted runs, helping teams isolate changes and avoid full DAG rebuilds.
Setting Up Dynamic Tables
To use Snowflake Dynamic Tables in dbt, users can define a custom materialization or use community packages that abstract the setup. Dynamic Tables require specification of a target lag (e.g., 5 minutes) and a warehouse for continuous refresh.
Configuration involves setting the materialization to dynamic_table, defining the target_lag, and ensuring the correct compute resources are allocated. Because dbt doesn't yet natively support Dynamic Tables, developers often use pre-hook and post-hook SQL to manage creation and refresh behavior.
This setup enables near real-time data processing, making it suitable for event-driven architectures and low-latency analytics workflows.
Common Challenges to Anticipate
Teams working with dbt and Snowflake may face challenges such as managing dependencies in large DAGs, controlling warehouse costs, and ensuring consistent testing across environments.
Other common issues include:
- Slow performance due to suboptimal query patterns or model design
- Difficulty in debugging failed runs in large, interdependent projects
- Managing schema changes in upstream data sources
- Coordinating data refresh timing with downstream reporting tools
Adopting naming conventions, limiting DAG depth, using dbt tests, and monitoring warehouse usage can help mitigate these problems.
Step-by-Step: Building dbt on Snowflake
This walkthrough outlines the complete flow for setting up and running a dbt project with Snowflake, from account preparation to building and testing models.
1. Set up your Snowflake environment
Before connecting dbt, prepare the required Snowflake resources:
- Create a warehouse: Provision a virtual warehouse that dbt will use to execute transformations. Configure auto-suspend and auto-resume to control costs.
- Create a database and schemas: Define a database for analytics and separate schemas for raw, staging, and transformed data layers.
- Create a role for dbt: Set up a dedicated role with permissions to create schemas, tables, and views.
- Grant privileges: Grant the role usage on the warehouse and database, and create privileges on relevant schemas.
This ensures dbt has the correct permissions and isolated compute resources for transformations.
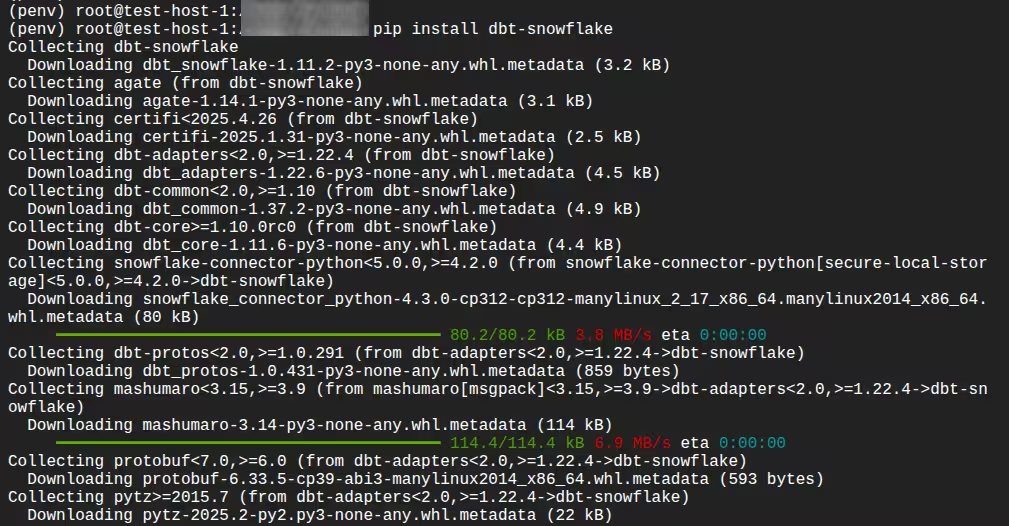
2. Install dbt and the Snowflake adapter
Install dbt along with the Snowflake adapter:
pip install dbt-snowflake
Confirm installation:
dbt --version

This verifies that dbt Core and the Snowflake plugin are correctly installed.
3. Configure your dbt profile
dbt connects to Snowflake using a profile configuration file (profiles.yml), typically located in your home directory under .dbt/.
Define:
- Account identifier
- Username and authentication method (password, key pair, SSO, etc.)
- Role
- Warehouse
- Database
- Schema
- Thread count
Example structure:
your_project_name:
target: dev
outputs:
dev:
type: snowflake
account: <account_identifier>
user: <username>
password: <password>
role: <role_name>
database: <database_name>
warehouse: <warehouse_name>
schema: <schema_name>
threads: 4
Test the connection:
dbt debug
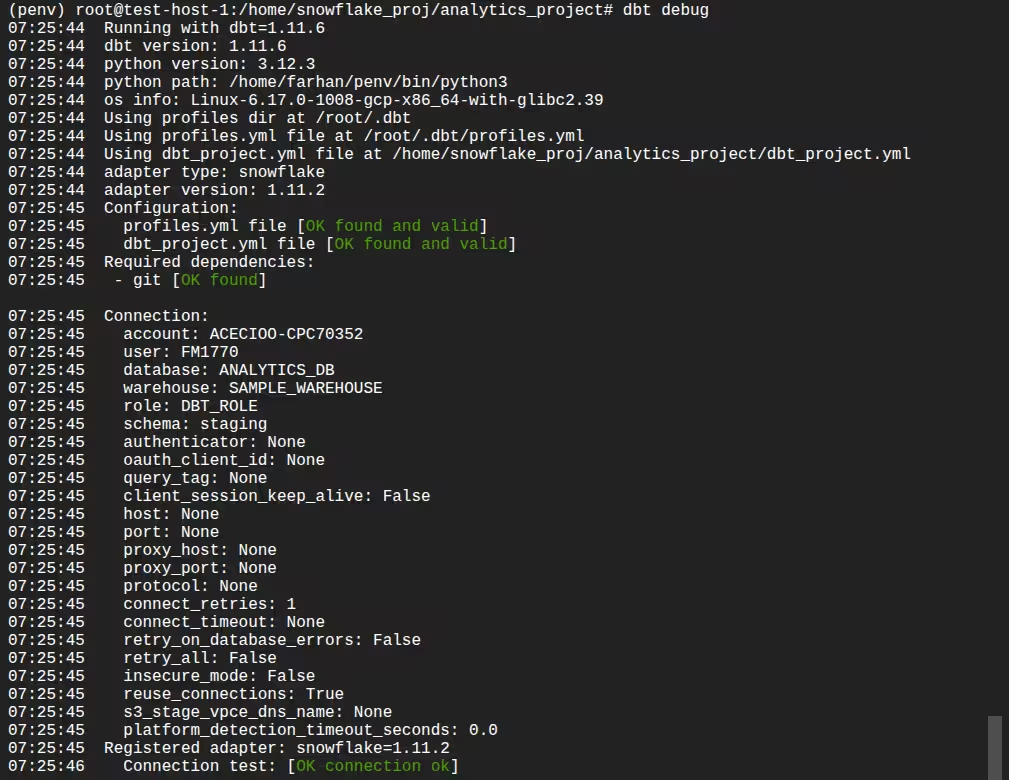
A successful output confirms connectivity and credentials are configured correctly.
4. Initialize a dbt project
Create a new project:
dbt init analytics_project
This generates:
dbt_project.yml- A
models/directory - Example model files
- Project-level configurations
Navigate into the project directory to begin development.
5. Configure project settings
In dbt_project.yml, define:
- Default materializations
- Model folder structure
- Target schemas
- Tags or custom configurations
Example configuration:
models:
analytics_project:
staging:
+schema: STAGING
+materialized: view
marts:
+schema: MARTS
+materialized: table
This enables layered architecture such as staging → intermediate → mart.
6. Define sources
Declare raw data sources in a YAML file inside the models/ directory:
version: 2
sources:
- name: app_raw
database: ANALYTICS_DB
schema: RAW_APP
tables:
- name: app_users
- name: app_orders
Defining sources allows dbt to:
- Track lineage
- Test source freshness
- Reference tables using
source()
7. Create your first model
Add following SQL model file inside models/staging/, for example:
select
id as user_id,
first_name,
last_name,
email,
created_at
from {{ source('app_raw', 'app_users') }}
Add following in models/staging/stg_app_orders.sql
select
order_id,
user_id,
order_total,
order_date,
updated_at
from {{ source('app_raw', 'app_orders') }}
dbt models are SELECT statements. dbt handles creation of views or tables based on materialization settings.
8. Run the models
Execute:
dbt run
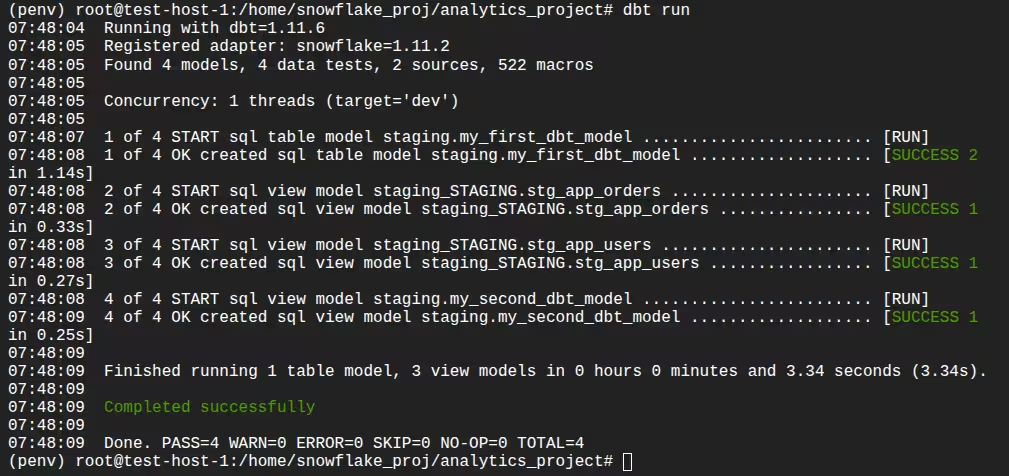
dbt will:
- Compile SQL using Jinja templating
- Resolve dependencies
- Execute compiled SQL in Snowflake
- Create models in the configured schema
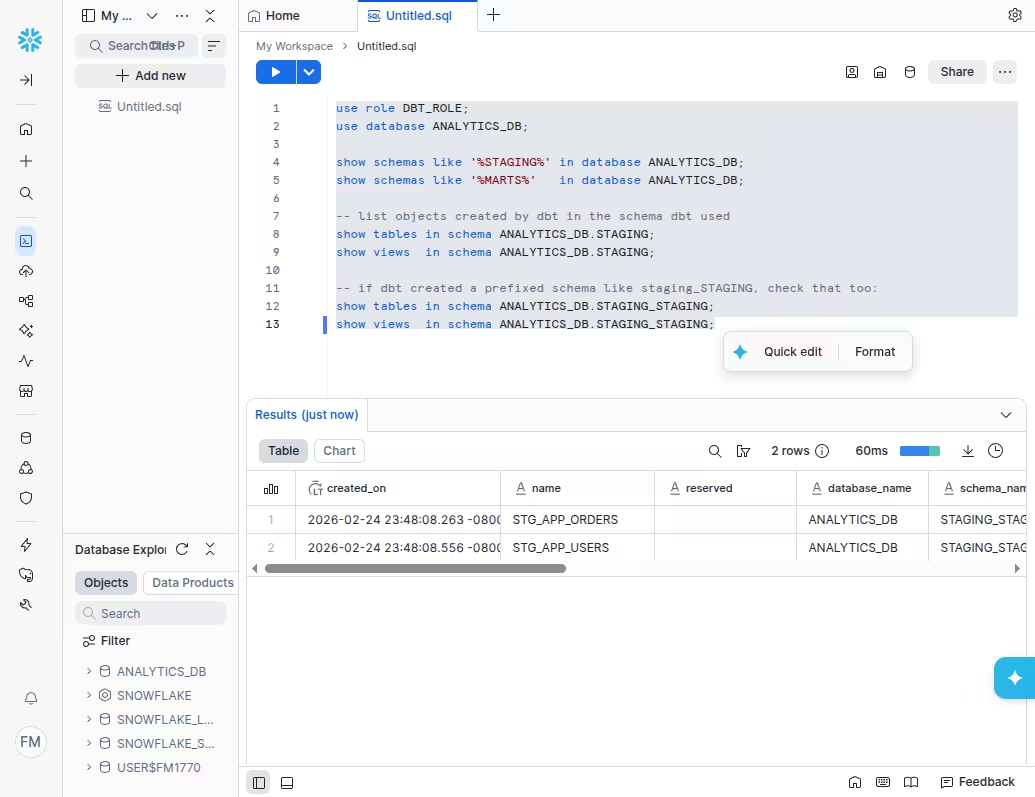
Verify the created objects in Snowflake.
You can verify using the following queries:use role DBT_ROLE;
use database ANALYTICS_DB;
show schemas like '%STAGING%' in database ANALYTICS_DB;
show schemas like '%MARTS%' in database ANALYTICS_DB;
-- list objects created by dbt in the schema dbt used
show tables in schema ANALYTICS_DB.STAGING;
show views in schema ANALYTICS_DB.STAGING;
-- if dbt created a prefixed schema like staging_STAGING, check that too:
show tables in schema ANALYTICS_DB.STAGING_STAGING;
show views in schema ANALYTICS_DB.STAGING_STAGING;
9. Add tests
Define tests in YAML:
Add following test in models/staging/staging_tests.yml
version: 2
models:
- name: stg_app_users
columns:
- name: user_id
tests:
- not_null
- unique
- name: stg_app_orders
columns:
- name: order_id
tests:
- not_null
- unique
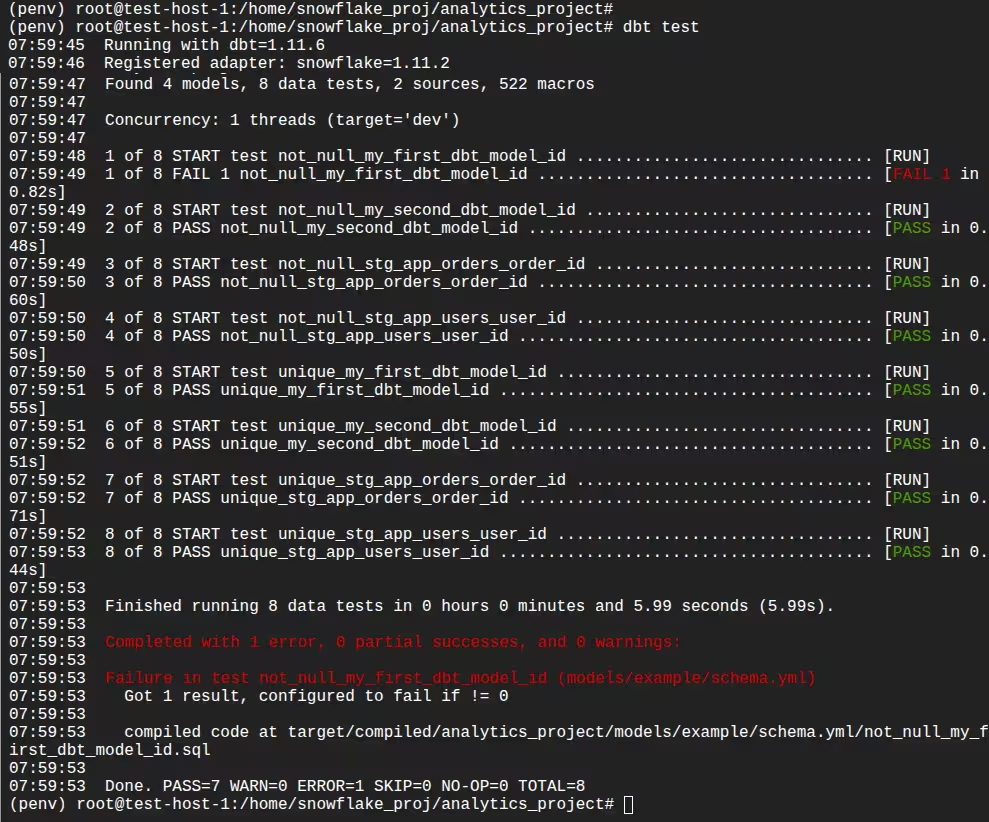
Run tests:
dbt test
dbt executes validation queries in Snowflake and reports failures.
10. Create downstream models
Build higher-level models referencing upstream ones:
-- models/marts/fct_orders.sql
select
o.order_id,
u.user_id,
u.email,
o.order_date,
o.order_total
from {{ ref('stg_app_orders') }} o
join {{ ref('stg_app_users') }} u
on o.user_id = u.user_id
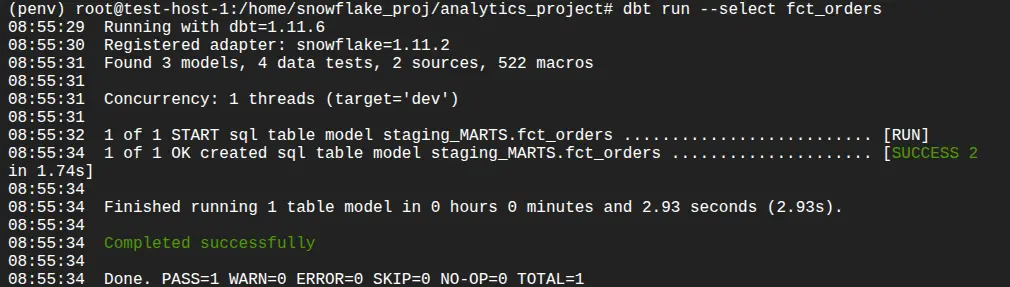
ref() creates dependency tracking and ensures correct execution order. You can run this using the following command:
dbt run --select fct_orders
11. Generate documentation
Generate project documentation:
dbt docs generate
dbt docs serve

This provides:
- Lineage graphs
- Model descriptions
- Column metadata
- Test visibility
12. Implement incremental models (optional)
For large datasets, configure incremental logic:
-- models/marts/fct_app_orders_inc.sql
{{ config(materialized='incremental', unique_key='order_id') }}
select *
from {{ source('app_raw', 'app_orders') }}
{% if is_incremental() %}
where updated_at > (select max(updated_at) from {{ this }})
{% endif %}
You can run this using this command:
dbt run --select fct_app_orders_inc
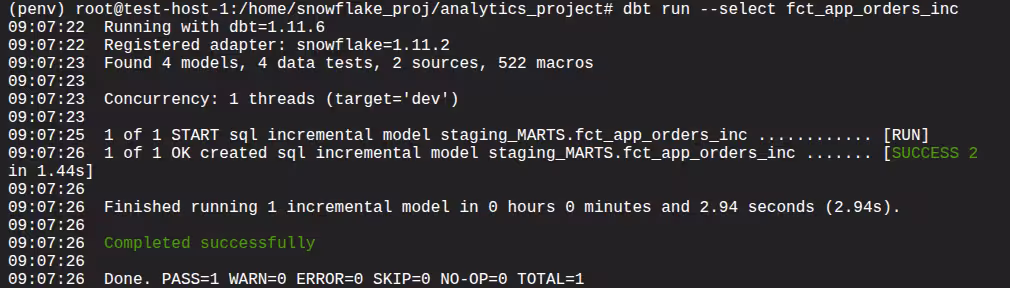
Snowflake executes optimized MERGE logic behind the scenes when configured properly.
13. Deploy and orchestrate
In production:
- Use separate dev and prod targets
- Run dbt via dbt Cloud, Airflow, or Snowflake Tasks
- Use CI workflows for pull requests
- Leverage Snowflake clones for safe testing
This supports version control, repeatable deployments, and scalable execution.
Related content: Read our guide to dbt cloud alternatives
Best Practices for dbt with Snowflake
Here are a few best practices that can help you get the most our of dbt in a Snowflake data warehouse.
1. Take Advantage Of Snowflake's Query Profiler To Help Optimize
Use the Snowflake Query Profile to analyze the performance of dbt-generated queries. After executing a model, review the query profile to inspect execution steps, time spent per operation, and scan statistics. Focus on identifying bottlenecks such as large table scans, inefficient joins, or skewed partitions.
Look for long-running steps like table scans or distributed joins, and investigate whether filters are being applied early in the plan. If not, consider rewriting the model to filter rows or select columns earlier. Use this insight to refine model logic, adjust materialization strategies, or apply clustering to improve performance on large datasets.
2. How To Use Micro Partitions Correctly
Snowflake automatically organizes data into micro partitions, but query performance depends on how well filters align with partition boundaries. In dbt, you can improve partition pruning by ensuring that frequently queried filter columns—such as dates or IDs—are used early in WHERE clauses.
Avoid unnecessary transformations on filter columns (like casting or functions) that prevent Snowflake from leveraging partition metadata. When designing incremental models, ensure new data appends cleanly in order based on partitioned fields to maintain micro partition efficiency. Also, monitor the average bytes scanned per query to confirm effective pruning.
3. Using Separate Warehouses For Different Environments
Use different Snowflake warehouses for dev, staging, and prod environments to isolate workloads and avoid resource contention. In dbt, define these warehouses in your profiles.yml and use environment-specific targets for deployments.
This separation allows developers to test models without impacting production jobs and supports tuning warehouse size independently per environment. For example, small dev warehouses reduce cost, while larger prod warehouses ensure SLAs are met for critical data loads. This practice also helps trace costs and query patterns by environment.
4. Using Snowflake Clones For Test Environments
Leverage Snowflake’s zero-copy cloning to quickly create isolated environments for testing without duplicating data. You can clone databases, schemas, or individual tables to test model changes, CI/CD runs, or schema evolution plans.
In dbt, point your development targets to these cloned environments. This allows full testing of transformation logic on production-like data without risk to live systems. Clones are especially useful for regression testing or validating model refactoring before merging changes to main branches.
5. Routing Expensive Queries To Differently Sized Warehouses
Assign resource-intensive dbt models to larger warehouses by configuring warehouse overrides at the model level. Use the config(warehouse=...) setting in individual models or groups of models that require higher compute.
Reserve smaller warehouses for lightweight staging or ephemeral models. For larger fact tables, incremental models, or late-stage transformations, route execution to more powerful warehouses that can process data faster with lower latency.
This strategy balances cost and performance, allowing teams to allocate compute efficiently and avoid overprovisioning across all workloads.
Managing Snowflake Data Pipelines with Dagster
As teams scale their use of dbt and Snowflake, orchestration and operational visibility become just as important as transformation logic. Dagster provides a modern way to manage dbt and Snowflake together as a cohesive, production-grade data platform.
With Dagster’s dbt integration, your dbt project is loaded directly into Dagster and represented as software-defined assets. Each dbt model becomes an asset in a unified asset graph, giving you automatic lineage, dependency tracking, and selective execution. Instead of triggering full dbt run jobs, you can materialize only the models impacted by upstream changes — helping reduce unnecessary Snowflake compute usage.
Dagster also integrates cleanly with Snowflake through configurable resources. You can define environment-specific connections (dev, staging, prod), route different assets to different warehouses, and safely test changes against Snowflake zero-copy clones. This makes it easier to manage environments and control costs without duplicating pipeline logic.
Beyond orchestration, Dagster adds observability and reliability. dbt tests can surface as asset checks, runs are fully logged, and failures can trigger alerts. You gain visibility not just into whether a job ran, but which data assets were updated, how long they took, and what downstream systems are affected.
Together, Snowflake handles scalable compute, dbt defines transformation logic, and Dagster ensures everything runs reliably, efficiently, and with full operational insight.


.jpg)
.png)

.png)